Getting started with Zoho SalesIQ
SalesIQ is the best sales conversion platform that helps you drive more profit to your business and serve your customers more efficiently. Let us start exploring SalesIQ!!! But before exploring, let us learn how to log in, embed the chat widget, and enable tracking on the website.
How do I Log into Zoho SalesIQ?
Enter your email and click the NEXT button.
Now enter your password and click the SIGN IN button, log in to your Zoho account.
You can also sign in using your Apple, Google, Microsoft, Linked-in, Facebook, Twitter, Yahoo, and Slack accounts.
Add Code to your Website
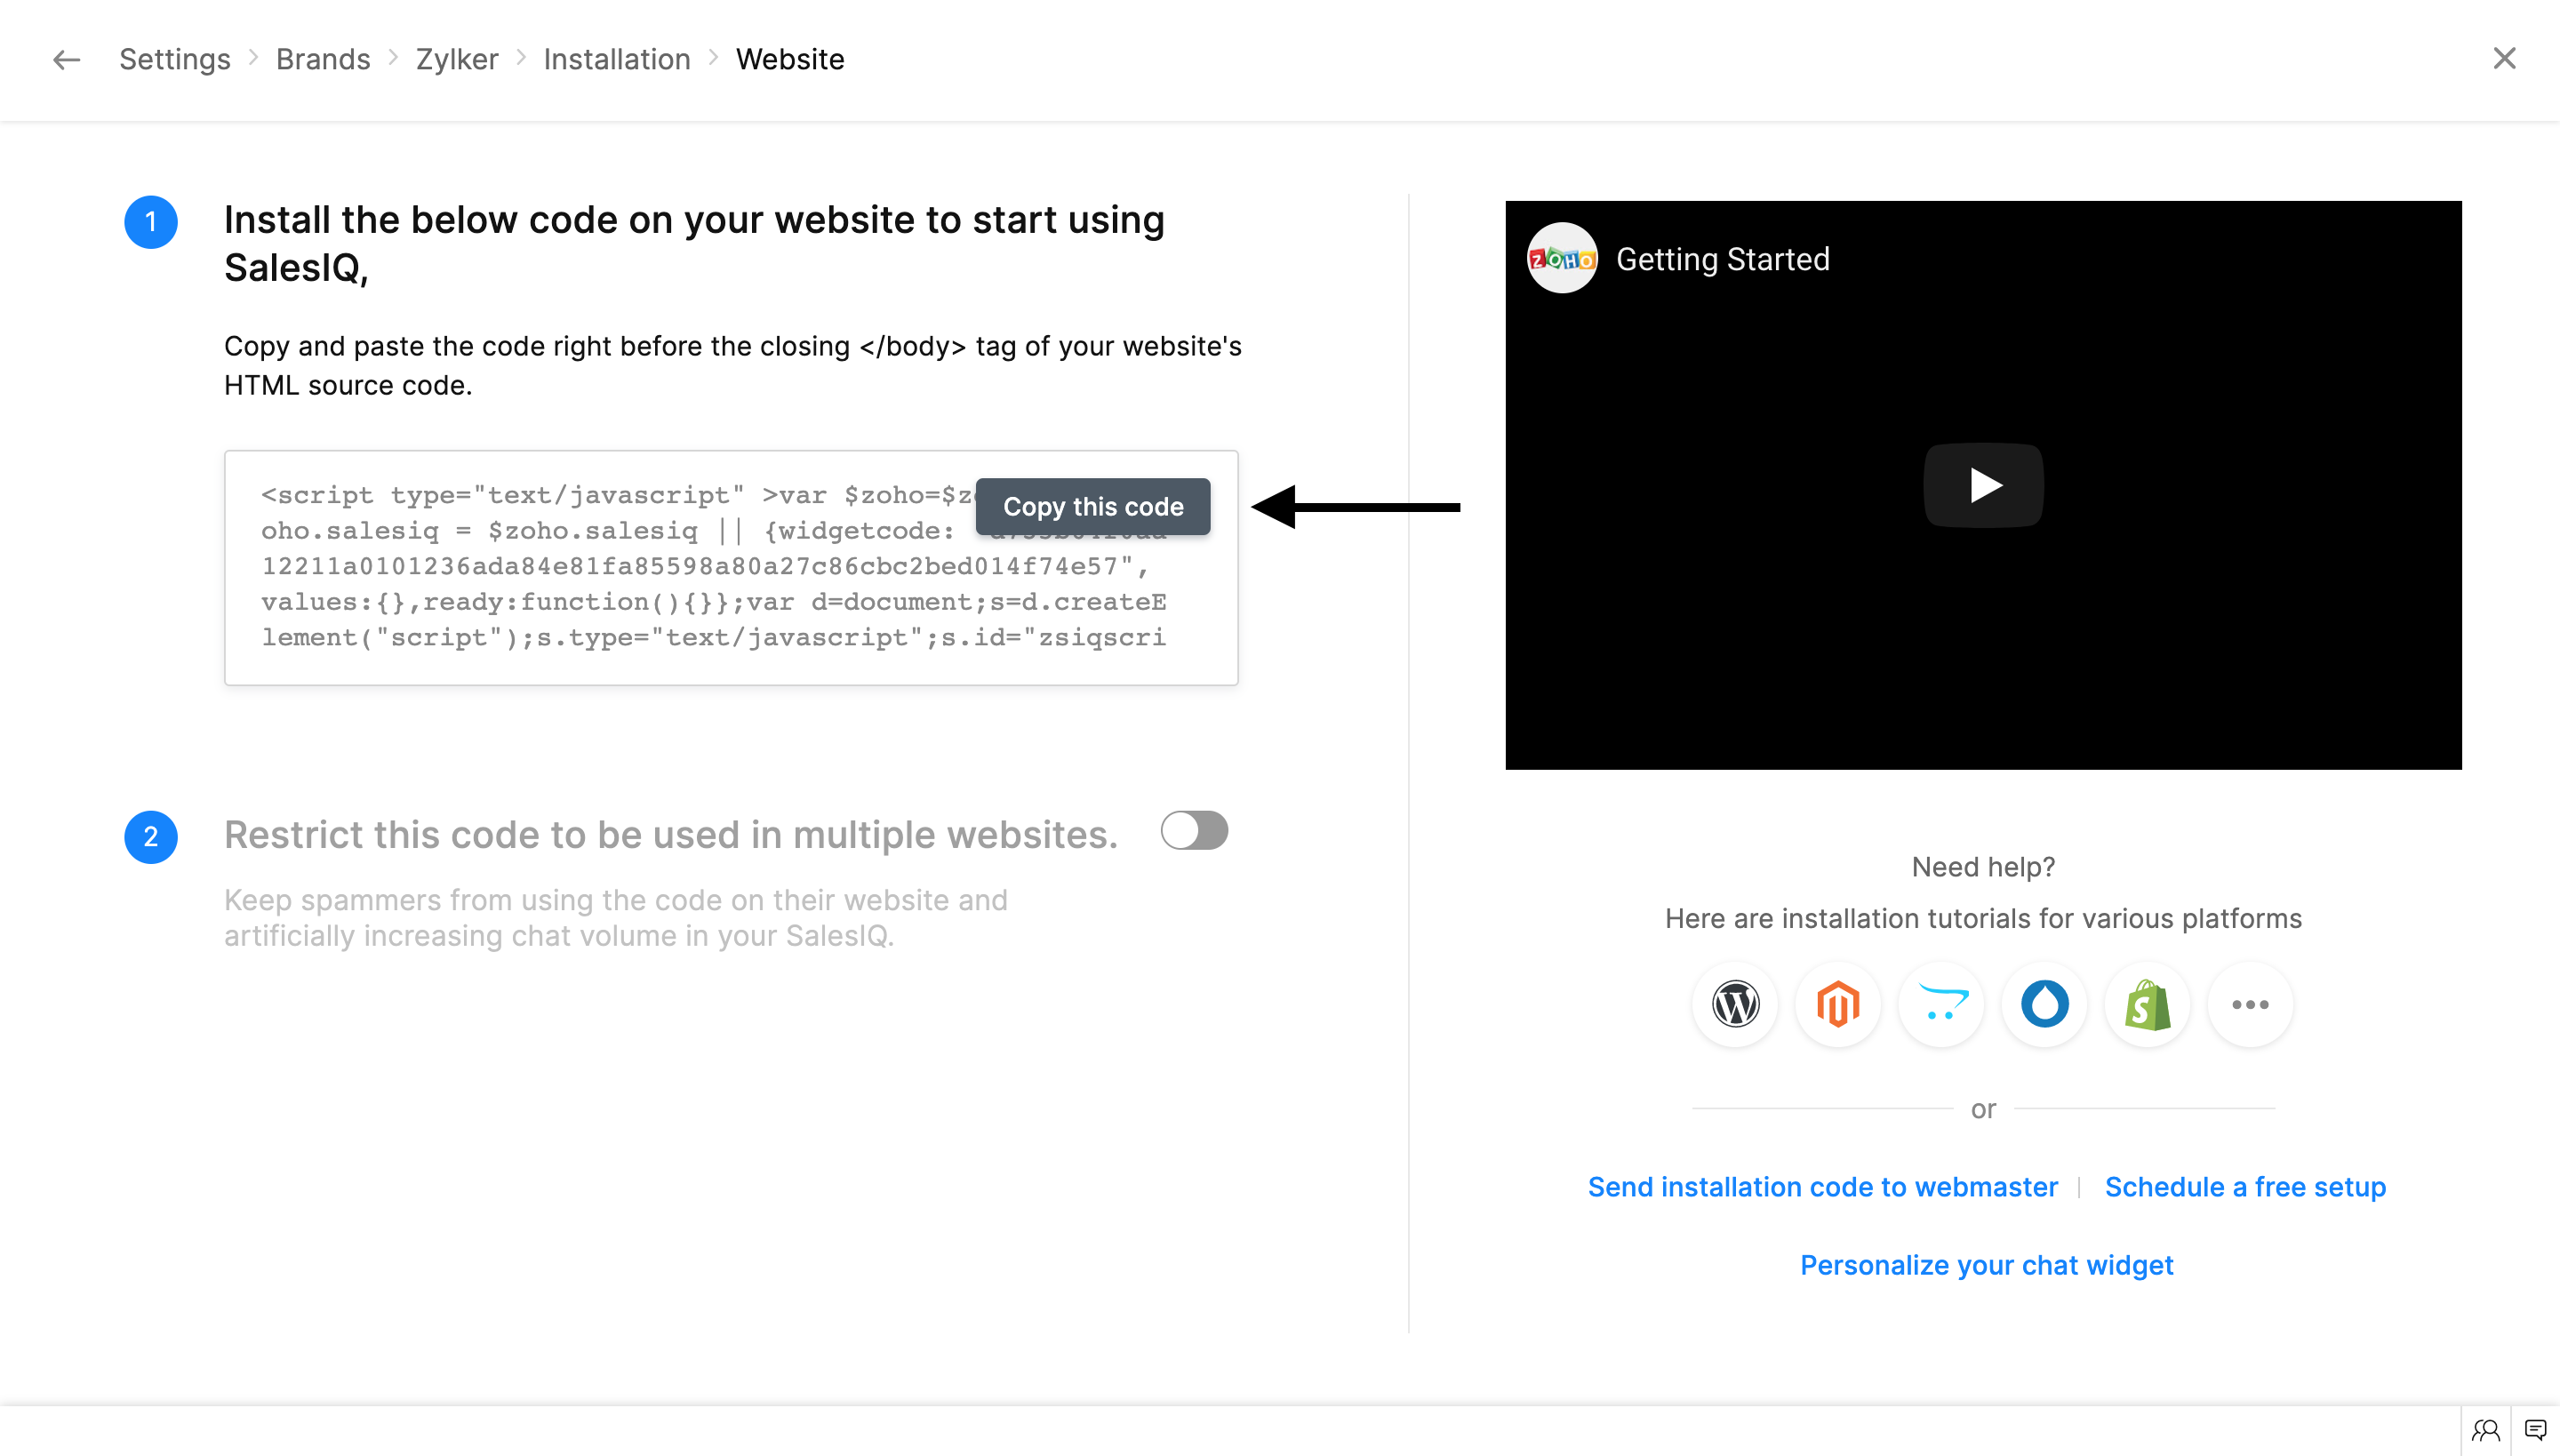
- Navigate to SalesIQ > Settings > Brands, choose your brand, or create one.
- In your brand page, choose your brand, click Installation > Website, copy the code and paste it anywhere above the </body> of your website source code. Then, Save the changes and publish your website.
 How to add SalesIQ widget code asynchronously?
<script type="text/javascript"> var $zoho = $zoho || {}; $zoho.salesiq = $zoho.salesiq || { mode: "async", widgetcode: "WIDGETCODE", values: {}, ready: function () { } }; var d = document; s = d.createElement("script"); s.type = "text/javascript"; s.id = "zsiqscript"; s.defer = true; s.src = "https://salesiq.zoho.com/widget"; t = d.getElementsByTagName("script")[0]; t.parentNode.insertBefore(s, t); d.write("<div id='zsiqwidget'></div>"); </script>Please replace the content inside the widgetcode:"WIDGETCODE" with your widget code.

Note : Please replace the content inside the widgetcode:"WIDGETCODE" with your widget code.
In doing so, the SalesIQ widget code will be executed asynchronously, and only after your website source code has successfully been executed. And so, you can make sure that there aren't any page loading delays.
Sharing the code with your webmaster
If you do not have access to your website source code or not familiar with HTML, you can directly mail the SalesIQ installation code to your webmaster.
In Settings > Brands > {Your brand name} > Installation > Website, click the Send installation code to webmaster .
Now in the pop-up, you can compose your email and send it to your webmaster.
Install SalesIQ for various platforms
SalesIQ integrates with WordPress, Blogger, Unbounce, Tumblr, Light CMS, Help IQ, Virb, Weebly, Wix, DotNetNuke, Sitefinity, Joomla, Drupal, and much more. Bring Live chat, tracking, and much more to your Blogs and e-commerce websites.
- In Settings > Brands > {Your brand name} > Installation > Website , on the right-hand side below the video, click the three dots to view all the platforms compatible with SalesIQ.
- Click on a product to know how to install the SalesIQ code on a website built using that platform.
Setting up your Live Chat widget
Setup Pre Chat Forms
In the Flow page, add the required fields by clicking on the Add Field text
Drag and drop the field you would like the users to fill before initiating a chat with your operators.
Fields can be marked as mandatory by checking the ' Mark this field as mandatory ' checkbox on the right.
Associate departments
You can route the visitors coming from a website to their respective departments. For example: If a visitor initiates a chat from a Car dealership website, you can route the request to the department handling automobiles. Only the operators of that department will be able to see the incoming chat request. You have to assign at least one department with a brand.
Chat Notification settings
You can allow your operators to decide if they want to pick a chat or to ignore them. Or you can automatically assign incoming chats to available operators whenever a visitor initiates one. Automatically assigning requests can help reduce missed chats.
Chat queue
You can set the maximum number of simultaneous chat request an operator can get. Once the queue limit has reached, the visitors will be asked to leave a message to contact the operators again.
Personalize SalesIQ on your website
Chat widget customization
Float Widgets
- You can customize your float widget by navigating to Settings > Brands > {Your brand name} > Personalization , click stickers on the left-hand side menu.
- Pick one from various float widget designs available.
- If you want to use your own widget, you can upload yours by clicking 'Upload' on the top right.
- Choose the float widget position by scrolling down to Widget position. You can pick where you want to position your widget.
- Click Save on the popup to save the changes you've made
Preview
- In the Brands Personalization page, click the eye icon on the top right corner.
- Click on the "+" icon, and add your website URL.
- Now you can view how the SalesIQ chat widget will look on your website.
- Toggle between the bottom menus to view the widget form different devices.
Customizing messages
- In the Stickers section under the Personalization page, scroll down to the Chat widget message - Online.
- Add a content and a byline text that will be displayed when you're online.
- You can do the same for Chat widget message - Offline. The text given here will be shown during non-business hours.
Customize chat window
- Chat window theme: Click on the drop-down arrow to reveal all the available pre-defined themes in SalesIQ, select your desired theme, and click S ave .
- Pick Chat window color: Scroll down to Pick a color for your chat window. You can pick a color from one of the recommended colors or use the color pick to choose any color you want.
- Set Chat window size: Scroll down to Choose A Size For Your Chat Window. Y ou can assign your chat window size to be either Medium or Large . Choose medium if you don't want to cove up your website content.
- Display company logo: You can opt to show your company's logo in the visitor chat window.
- Display operator profile picture on connecting: Enabling this option with allow visitors to view the profile picture of the operator they are connected to.
- Upload custom CSS : You can upload your custom designed widget's CSS using this feature. Click the Upload button and select your CSS file.
- Customize the Name of the Resources section inside the Chat window; this can indicate the users that there is a self-servicing tool available that they can use to find the solution. Also, you can choose to display the articles based on categories by selecting Category only in Choose How To Display Articles On Your Chat Window .
- Choose how to display articles on your chat window: Display articles in structured categories by choosing Category only, or list all the articles as a list without any categorization by selecting Show all.
Take your code for a test run
Initiate a test chat as a visitor
- After publishing your website with the SalesIQ code, open your website, and click on the SalesIQ widget.
- Enter your details in the input field to continue with the live chat, and send out a chat message.
- You will receive an incoming message in your SalesIQ portal, click Pickup to start the conversation.
- After you click Pickup a new live chat window will automatically open. Send out a response message to check if the user receives it on the website.
- Also, check all the advanced features of SalesIQ like Audio Calls, Sharing Files, Screen Sharing, etc. (if enabled).
Initiating a test chat as an operator
- In the Rings view, click on the visitor icon.
- A proactive chat window will open, type out your message in "Enter your message here" input field, and click Send.
- You'll receive the message on your website.
- Your SalesIQ portal is now ready to engage with your visitors!
Visitor chat window
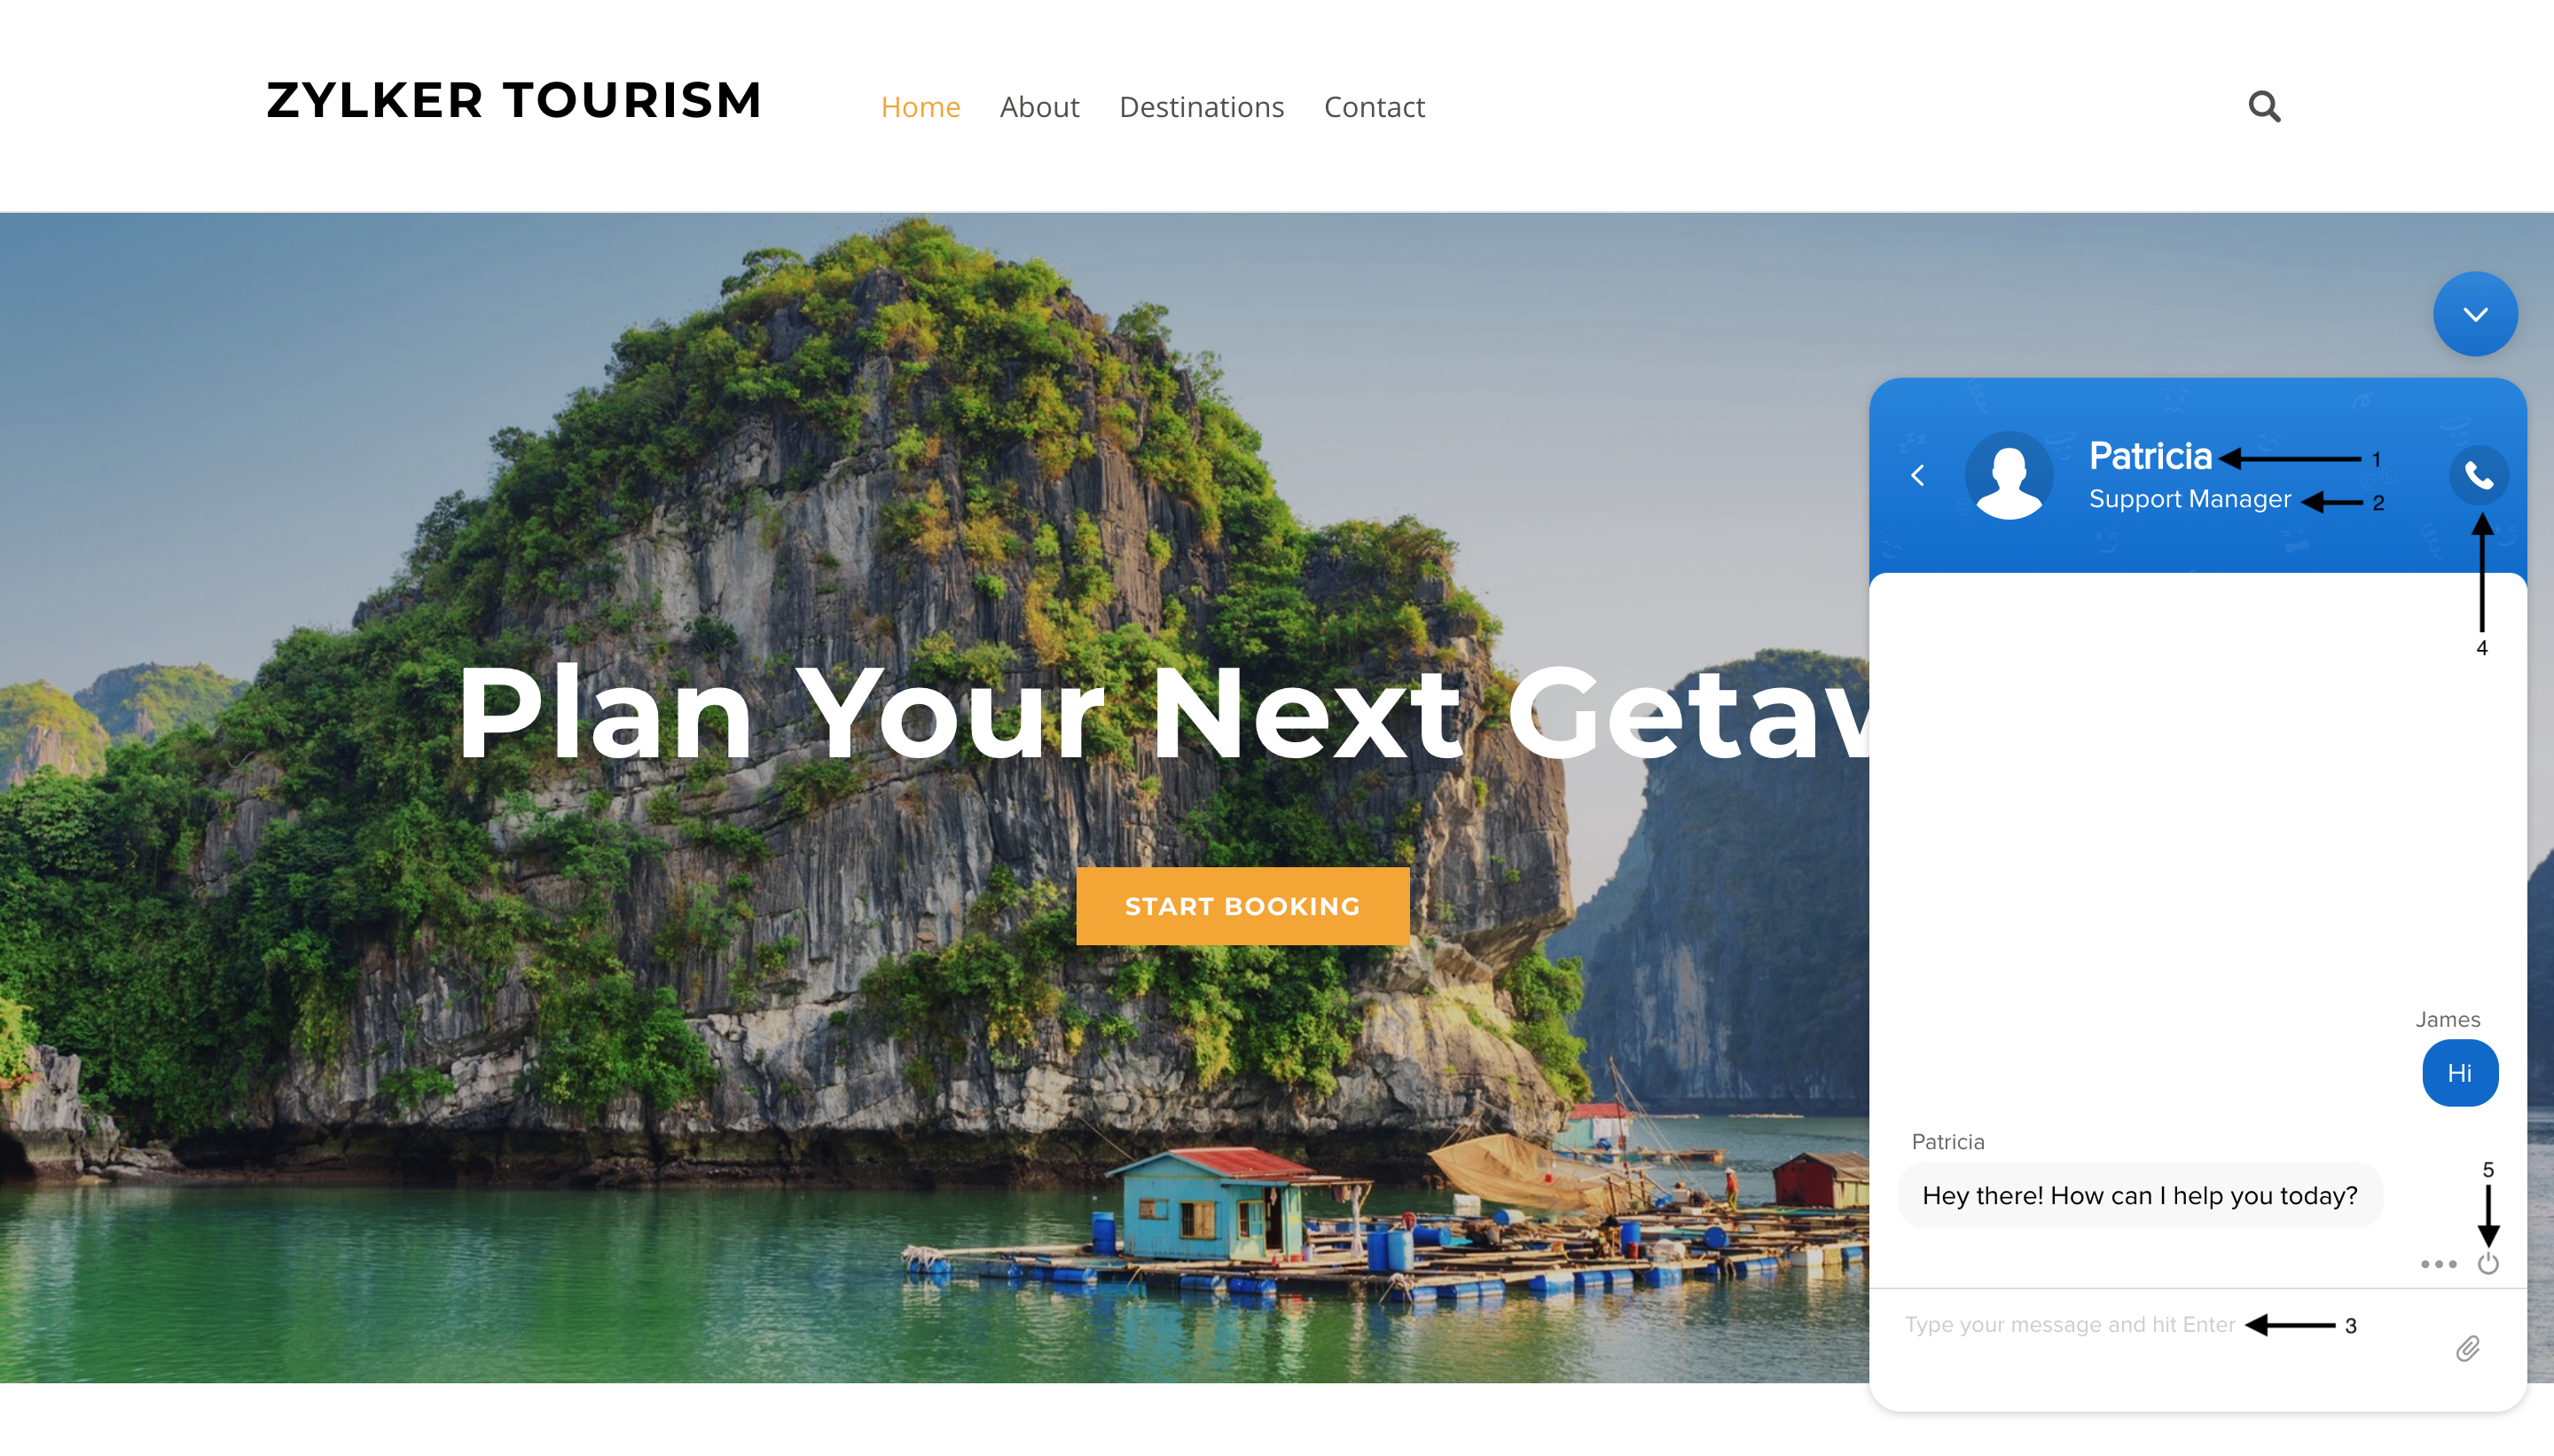
The visitor chat window consists of a striking and straightforward user interface that will allow visitors to converse with the operator easily. SalesIQ's extensive tools will help your visitors to convey their requirements to your operators without any hindrances.
- Operator Name: In the visitor conversation window, on the top, you can find the name of the operator assigned.
- Description : The description provided by the operator will be displayed below the name.
- Input text: Visitors can enter their messages in the input text field present at the bottom.
- Audio calls : Visitors can initiate an audio call by click this icon on the top right corner of the chat window. To know more about the audio call feature, click here.
- End chat : Clicking the power button above the input field will immediately end the conversation. Once the chat is completed, it will go to the feedback window.
 Export chat transcripts
SalesIQ allows you to save the chat transcripts and use it for future references. You can export the chat transcript either via email or by printing it directly.
- Email the transcripts: The visitor can mail the conversation transcripts to their email address by clicking the three dots above the input field and selecting the Send Mail option.
- Print the chat transcript: Click the three dots next to the End chat icon. Now select Print from the options, and now a new window will open where you can view the chat transcript. Click Print on the top right corner to print the transcript.
Insert images, pdfs, and more in chat
SalesIQ provides extensive support with the use of rich media in chat. The visitor can share Screenshots, Images, PDFs, Screen recordings, etc. in the conversation to enable the operators to understands and support the visitors better.
- Click the paperclip symbol on the right side of the input field. Select the file you want to attach to the chat.
- Now you can view the inserted file in the chat window.
Related Articles
HIPAA compliance with Zoho SalesIQ
The Health Insurance Portability and Accountability Act (including the Privacy Rule, Security Rule, Breach notification Rule, and Health Information Technology for Economic and Clinical Health Act) ("HIPAA"), requires Covered Entities and Business ...Integrating Zendesk with SalesIQ
What is Zendesk? Zendesk is a customer ticketing system that allows companies a method of tracking and responding to customer service requests. Together Zendesk and Zoho SalesIQ deliver a complete view of all your support interactions logged in one, ...Sync Zendesk data to Zoho SalesIQ
Together Zendesk and Zoho SalesIQ deliver a complete view of all your support interactions logged in one, organized database. Working together they deliver the added ability to connect, chat, engage and support in real-time within the context of ...Add operators and Assign roles in SalesIQ
Add more power and make your customer service run smoothly by adding operators in Zoho SalesIQ. With the ability to add members to your team and configuring them into one of three roles, you will be able to find the optimal structure for your live ...Integrating Leadberry with Zoho SalesIQ
Overview What is Leadberry? Leadberry is a web application that can help you enrich your website visitor's company information. With the help of the email address or the domain, it can help you with the visitor's company details and instantly provide ...