Booking appointments for services

This feature is opened in a phased manner and and will soon be available for all users.
An appointment can be booked for a service from the Appointments module in Zoho CRM. With customer details, service information, and appointments in the same database, you can get a complete overview of an individual's preferences and booking patterns and align your marketing and follow-up activities to meet their expectations.

Appointments can be easily rescheduled and cancelled. Members can select the reason and enter notes when they reschedule or cancel an appointment. These can be helpful in making decisions for future appointments.
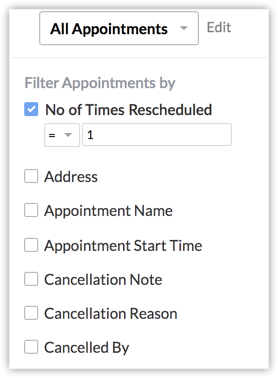
You can filter appointments based on criteria such as the number of times it was rescheduled, the reason or notes added when rescheduling and cancelling, or location. For example, if you observe more customers are rescheduling hair cuts and spa services to the end of the day, you can change your service times and accommodate other services during the morning hours. This helps you manage your appointments better and use your working hours more efficiently.
Accessing the Appointments module
The CRM administrators can access and give other profiles create, edit, and delete permissions to the Appointments module.

Note: The Appointments module will be added to the CRM account automatically when the Services module is enabled.
To give access to other profiles:
- Log in to your CRM account with Administrative privileges.
- Go to Setup > Customization > Modules and Fields.
- In the Appointments module, click the More icon and select Module Permissions.
- Select the profiles that must have access to the module.
- Click Save.
Customizing the appointments layout
The appointments module is a system-defined module that is added to the list of CRM modules once the services module is enabled. The fields present in the module are pre-defined and cannot be deleted.
The Appointments module consists of three layouts: Create, Reschedule appointment, and Cancel appointment.
You can customize these layouts by adding fields that may be necessary in your business. For example, a car wash service can use an image field to upload images of the car while booking an appointment.
You can add reasons of your own for rescheduling or cancellation of appointments, by default by customer and by team are provided.
To customize the appointment layouts
- Navigate to Setup > Customization > Modules and Fields.
- Select the Appointments module > Standard Layout.
- Select the Create, Reschedule Appointment, or Cancel Appointment tabs.
- Add the required fields from the New Fields section.
- Click Edit properties to add values to the fields.
- Click Save.
Booking appointments
Appointments can be booked or created from:
- The Appointments module
- The CRM calendar
- The Services module
- Modules associated with the Appointments for field
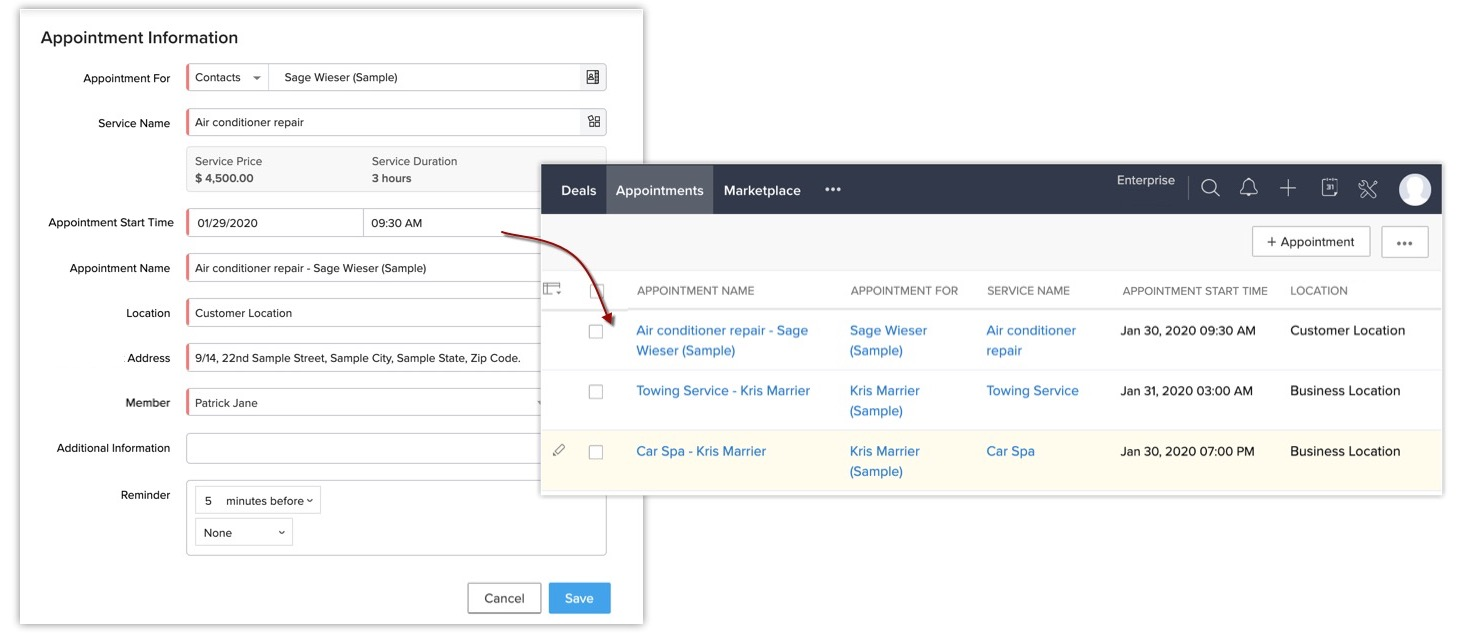
When booking an appointment you must enter the following details:
- Customer name: The customer the appointment is booked for. Contacts and other custom modules that contain customer information will be available.
- Service name: The service the appointment is booked for.
- Start time: The date and time of the appointment. The date and time must fall within the business hours set in your CRM account.
- Duration: The service duration is auto-populated based on the service availability set for a particular service. This cannot be edited from appointments.
- Location: Business or client location can be selected. Different options will be available based on the service locations set for the service you have chosen.
- Address: If the location is business, then the address saved in the company details will be auto-populated. If the location is the client's address, then it must be entered manually.
- Member: Thee CRM users who will handle the appointment. You can book an appointment for one member only.
- Reminders: The member can be sent reminders at specified time intervals before the appointment.
To book an appointment from the appointments module:
- Go to the Appointments module and click + Appointment.
- In the Appointment Information pop-up:
- In Appointment for, select the Module and the Record.
- Select the Service Name.
- Click the
icon to view the list of services.
- Specify the Date and Time in Appointment Start Time.
- The Duration will be auto-populated based on the service availability. It is not editable.
- Enter the Appointment Name.
- Select the Appointment Location from the dropdown list.
- Enter the address only if you have selected the client address as the location.
- In Member, select the user who will manage this appointment.
- Select an appropriate reminder from the Reminder dropdown list.
- Click Save.
To book an appointment from the calendar:
- Go to the CRM Calendar from the top menu bar and choose a date.
- Click Create and select Appointment from the dropdown.
- Enter the Appointment details.
- Click Save.
To book an appointment from the services module:
- Go to the Services module and select Appointments from the related list.
- Click New Appointment.
- Enter the Appointment details.
- Click Save.
To book an appointment from modules listed in Appointments for
Appointments for is a system defined multi-module lookup field, where all the custom modules that contain customer records are listed. By default, the Contacts module will be listed, so you can book appointments for contacts. You can check the other modules you want to list, too.
- Go to the desired module, for example, Contacts, Clients, Customers etc.
- Scroll down to the Related list and click + Appointment.
- Enter the Appointment details.
- Click Save.
To associate other modules to the appointments for:
- Go to Setup > Customization > Modules and Fields.
- Click the Appointments module and select the Standard layout.
- Click the More icon in the Appointment For field and select Edit Properties.
- Check the modules you want to be displayed.
- Drag and drop the modules to reorder them.
- Click Save.

Note
If you want to maintain a log of past appointments for record keeping or to meet the company's audit guidelines, you can create appointments with a past date. Remember to check if the service you are creating the appointment for is set as available on the required dates in the past.
Cloning appointments
If a customer requests the same appointment they previously booked, you can find the appointment by filtering using the customer's name and then clone it, modify as required, and save it.
To clone appointments:
- Go to the Appointments module and select the appointment you want to clone.
- Click the More icon and select Clone.
- Modify the appointment information and click Save.
Managing appointment preferences
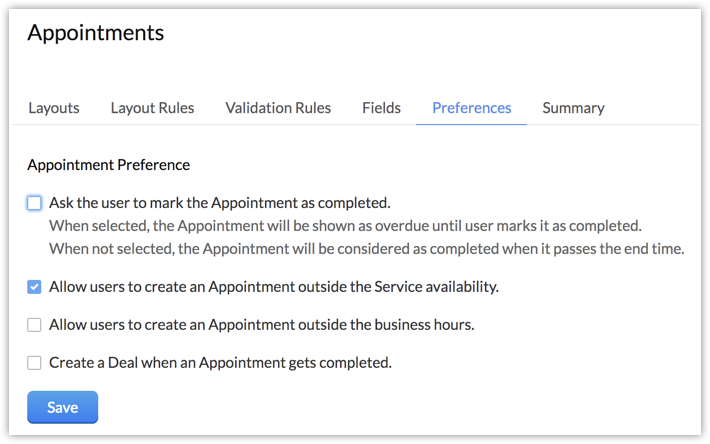
You can set certain specifications for the appointment from this section. For example, you can define whether the service member should fill a job sheet or if they have to mark an appointment complete etc. from the appointments preference section. The specifications defined here will apply to all the appointments. The following specifications are available:
- Ask users to mark the appointment as completed - This option will be turned on by default, you can toggle it off if not needed.
- Mandate users to fill job sheet.
- Allow users to create appointments outside the service availability.
- Allow users to create appointments outside business hours.
- Create a deal when the appointment is completed.
To manage appointment preferences
- Go to Setup > Customization > Modules and Fields.
- Click Appointments modules and go to the Preferences tab.
- Select the options based on your requirement:
- Ask users to mark the appointment as completed.
- Mandate users to fill job sheet.
- Allow users to create appointments outside the service availability.
- Allow users to create appointments outside business hours.
- Create a deal when the appointment is completed.
Marking an appointment complete
By default this option will be turned on under appointments preferences. This will allow managers to ask the service members to mark their appointments complete, until they do, the appointment will be considered overdue.
An appointment can be marked complete from:
- The list view in the appointment module.
- The detail page, by selecting an appointment.

Note:
- The Mark as Complete option will only be available if the option to Mark an appointment complete is checked in Appointment Preferences. If this option is not checked, the appointment will be auto-completed after the specified end time.
- An appointment can be marked complete by anyone who has access to the module the appointment is in.
Making it mandatory for users to fill out job sheets
You can make it compulsory for the agents to submit a job sheet before they mark their appointments as completed. The job sheets will only open automatically when the service member marks an appointment completed if you have marked it as mandatory to fill in a job sheet. You will also have to check the Job sheet required option while creating the service.

If the service requires a job sheet to be filled in, then the appointment creator will be prompted to add a job sheet before saving the appointment.
To make job sheets mandatory:
- Go to Setup > Customization > Modules and Fields.
- Click the Preferences tab in the Appointments module.
- Check Mandate the user to fill out job sheet.
Create appointments outside service availability
By default, appointments can only be created if the service is available for that specific time. For example, if "Lawn care service" was available from January 1st through June 30th, then you can only create an appointment during that period.
However, there may be instances when appointments have to be booked outside the service availability period. For example, a dental clinic provides implants and denture services from Monday to Saturday, but in special cases a visiting surgeon may perform the procedure on a Sunday.
In this case, they will have to create an appointment for Sunday, which is outside the service availability period.

To allow booking appointments outside service availability
- Go to Setup > Customizations > Modules and fields > Appointments.
- Select the module and click the Preferences tab.
- Check allow users to create appointments outside service availability.
- Click Save.
Creating appointments outside business hours
Sometimes you may have to book appointments outside the organization's business hour. For example, you may have to accommodate an urgent delivery request during non-working hours.
When an appointment is booked outside business hours, an alert will be shown. You can still book the appointment.
To allow booking appointments outside business hours
- Go to Setup > Customizations > Modules and fields > Appointments.
- Select the module and click the Preferences tab.
- Check allow users to create appointments outside business hours.
This option will only be displayed if you check to allow appointments to be created outside service availability. - Click Save.
Creating deals from completed appointments
Appointments that are completed successfully can be automatically turned into deals. The deals will be in the closed won status by default. This will help with generating reports such as the number of deals won in the last quarter, revenue generated in the last month, services that have the maximum number of deals, and more.
You can automate the creation of a deal on completion of an appointment. This helps prevent delays due to manual record entry and ensure that customer details passed on the other team members are accurate.
To configure creation of deal in appointments preferences:
- Select a layout where the deals should be created.
- Choose the deal owner. It can be: the admin, the user who created or modified the appointment, or the member the appointment was assigned to.
The amount and closing date are read-only fields which will be auto-mapped to the service price and appointment start date respectively. The deal name will be mapped with the appointment name. It cannot be changed. - The amount and closing date are read-only fields which will be auto-mapped to service price and appointment start date respectively.
- The deal name will be mapped with appointment name. It cannot be changed.
- Select an account name from the available list or create an account.
- Deal stage is closed won by default. You can select the field.
- You can add more fields from the deals module.
To create deals automatically
- Go to the Appointments module and click Preferences.
- Check Create a deal when an appointment gets completed.
- In the Configuration page, choose the layout of the Deals module.
- Select a Deal owner from the drop-down list.
- Select an Account name and choose Closed Won for the Deal stage from the drop-down list.
- Click +Add Deal Fields, to add more fields.
- Click Save.

Note: You can modify or check the configuration by clicking View Configuration from the Appointments Preferences page.
Rescheduling and cancelling appointments
Appointments can be rescheduled or cancelled at anytime by any user who has access to the module the appointment is in. It is mandatory to enter a reason and notes before rescheduling or cancelling. An email notification is sent to the appointment owner whenever the appointment is rescheduled or cancelled.
An appointment can be rescheduled up to 10 times, the number is recorded automatically. You can view the rescheduling history on the details page.

Note:
- You will not receive email notifications if you reschedule or cancel an appointment that belongs to you.
- Appointments can be rescheduled to a past date. For example, an appointment for 9th January 2021 can be rescheduled to any past date. See more about
An appointment can be rescheduled and cancelled from:
- The list view in the appointment module.
- The detail page, by selecting an appointment.
Managing appointment notifications
A member will automatically receive notifications (email and pop-up) when an appointment is assigned. However, individual users can specify that they don't want to receive notifications in the CRM calendar.
To set preferences for appointment notifications:
- Go to the CRM Calendar from the top menu bar.
- Select a date and click Options and Preferences.
- Check or uncheck the Notify me when an appointment is assigned checkbox.

Note: You will not receive email notifications if you create an appointment for yourself.
Setting reminders for appointments
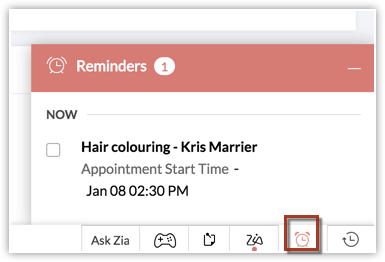
Members can be sent reminders about the appointment at specified intervals before the configured time.

Reminders can be set from two places:
- While booking an appointment: You can set reminders at set intervals, such as 15 minutes before or a day before the appointment.
- From the CRM calendar: In the calendar, go to Options > Preferences > Reminders to select the interval to send reminders at.
Creating reports for services and appointments

Reports for services will be available once the revamp of reports is rolled-out.
Reports on services can give you useful insights about how your business is performing. You can create reports using different fields and combinations to find:
- The number of appointments created for each service.
- Number of appointments that were rescheduled or cancelled last month.
- Number of deals that were won based on the completed appointments.
- Appointments based on the reason of cancellation.
To create reports:
- Go to the Reports module from the top Menu bar.
- Click Create Report.
- Choose either Services, Deals or Appointments as the Primary module.
- Click Continue.
- In the configuration page, click the + icon to add the child module.
- Select a child module from the drop-down list.
- Select relationship type: Inclusive or Exclusive.
- Click Done.
- Click Continue.
- Verify the data in the report preview and click Save.
Creating Dashboards for services and appointments
Get quick insights on important business metrics with the help of pre-defined dashboards. You can also create custom dashboards to view:
- The number of appointments each member has
- Compare the number of appointments created every month
- Identify the trend with cohort analysis of services for a period
- Find the services that are most popular among a group with the help of quadrant analysis.
To create dashboards:
- Go to the Analytics tab from the Menu bar.
- Click Add component.
- Choose a component and define the metrics.
- Click Save.
SEE ALSO
Related Articles
Managing services with Zoho CRM
This feature is opened in a phased manner and and will soon be available for all users. Services such as consultation, home cleaning, repair and maintenance, pickup and delivery, and salon or spa appointments are time-bound activities that take place ...Calendar Booking
Calendar booking comes in handy for the customer to book a meeting almost instantly. It allows customers to see when the support agents are available and enables them to schedule a meeting or call independently. For example, Travis has just purchased ...Embed Calendar Booking
Embed options for Wordpress To embed in Wordpress Login to Zoho CRM with administrative privileges. Go to the Calendar. Click Options and choose Calendar booking from the drop-down list. In the Manage Calendar Booking page, click More > Embed against ...Is it possible to book appointments in Zoho CRM using Zoho Bookings?
Yes, you can . You need Zoho Bookings , which can be integrated to your CRM account from the marketplace. Let's see how Zoho Bookings can be used in order to book appointments. A use Case : There is a tour and travels company called Go India ...Workflow for Appointments
This feature is opened in a phased manner and will soon be available for all users. In service organizations the workforce mostly consists of back office staff and field agents who book appointments and provide service to the customers. It is ...