Working with Meetings

- Activities module is split up into Tasks, Calls, and Meetings modules. This change will reflect for new sign-ups from September 6, 2021.
- Existing users will have both the Activities module and the individual Tasks, Calls, and Meetings modules to ease the transition.
- Activities module will be discontinued for existing users after giving them enough time for the transition. Post which, only Tasks, Calls, and Meetings modules will be available.

Create Meetings
To create a meeting
- In the Meetings module, click Create Meetings.
- In the Meeting Information popup, specify the event details.
- Click Save.
To create meetings from Calendar
- Click the Calendar icon in your CRM account and select the Day, Week or Month view.
- In the Calendar, click the Create link or click on a time slot in the calendar.
- In the Meeting Information popup, specify the meeting details.
- Click Save.

- Meetings are automatically closed at the specified end date and time. There is no status update for meetings.
Create recurring meetings
A meeting that needs to happen repeatedly at a specific date or time can be created as recurring meeting. You can also create recurring tasks in bulk from the list view.
To create recurring activities
- In the Meetings module, click Create Meeting.
- In the Meeting Information page, specify the activity-related details.
- In the Repeat field enter the following:
- Specify the From and To dates for the event to be repeated.
- Specify the Repeat Type for the event and select the options accordingly (Refer to the table below).
- Click Save.
- Specify the From and To dates for the event to be repeated.
| Daily | Description |
| Everyday | Select this if the activity should be repeated everyday. |
| Recur every ___ day(s) | Select this to specify how often in days the activity should be repeated. |
| Weekly | Description |
| Recur every ____week(s) | Enter how often in weeks the activity should be repeated. |
| Days of the week | Select the check box(es) that correspond to the day(s) of the week on which the recurrence should occur. |
| Monthly | Description |
| On day __ of every ___ month(s) | Enter how often in months and on the specified date the activity should be repeated. |
| On____ ____ of every ___ month | Select a particular day when the activity should be repeated every month. |
| Yearly | Description |
| On every___ ____ | Enter how often in a year the activity should be repeated. |
| On ____ ____ of ____ | Enter how often in a year and on the specified date the activity should be repeated. |
Set reminders for meetings
You can send reminders for a meeting to alert the attendees before the meeting starts, there are two ways in which a reminder is sent:
- Alert through Email
- Alert through Pop-up
While creating a meeting from the Activities module, you cannot disable either of the reminder options. Both the options are selected by default. However, you can disable the Email reminder in the calendar preferences. The pop-up reminder cannot be disabled in calendar.- In the Meetings tab, click on the meeting for which you want to set reminders.
- In the Meeting Details page, click Edit.
- Select the Reminder from the drop-down list.
- Click Save.
Add participants and invite them for a meeting
- In the Meetings tab, click on the meeting for which you want to add invitees.
- In the Participants section, click Add.You can also click Edit and add participants for the meeting in the popup box.
- In Add Participants pop-up window, select the group from which you want to add participants.You can also directly search for Users, Leads, Contacts, etc.
- In the list of Users, Leads, or Contacts, select the corresponding check box(es).
- In the Invite by E-mail Address text box, specify email addresses of the participants you want to invite and whose details are not available in Zoho CRM.
- Click Add.
You will receive email notifications on the RSVP status each time an invitee accepts, declines or holds your invitation. You can also re-invite them individually by clicking the Re-invite button under Actions from the Participant Status window.
Standard fields in Meetings module
| Field Name | Description |
| New Meeting | Specify a name for the meeting. |
| Location | Enter the venue for the meeting. |
| All Day | Select the checkbox if it is an all day meeting. |
| From | Specify the date and time when the meeting will be started. |
| To | Specify the date and time when the meeting will be over. |
| Participants | Add invitees who will participate in the meeting. |
| Related To | Select the contact or lead related to the meeting. |
| Repeat | Specify the recurring pattern for the meeting. |
| Description | Specify the details about the meeting. |
| Reminder | Set a reminder for the meeting. |
Color coding picklist values in Meetings
- Go to Set up > Customization > Modules and Fields
- In the modules list view, Click Meetings
- Select the Standard layout to add the picklist
- Select or add a picklist from new fields tray to the layout.
- Click on the ellipses option (...) on the picklist and select Edit Properties.
- Select Enable color coding for picklist values.
- Assign colors by clicking on the color palette available for each picklist values.
- Click the add icon + to find more hues of the colors
- Click Done, and Done.
Associate check-in to a meeting
If your business requires you to travel and constantly be on the move, then check-in is for you. In Zoho CRM, sales managers and sales reps can manage their work-related visits easily with the help of check-ins from the Zoho CRM mobile app.
A check-in from the Zoho CRM mobile app is always associated to an meeting. When you check-in from a location, the app prompts you to associate the check-in with an existing meeting. You can click the desired meeting and record the check-in for that meeting. In case there are no meeting for the record, you will be prompted to create a new meeting.
Consider the following scenario to understand how you can organize and monitor check-ins in Zoho CRM.
- A sales manager creates meetings, (client visits) to be made by his/her sales rep.
- The sales rep visits the client offices and checks-in from each location.
- Each check-in is associated to the respective meeting in Zoho CRM. This tells the sales manager that the sales rep has visited the client.
- Also, the check-in is recorded as a note associated to the lead/contact in Zoho CRM.
- The sales manager can then create reports based on the check-ins to draw inferences. For example, he/she can create a report to see all check-ins made by location or by a particular sales rep.
Note that a check-in can only be made from the mobile app and not from the web version, as it is a feature meant for people on the move. When a check-in is made, the location from which it was made is recorded in CRM; therefore this is a fool-proof method to keep a track of client visits.
When you have reached a client's office, you can check-in to the location using the Zoho CRM mobile app. When you check-in, you will associate it to an existing meeting.
To associate a check-in to an meeting
- Go to Leads/Contacts/Accounts modules.
- Tap the Check-in icon to create a check-in.
- If there is already an meeting associated to the contact, the existing meeting(s) show up.
Select an meeting. The check-in is associated as a note for the meeting. - If there is no meeting the app prompts you to create a new meeting for the check-in.
Create a new meeting and associate the check-in to the meeting.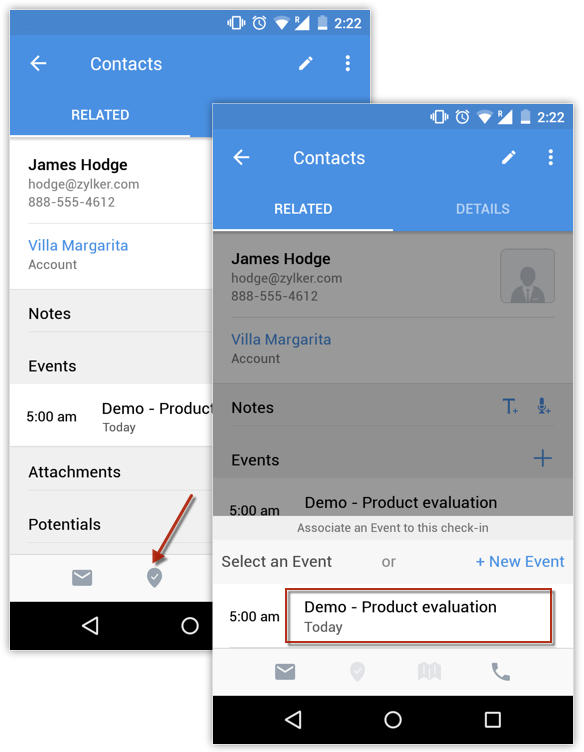
- When a check-in is made, an update regarding the check-in is posted to Feeds automatically.
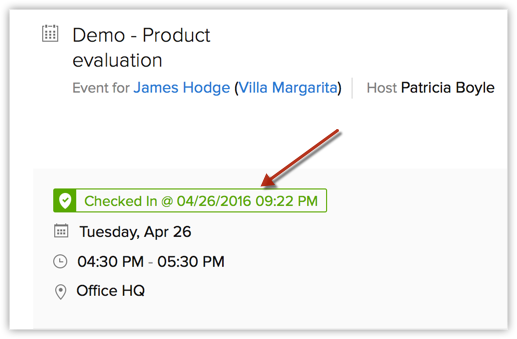
View details of a check-in
Once a check-in has been associated to an meeting, the details of the check-in can be seen in the details page of the meeting it is associated with as well as the related lead/contact/account details page.
To view check-in details in the meeting's details page
- Go to the Meetings module.
- Click the desired meeting.
- The associated check-in details are displayed.

To view check-in details in the Lead/Contact/Account details page
- Go to the Leads/Contacts/Accounts module.
Check-ins can also be associated to any other module in which meetings can be associated. - Click the desired record.
- The details of the check-in associated to the record are displayed as a note for the record.
Create check-in reports
Sales managers can create check-in reports to make inferences regarding the field visits assigned to their sales reps. Zoho CRM provides a suite of default reports for check-ins.
To access check-in reports
- Go to the Reports module.
- Click Meeting Reports.
The default reports are listed. You can also create new reports based on check-ins.
Related Articles
Working with Tasks
Activities module is split up into Tasks, Calls and Meetings modules. This change will reflect for users who signed up after September 6, 2021. Existing users will have both the Activities module and the individual Tasks, Calls and Meetings modules ...How can I prevent recurring activities from falling on a non-working day?
When configuring repeating activities, you will have the option to skip weekends, holidays, or non-working days. I. For recurring meetings: If a meeting is repeated at regular intervals, you can skip weekends, holidays, and non-working days If a ...Working with Custom Fields
In Zoho CRM, you can add new fields as per your requirements. These fields will be available to all the users added to your organization's CRM account. Customize Zoho Defined Fields: You can edit, delete and hide some of Zoho defined fields, but note ...Is it possible to book appointments in Zoho CRM using Zoho Bookings?
Yes, you can . You need Zoho Bookings , which can be integrated to your CRM account from the marketplace. Let's see how Zoho Bookings can be used in order to book appointments. A use Case : There is a tour and travels company called Go India ...Exporting Meetings to Google Calendar
Sharing your Zoho CRM calendar meetings is made easy with the Export to Google Calendar feature. By exporting the selected meetings from CRM Calendar to Google Calendar, you can view and share them with other users in Google Calendar. It also helps ...