Using Custom Buttons
Customization is the most powerful way to build a flexible CRM system. In Zoho CRM, you can customize modules, fields, pages, links, and a lot of other elements. In addition to these elements, Zoho CRM now allows you to create new button actions with the help of an advanced feature called Custom Buttons.
Zoho CRM has standard buttons that are used to execute various predefined actions. For example, Convert is a standard button used to convert a Lead to Contact, Account or Potential. Similarly, Clone is another standard button that is used to clone any record within your CRM account. Likewise, CRM Administrators can create new buttons and define a set of actions based on their requirements . Custom Buttons in Zoho CRM can be used to connect your CRM with third party applications, connect different Zoho CRM modules or connect with other Zoho applications.

- Custom Buttons are restricted based on profile permissions. Administrators can share each custom button with different profiles and users in those respective profiles can only access it.
- Custom Button is available for all standard and custom modules.
Create Custom Button
- Create/Clone page : The button will be available while creating or cloning a record.

- Edit page : The button will be available while editing a record.

- View page : The button will be available in the record's detail page.
- List View - Utility Menu : The button will be positioned right next to the More option in List view.

- List View - Each Record : In the List view, the button will be displayed across each record.

- List View - Mass Action Menu : The button will be available in the mass action menu only when records are selected in the list view.

- Related Lists Page : In the record details page, the button will be available right next to the related list.
Wizards: The button will be available for execution in the Wizard layout.
- Log in to Zoho CRM with administrative privileges.
- Go to Setup > Customization > Modules and Fields.
- From the List of Modules , select the required module.
- In the Links & Buttons tab, click Create New Button .
- In the Create Your Button page, do the following:
- Enter the name of the button.The button name should not exceed 30 characters.
- Click the Add Description link and specify the details of your custom button.The description should not exceed 250 characters.
- Choose the location of your custom button from the drop-down list.

- Choose an action to be executed when a user clicks the custom button.
You can either choose a predefined action from the gallery or an existing action that was already created by users in your organization. Also define your own action by writing a custom function, open a new web tab or invoke a URL based on your needs.It is mandatory to choose the button action. See Also Button Actions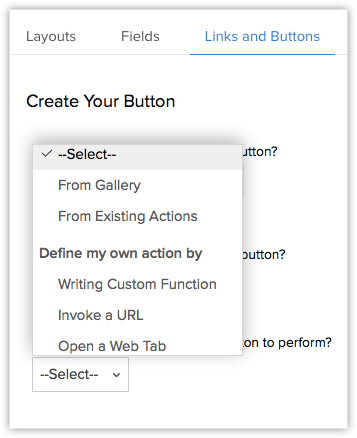
- In case you wish to obtain location information of the users executing this Button, you can turn the location preference toggle ON.
- Click Save.
Once the custom button is associated with an action, CRM Administrators can manage permissions by assigning only specific profiles to view and access the custom button.
Fetching Location Information Via Custom Buttons

- This consent popup will appear on both iOS and Android apps of Zoho CRM.
- If the mobile app user hasn't enabled location services on their phone, Zoho CRM will first prompt them to turn on location services on their device and then subsequently request consent for tracking their location via the custom button.
- This consent popup is designed to appear only for the mobile application of Zoho CRM and not the web version.
- The Location option will be shown only for "Functions"(ie., From Gallery, From Existing Actions, Writing functions) in Custom button.
- Location option is not supported for "Custom Actions".
- Location option will be shown for Create/Clone Page, Edit Page, View Page and Related List and is not supported for list view options and Wizards.

- You are allowed to create up to 50 custom buttons for each module in Zoho CRM.
- If you have placed the custom button in a List View page, make sure you select at least one record before you execute the button action.
- From list view, you can also choose multiple records to perform the button action. In case when multiple records are selected and the button action is a custom function, then the values of the records passed will be ||| (three pipe symbols) separated.
If you place the button in the List View - Utility Menu , the record information will not be available while configuring the button's action (i.e. in functions, or while invoking a URL).
Define Button Action
Every custom button should be associated with an action when a user clicks the button. You can define your button action in any of the following ways:
- From gallery
- From existing actions
- Write your own custom functions (powered by Deluge Script Editor)
- Invoke a URL
- Open a web tab
1. Choose your button action from gallery
Zoho CRM offers you a few ready-to-deploy button actions in the gallery, which can be associated with a custom button for different business scenarios whenever required.
To associate Gallery function with a custom button
- Create a custom button and choose your button action as From Gallery from the drop-down list.Ready to use actions will be listed in the gallery.
- Click Configure for the corresponding action that you want to use.For example: Sum up Potential Amount.
- In the Configure Custom Function dialog box, specify the values for the Argument mapping and click Save .For example:
- accountId: Choose "accountid" from the list of fields.
- accountId: Choose "accountid" from the list of fields.
- Select the profiles to which you want to provide access to this newly created button.
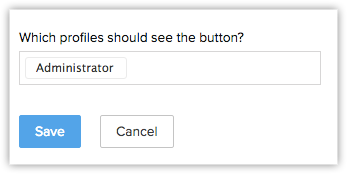
- Click Save .Your custom button will be created successfully.
2. Choose your button action from existing action
Existing actions are predefined button actions created by users in your organization . This option will be available only when you have already created custom functions for custom buttons in your Zoho CRM account. These actions can be reused with different custom buttons whenever required.
3. Define your own button action
You can define your own button action in the following ways:
- writing custom function or
- invoking a URL
- open a web tab
Write your own custom function
Using our Deluge Script Editor, you can start defining your own button action by writing a new custom function. See Also Deluge Script - Reference Guide .
To write your own custom function
- Go to Setup > Customization > Modules and Fields .
- From the List of Modules , select the required module.
- In the Links & Buttons tab, click Create New Button .
- Create a custom button and choose your button action as Writing Custom Function from the drop-down list.
- In the Create New Function popup, enter the Function Name , Display Name and add a Description .
- In the Customized functions page, do the following:
- Specify the Name and Description to your function and click the Edit Arguments link.
- In the Edit Arguments box, specify the Function Name and map the argument key with field name or specify custom value. To map with field name, enter "#" as param value and choose the required option from the dropdowns.
M apping user values : Choose Users from the dropdown to map the user related fields such as User ID, Email, Mobile, Online Status, Profile , etc.
Mapping organization values: Choose Organization from the dropdown to map the organization related fields such as Organization ID, Organization Name, Organization Description, etc.
Mapping module related values : Choose the module name from the dropdown to map the fields of that module. For instance, while setting up custom button for Contacts module, you will be able to find the Contacts module, and its looked up modules if any, such as Accounts, Vendors, etc. If you choose the Contacts from the dropdown, you will be further able to map its fields such as Contact id, Contact Owner id , etc.
Mapping Zoho CRM variables : If you have set up a set of values as Zoho CRM variables to be used as merge fields in email templates, or as reusable authentication parameters in functions and APIs, you can map it here. Choose Zoho CRM Variables and then map the group name and variable name.
- Mapping to extract data : Choose Request from the dropdown to extract data such as All Fields, Parameters, Headers, FileContent and Body . Using this for option while creating custom button for the List View - Utility Menu location lets you capture the c vid, pageno, modulename and moduledisplayname . Using this option while creating custom button for Create / Clone page, Edit Page, View page, List view each record, List View - Mass Action Menu , and Related List , location lets you capture the modulename , and moduledisplayid .
- Click Done .
- Write your required function in Deluge Script Editor.
- Click Save and Execute Script to validate your code.If there are no errors, your script is ready to associate with the custom button.
- Click Save .The script will be associated with the custom button. Choose different user profiles to check who can access the custom button and click Save in the Create Your Button page . Whenever you click on the custom button, the associated function will be triggered and the required action will be performed in one click.
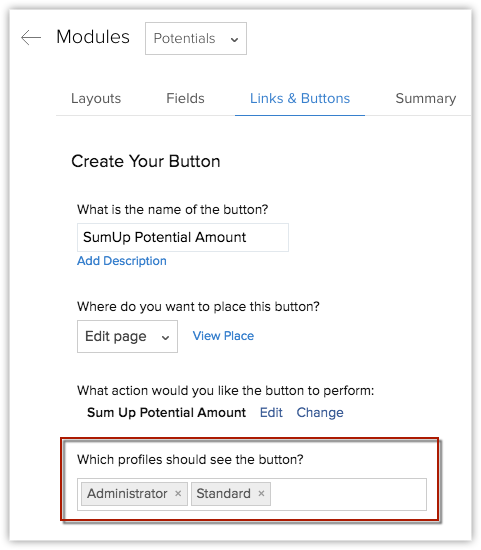


- Workflow rules can also be triggered through the custom function executed from custom button by using the CRM API integration tasks inside Deluge Scripting.
Invoke a URL
The following is an example that shows how you can invoke a URL using a custom button.
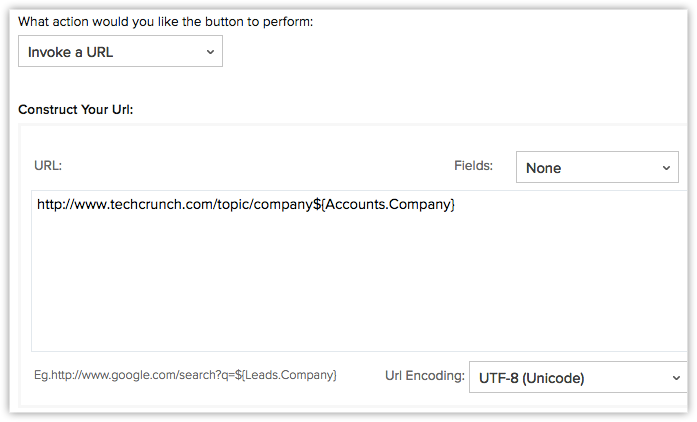
Visit Company profiles of your Leads in Zoho CRM: All the contacts in your account can have a field where you specify the Company Name. By creating a URL that is associated with a particular company, you can directly go to the account's company profile by just clicking the custom button (This custom button can be placed while creating, cloning or viewing a record based on your requirements). For example: The link can be: http://techcrunch.com/topic/company/$%7BAccounts.Company }

- The content of the URL can be dynamic and you can merge the URL with module fields. In case of List view, the merge fields should be comma separated.
- The "Invoke URL" option of the button actions only opens a URL in a new tab.
- However, if you require a business logic to be executed along with the opening of the url, you can use the "openUrl" method available in the Functions editor. Write your function and use the openUrl method in it to open the url after processing the business logic.
To invoke a URL in a click of a button
- Create a custom button and choose your button action as Invoke a URL from the drop-down list.
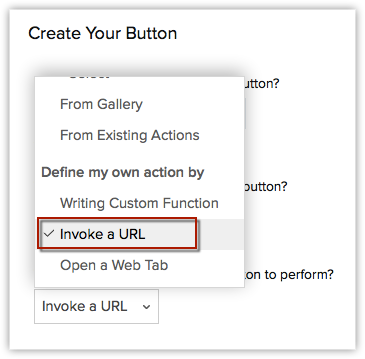
- Enter the value to construct the URL.The URL length should not exceed 3000 characters.
- Select the Fields from the drop-down list. This will insert the field variable as part of the URL.
- Choose where you want to show the button action.
- Select the profile to which the custom button needs to be accessible.
- Click Save.
Open a Web Tab
Choose Open a web tab as your button action that allows to open a web tab in a new tab along with the associated merge fields in just a click of a button. You can either create a new web tab or choose from the list of web tabs that have been created already and associate to your custom button.
To open a new web tab
- Create a custom button and choose your button action as Open a web tab from the drop-down list.
- You can either create a new web tab or choose one from the available list.
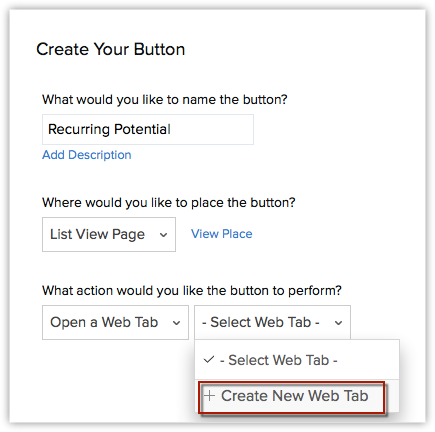
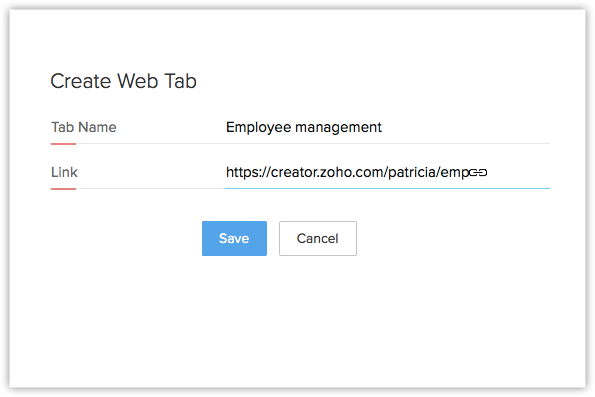
- Now create a new web tab and associate it with your custom button.
- The web tab URL will be displayed. You can add merge fields as per your requirements. Click Save .
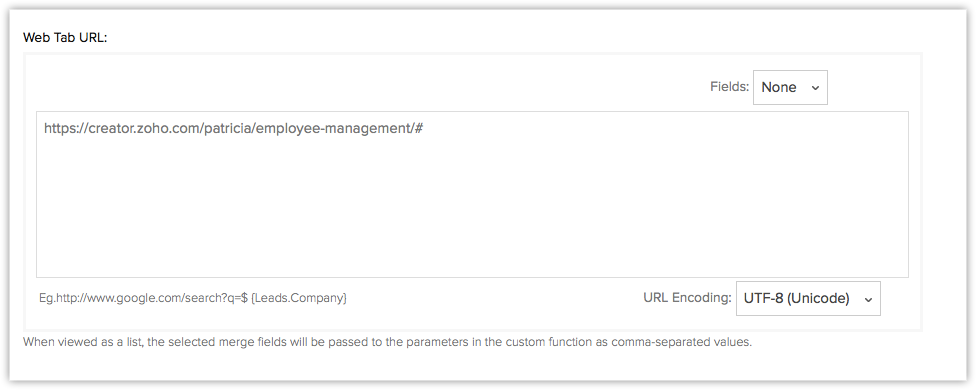 Therefore, the web tab along with the associated merge fields will be opened, whenever you click the custom button.
Edit Custom Button
You can edit the existing custom buttons whenever required. Only the Administrator of the Zoho CRM account can edit the custom buttons.
To edit a custom button
- Go to Setup > Customization > Modules and Fields > [Select Module] > Links & Buttons .Under the Links & Buttons tab, all the existing custom buttons will be listed.
- Choose the required button that you want to edit and click the Edit
 icon.
icon. - In the Edit Your Button page, edit the button name, button action, etc. as per your requirements.
Sort Custom Buttons
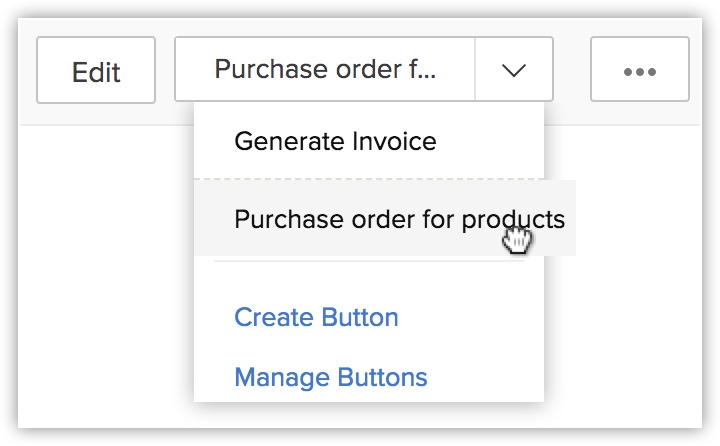
You can now sort the order in which the buttons are visible in the module/record. Let's say you've created 5 buttons, each having its unique usage. 2 buttons that are used frequently can be placed at the top of the list and the 3 which are used moderately can be placed lower.
To sort a custom button
- Go to the module in which you created the button.
- Click the down arrow near the custom button to view the list of buttons.
- Drag and drop the buttons to sort them in the required order.
Delete Custom Button
Zoho CRM Administrator can delete the custom button anytime.
To delete a custom button
- Go to Setup > Customization > Modules and Fields > [Select Module] > Links & Buttons .Under the Links & Buttons page, all the existing custom buttons will be listed.
- Choose the required button that you want to delete and click the Delete
 icon.
icon.
Related Articles
Customizing List View Using Canvas
In Zoho CRM, you can create and swap the record views between List View and Kanban View as and when required. But, these views may not be enough when you want to add a record image or arrange the fields in a different order or insert a background ...Customizing Record Detail Page Using Canvas
The canvas list view provides ways to customize the record display in the module list. You can add record images, use custom buttons to represent fields, use specific font style or size for the field labels, change the alignment of field types and ...Links and Buttons - An Overview
Zoho CRM offers several out-of-the-box features to extend business logic into CRM, which includes the ability to build custom fields, forms, modules, and pages to cater the unique needs of your business. In addition to this, you can now start ...Can I send mass emails from custom modules?
Yes, you can send mass emails from custom modules in the same way as from standard modules like Leads, Contacts, and Deals. To send mass emails from a custom module Go to the module which contains records you want to send mass emails to. Navigate ...Can I change the data type for the custom field that I already created?
No, you cannot change the data type for the custom field that you have already created. For example, if you create a currency custom field, you cannot change it to a text field.