Setting up Web Forms
- Building the form - Drag and drop fields to build a form and format it easily with the WYSIWYG editor.
- Specifying the form details - Add details such as form name, landing page URL (where the visitor needs to be redirected after the form is submitted) record assignment rule, notification details, etc.
- Generating the code for the form - Embed the form using various code formats. Codes for some third-party sites (WordPress, Google Sites, Facebook, and Joomla) are readily available.
You can build web forms to generate records for the Leads, Contacts, Cases and any other Custom modules. While building a web form, the following elements are available in the form:
| Option | Description |
| Add fields | Drag and drop the fields that are required in the form. By default, some of the fields are already added when you build a new form. |
| Set field font and form layout | Use the WYSIWYG editor to change the font style and size, background color, alignment of the fields, etc. in the form. |
| Insert standard Captcha | Captcha is used for security in feedback forms, website registration, comments from visitors, etc. Add captcha for the Zoho CRM system to prevent unauthorized automated spamming programs from filling out the web form. This option is available only in the Paid editions. |
| Add privacy policy link | Add a checkbox for people to accept your legal agreements such as Terms & Conditions, Privacy Policy, etc. |
| Upload files in the form | Capture files through your web-to-lead/contact/case forms (or any other custom module), such as screen shots of an issue, quote requests, photos of individuals, etc. You can upload up to 3 files and the size of all the files put together should be within 20 MB. If the total file size exceeds the limit, the form will not be submitted and the record will not be added in Zoho CRM. This option is available only in the Paid editions. |
| Mark fields as mandatory | Collect important information such as name, email address, mobile number, etc. from the visitors who fill out the web form by marking fields as mandatory. |
| Mark fields as hidden | Add a hidden field and its value in the form. These hidden values are submitted along with the web form but are hidden to the visitors who fill out the form. |
| Add help link for a field | A field you provide may require data to be filled out in a specific format. For example, the date format may need to be specified in DD-MM-YYYY. You can use the option to add a tip or hint to help the visitor who fills out the form. |
| Change button name | The name of the call to action button can be Save, Submit, or another other name. You can easily change the name if your needs change. |
| Specify location URL of the form | The Location URL is the web page URL where you plan to host the web form. Specifying the URL helps you prevent spam and allows only forms submitted through the provided domain to be captured as valid information. |
| Specify landing page URL | This is the URL of the web page to which the visitor needs to be redirected once the web form is submitted. |
| Select record assignment rule | Records generated through the web forms can be automatically assigned to the users in CRM with the help of assignment rules. |
| Specify notification options | Set notifications that need to be sent to the record owners and the visitors who submit the forms. Email templates or autoresponse rules can be used to send notification emails. When the email has to be sent to users within the organization, it is sent as a notification from the email address notifications@zohocrm.com. |
| Enable Double Opt-in | Enable the double opt-in mechanism for webforms, so that customers who submit their information will have to confirm their submission before their data is pushed into Zoho CRM. |
| Embed form code | Embed the web form's code in your web page. The code is available in three different formats: HTML source code, Embed code and iFrame code. |

Generate Web Forms
To generate web forms for Leads, Contacts, and Cases

- Go to Setup > Developer Space > Webforms.
- In the Webforms page, choose the appropriate Module from the drop-down list.The existing web forms for the selected module will be listed.
- Click New Form.

- In the New Form popup, do the following:
- Enter the Form Name.
- Select the Module for which you are creating the webform from the drop-down list.

- Enter the Form Name.
- In the web form builder, do the following:
- Build a form
- Drag and drop the fields that you need in the web form.
- Insert captcha.
- Add the option to upload files.
- Mark fields as mandatory.
- Make fields hidden in the form.
- Provide hint or help links for fields.
- Set font and layout of the form.
- Change button names.
- Drag and drop the fields that you need in the web form.
- Specify form details and other options
- Add form details such as, form name, landing page URLs and form location URL.
- Set a record assignment rule.
- Set notification options
- Add form details such as, form name, landing page URLs and form location URL.
- Copy web form code and embed options
- Get code to embed in your site and other third-party sites.The code is available in three different formats: HTML source code, Embed code, and iFrame code.
Step 1: Build a Form
Drag and drop fields in the WYSIWYG editor, which also provides various other options to build a form.
Add Fields
Drag and drop the fields you need in the form and change the font style and size, background color, alignment of the fields, etc.
To add fields and set the font and layout of the form
- Under the Fields section, select and drag and drop a field in the form builder.
- Make any desired changes to the font, background color, field label alignment, and form width.

- By default, some of the fields are already added in the form.
- For Leads and Contacts - LastName, Email and Phone fields.
- For Cases - Status, Subject and Description fields.
- You cannot remove the following fields from the form, as they are mandatory for a record.
- For Leads and Contacts - Last Name field.
- For Cases - Subject field.
- To have custom fields, you need to first create them in the particular module. See Also Custom Fields
- When you add the Account Namefield in the web form for Contacts and contact details are submitted, an account will automatically be created in Zoho CRM. If an account with the same name already exists in your CRM account, an account will not be created when the form details are submitted.
- An Account will be created, even if certain mandatory field details are not provided. Later, when the account is edited, you need to provide the other mandatory details before saving the record.
Date Picker
- Under the Fields section, drag and drop the Date or Date-Time field.
- Click the settings icon.
- In the Field Properties pop-up specify the following:
Label: Enter the name for the date field. This will be displayed as the field name in the form.
Date Format: Choose a date format from the drop-down. Dates picked by the users will be displayed in their chosen format. - Under Options, select the required:
(i) Mark as hidden field
(ii) Mark as require field
(iii) Add hint message - Click Save.
Upload Files
- Under the Advanced Fields section, drag and drop the File Upload field.Note that the visitor cannot upload a file exceeding 20 MB. You can use the help link option in the Field Settings to provide this hint.

Insert Standard Captcha
Add captcha to prevent unauthorized automated spamming programs from filling out the web form. This option is available only in the Paid editions.
To insert standard captcha
- Under the Advanced Fields section, drag and drop the Standard Captcha field.

Insert reCAPTCHA
Specify the following to register:
- Label - Enter a name which lets you identify the website that is registered for the reCAPTCHA.
- reCAPTCHA type - Select the ones that you will be using in your website. Make sure to select reCAPTCHA V2 - "I am not a robot" checkbox as the Zoho CRM webform supports only this type.
- Domains - Enter the domains for which you are registering. Once a domain is defined, the reCAPTCHA can be used for all the appropriate sub-domains.
- Owners - Specify the email address of the users who can access the admin console of the reCAPTCHA settings. They share the ownership rights over the site key.
- Click the Advanced Fields section.
- Drag and drop the reCAPTCHA field.
- In the reCAPTCHA Settings popup, do the following:
- In the Key Details section, enter the Label, Site Key, Secret Key.
You can get the Site key and the Secret key from the Google reCAPTCHA Settings page. - Specify the Theme Preference.
You can either choose the Default/Dark theme. - Select the Acknowledgement for use checkbox and click Save.
- reCAPTCHA is available in all the paid editions of Zoho CRM.
- A webform can contain only one reCAPTCHA.
- Please ensure that the registered reCAPTCHA domain is the same as that of the Form Location URL.
- The domain validation for your reCAPTCHA has to be disabled if you have embedded your webform using iFrame code.
- For details on reCAPTCHA for Internet Explorer versions 8, 9, 10, refer to https://support.google.com/recaptcha/answer/6223838?hl=en
Insert Privacy Policy option
Every business has some form of legal agreements in place, such as a Terms & Conditions agreement, a privacy policy or an End-User License Agreement (EULA). It is important that people read such agreements and legally agree to them with a deliberate action such as selecting a checkbox in a form.
In Zoho CRM, you can make sure this is addressed by using the Privacy Polic y option. Using this option you can add a checkbox and customize the message appropriately. Unlike other checkbox fields, this checkbox field has a validation; the form will be submitted only after this checkbox has been selected.
To insert privacy policy option
- Under the Advanced Fields section, drag & drop the Privacy Policy field.

- In the Privacy Policy popup, add and format your desired message.You can add a link to the text as well (for example, a link to the privacy policy page).

Mark Fields as Mandatory
Mark important fields as mandatory to collect important information such as name, email address, mobile number, etc. from the visitors who fill out the web form.
To mark fields as mandatory
- Move your cursor to the field that you want to mark as mandatory.
- Click on the Settings icon.
- In the Field Properties pop-up, select the Mark as required field checkbox.
- Click Done.

Mark Fields as Hidden
Add a hidden field and its value in the form. These hidden values are submitted along with the web form but are hidden to the visitors who fill out the form. For example, if you have hosted the same form in various web pages, the hidden field will help you identify which web page hosted the web form that generated a specific record.
To make fields hidden in the form
- Move your cursor to the field that you want to hide in the form.
- Click on the Settings icon.
- In the Field Properties pop-up, select the Mark as hidden field checkbox.
- Specify the value for the field and click Done.

Add Hint Message Help Link
A field you provide may require data to be filled out in a specific format. For example, the date format may need to be specified in DD-MM-YYYY. For such requirements, you can use the option to add a tip or hint to help the visitor who fills out the form.
To provide hint or help links for fields
- Move your mouse pointer to the field for which you want to provide hint or help link.
- Click on the Settings icon.
- In the Field Properties pop-up, select Add Hint Message checkbox.
- Choose one of the following:
- Help Icon: Specify the help or hint text. For example, the date field can have the fotmat MM-DD-YYYY and provide the link URL.
- Link: Specify a text for the link and provide the link URL.
- Help Icon: Specify the help or hint text. For example, the date field can have the fotmat MM-DD-YYYY and provide the link URL.
- Click Done.

Change Button Name
By default, there are two call-to-action buttons: Submit and Reset. You can rename these buttons as needed.
To change button names
- Move your cursor to the field that you want to rename in the form.
- Click on the Settings icon.
- In the Field Properties pop-up, modify the field name.The name of the field will be changed only in the form.
- Click Done.

Remove Field from the Form
Easily remove unwanted fields from the web form and add them whenever required.
To remove a field from the form
- Move your mouse pointer to the field that you want to remove from the form.
- Click on the Delete icon.
Preview the Web Form
Take a look at the web form before publishing it in your web site.
To preview the form
- In the form builder, click on the Preview link.A preview of the form will be available.

Step 2: Specify Form Details
- Specify Form location URL. This should be the web page where the web form will be hosted. It should start with "http://" or "https://". (e.g., https://www.zylker.com/contact-us.html ). This prevents spam and allows only forms submitted through the particular domain to be captured as valid information. Add multiple URLs by clicking the Add button after adding one location URL. If you plan to host the web forms in a location that you are unsure of at the moment, enter * in this field. This way, the form is accepted from any location from where it is hosted.
- Specify a landing page URL. The visitor who submits the form will be redirected to the URL specified here. It should start with "http://" or "https://".The length of the return URL should not exceed 255 characters. (e.g.,
https://www.zylker.com/thank-you.html ) - Choose one of the following options to AssignOwner to the records that are submitted via web form.
- Choose a User: Select from the drop-down list. All the records generated through the form will be assigned to the selected user.
- Create or Choose [Module] Assignment rule to assign ownership: Select an existing assignment rule or create a new one. Records will be assigned to the users based on the rules you set. With assignment rules you can implement the Round Robin method to assign records to the users. See Also Assignment Rules
- Choose a User: Select from the drop-down list. All the records generated through the form will be assigned to the selected user.
- Add relevant Tags , if applicable, from the list of existing tags for the module.The chosen tag will be added to all of the records captured from the webform.
- Toggle on the Enable Double Opt-in button.Note that this option can be used only if the primary email field is added to the web form. When a web form with double opt-in is submitted, a confirmation email is sent to the visitor for additional verification.
- Enable Notify [Record] Owner, if required and select an email template that will be sent to the record owner. When a notification email has to be sent to users within the organization, it is sent as a notification from the email address notifications@zohocrm.com.
- Enable AcknowledgeVisitor if you want to send an email to the person who submitted the web form. After you select an email template, you will be prompted to enter the From and Reply to fields.Here you can choose one of these options in the drop-down list:
- your account email address
- organization email address
- email address of the record owner
- other user's email address
- your account email address
- Using Auto-ResponseRule: Use one of the existing autoresponse rules. Based on the details gathered using the web form, auto-response rules can be triggered to send specific emails.When details gathered through the web form do not satisfy the auto-response rule criteria, then the email template selected in the second option will be sent as an acknowledgment email.
- Default response for all visitors: Choose an email template that will be used to send email to the leads generated via this web form.

- Enable VisitorTracking and select the portal from the drop-down list. If you have enabled the feature, this will automatically include the visitor tracking code in your web form's code (applicable only for the Source Code and Embed Code formats).
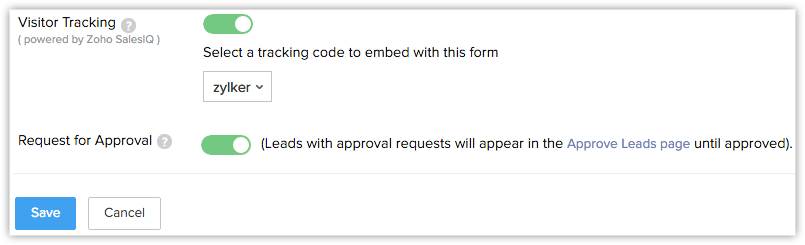
- If you choose the iFrame code format in the Embed Options , you have to manually add the visitor tracking code along with the iFrame code in your web page. For the iFrame code format alone, the visitor tracking code is not automatically included along with the code. For the Source code and Embed code formats the visitor tracking code will automatically be included.To find the Visitor Tracking code to embed, go to Setup > Channels > Chat and copy the code from the Visitor Tracking page.
- If you have not enabled the Visitor Tracking feature, you will be asked to create a portal here to start using this feature.
- Check Request for Approval, if you want to submit the records for approval. See Also Approve RecordsNote that users with the Approve Web-to-Leads/Contacts/Cases permission in the profile can approve the records.
- Click Save.
- Note that the limit for the Form location URL added depends on your Zoho CRM account plan.
- Standard & Professional - 5
- Enterprise - 10
- Ultimate - 20
- Developer - 5 - The Request for Approval option will help you validate the generated records manually, and then add them to the corresponding module in Zoho CRM. If this option is not selected, all the records generated through the web form are added directly to the corresponding modules.
- If the domain name in the Location URL does not match with the URL where the web form is hosted, then the information will not be captured. Alternatively, you can enter [*] in the landing URL field to capture from other / multiple domains.
Step 3: Use Web Form Code to Embed
The code for the web form is available in three formats: Source code , Embed code , and iFrame code. The code is also readily available for some third-party sites: WordPress, Facebook, Google Sites, and Joomla. Please note that the Script and iFrame code is available only in the Paid editions.
To embed web form code
- Select Source Code, Embed or the iFrame code from the list as required.

- Copy the code and paste it in the website where you want the web form.
- Select the Track the records along with Google Ads information through web forms checkbox, if desired.Copy the tracking code displayed and paste it at the bottom of every page of your website immediately before the </body> tag.Note that this Google Ads tracking code appears only if you are a Google Suite user and you have enabled Google Ads integration.
- Click Done.
- In order to avoid spam, the generated Web Form (HTML file) must be published in an active web server (Apache, Microsoft, IIS, etc.).
- The web form will not work if you submit the form values from your desktop.
- When the HTML code is generated for the web form, certain entities are hidden by default. If you remove those hidden entities, the web form will not work. Here is the code snippet that should not be removed from your web form code:
<input type="hidden" name="xnQsjsdp" value="" /> <input type="hidden" name="xmIwtLD" value="" /> <input type="hidden" name="actionType" value="" />
Enable Double Opt-in
Double opt-in is a process in which users confirm twice that they are interested in what you offer and willingly fill out the web form. It helps you get quality leads, and lets you dedicate time and resources to people who want to hear from you. When you enable the double opt-in mechanism for webforms, customers who submit their information will have to confirm their submission before their data is pushed into Zoho CRM.
The two steps involved in double opt-in are:
- A user fills in their email address and other details and submits the form through your website.
- A confirmation email is sent to the email address provided by the user. The user needs to click on the link in the email and confirm.
To enable double opt-in for your web form
- Go to Setup > Developer Space > Webforms.
- In the Web Forms page, choose the Module from the drop-down list.The existing web forms for the selected module will be listed.
- Click Create Web Form or choose one of the existing web forms.
- In the web form builder, edit the form, if required and click Next Step.
- In the Form Details popup, toggle on the Enable Double Opt-in button.Note that this option can be used only if the primary email field is added to the web form. When a web form with double opt-in is submitted, a confirmation email is sent to the visitor for additional verification.
- Click Save.
- Publish the new web form's code that is generated on your website.
- Enable Double Opt-in option will not be available for Free and Trial Editions of Zoho CRM.
Clone webforms
- Select the desired web form from the list view and click the More icon.
- Click Clone.
- Select the desired layout from the drop-down list.
You cannot change the module of the web form. - In the web form creation page, add or remove fields or make desired customizations.
- Click Preview to see and confirm the changes.
- Click Next and Save.
- In the Embed Options page, select the Code Format (source, Embed or iFrame).
- Click Copy Code and Done to save the cloned web form.

Troubleshooting tips
Related Articles
Web Forms
Capture visitor information directly from the website using Web Forms Help guide Web Forms - An Introduction Setting up Web Forms Including Opt-in Checkbox in Web Forms for ConsentWeb Forms - An Introduction
Web forms simplify the process of capturing visitors or users information from your website into your CRM system. They are designed to automate the importing of data from websites into Zoho CRM. Non-technical users find it easy to design and publish ...Zoho CRM Web Forms for Google Sites
Web forms simplify the process of capturing visitors' or users' information from the website into your CRM system. They are designed to automate importing of data from website into Zoho CRM and to enable non-technical users to design and publish ...Setting Data Encryption
Data encryption is a way to safeguard personal or sensitive information like credit card details, backup phone numbers, personal identification numbers etc. that are stored in your CRM database. It prevents the data from being stolen or lost by ...How do you integrate Zoho Forms with Zoho CRM?
It is possible to integrate Zoho CRM with Zoho Forms in the following CRM editions: Enterprise Ultimate You can use Zoho Forms to build online forms or applications to collect data from your website visitors. When you integrate Zoho Form with CRM, ...