Instant Workflow
This workflow, once activated, will trigger each time whenever a defined condition is satisfied.
User scenario
Jane has an online store for antiques. Contacts join her mailing list through the signup form embedded in her website. To promote her collection of antique jewellery to her female contacts, she defines a workflow with the condition "Title" is "Ms, Mrs" and the action "Send email" and then configures her promotional content. When the workflow is activated, the promotional email will be sent to every new contact who selects one of those titles on her signup form.
Create an instant workflow
- From the Navigation toolbar, select Automation and choose workflows.
- Click Create Workflow present at the top-right corner.
- Click Conditional Workflow, and select click Create under Instant.
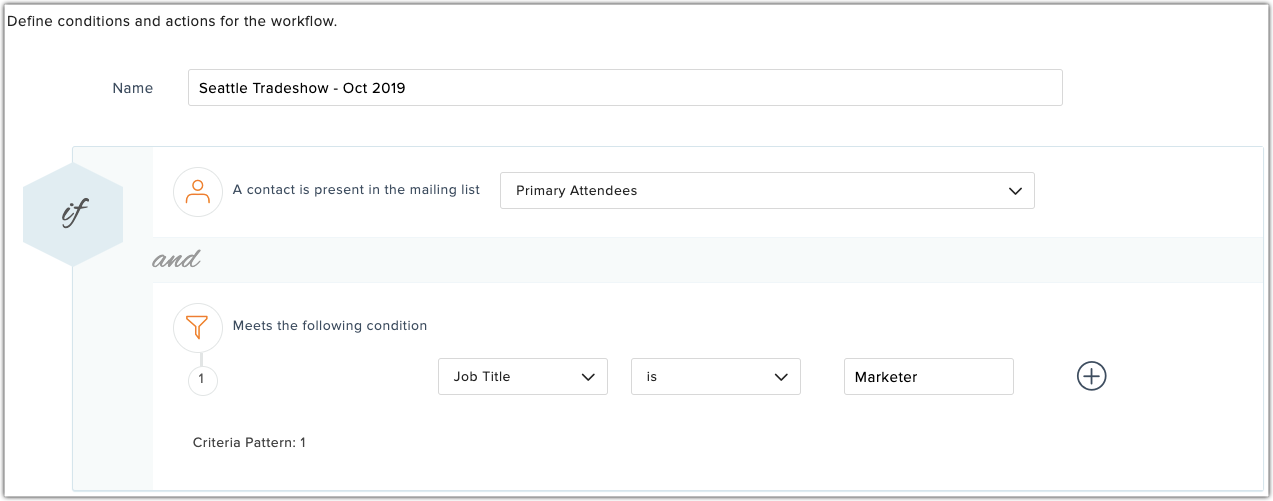
- Provide the following information:
- Name for the workflow for your reference in the future.
- Select a mailing list to associate with the workflow. If necessary, you can create a new mailing list.
- Set up criteria defining the conditions with which your contacts should be categorized. You can set up to six criteria and set the criteria pattern as of your choice. You can also define the conditions based on consent status as a criteria.
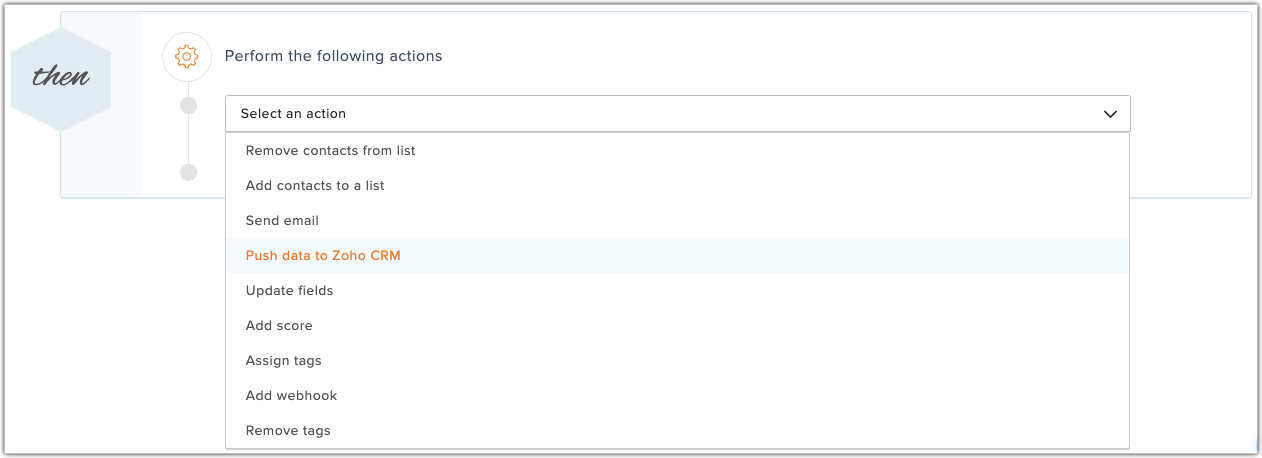
- Select an action to be performed. You can select any number of actions:
- Remove contacts from list: Contacts who meet the criteria will be removed from the mailing list.
- Add contacts to another list: Contacts who meet the criteria will be added to another mailing list i.e, a target list. Select the target list from the dropdown. You can also create a new mailing list as your target list.
Mark as Smart ListYou can mark your target list as a Smart List. (A Smart list will contain only those contacts who meet the defined criteria.) When you mark your target list as a smart list, the workflow will add the contacts who meet the specified criteria to the smart list.
After the workflow is activated, if any contact already present in the smart list stops meeting the criteria, then they will automatically be removed from the smart list. Also if any new contact added to the smart list through the workflow (i.e., those who met the specified criteria), stops meeting the criteria, they will be removed from the smart list. Thus the smart list, at any point of time, will hold only those contacts who match the criteria specified in the workflow. Note : The contacts who don't meet the criteria will be removed ONLY from the smart list but will remain active in your mailing lists.
 - Send email to contacts who meet the criteria. Create a new campaign and configure content. You can choose to send it immediately, or schedule it for later.
- Push to Zoho CRM the contacts that meet the criteria. You can either push all contacts to Zoho CRM or update just the existing contacts' Campaigns related information in Zoho CRM. To push contacts, you will have to configure mapping with your Zoho CRM account.
- Update fields of the contacts who meet the criteria. Select the field to be updated and provide a value for the field. You can choose to update any number of fields. In update field you can do one of the following:
- Text fields: Overwrite the existing text value or append text to the existing value.
- Integer fields: Overwrite the existing integer value or add or subtract an integer from existing value.
- Date and time fields: Overwrite the existing date and time with any value or update to the date and time when the action occurs.
- Text fields: Overwrite the existing text value or append text to the existing value.
- Add contact score to contacts that meet the criteria. Select a score to be added.
- Assign tags to contacts who meet the criteria that you define.
- Associate webhook Send details of contacts who meet the workflow criteria using webhooks. Select the webhook you want to associate. If necessary, you can create a new webhook.
- Remove tags from contacts who meet the defined criteria and are already assigned with a tag.
- Remove contacts from list: Contacts who meet the criteria will be removed from the mailing list.
- Name for the workflow for your reference in the future.
- Click Activate Now to enable workflow immediately or click Save as Draft for use in the future.
Once activated, the workflow will be triggered every time conditions are met. You can pause and reactivate the workflow at any time.


Changing criteria pattern
The default criteria pattern is ''( ( ( ( ( 1 and 2 ) and 3 ) and 4 ) and 5 ) and 6 )'' if you choose all six criteria. However, you can choose between the operators 'And' or 'Or' between the conditions. If you wish to change the position of the parentheses, click the link Change pattern to edit the pattern.
Use Case
You want to filter contacts by creating a view that displays all contacts from automobile industry who recently attended a trade show and whose location is either San Diego or San Francisco. When you specify this criteria using the Criteria Editor, the criteria pattern will be displayed as shown below:
The default pattern is (((1 and 2) and 3) or 4). However, the required pattern is ((1 and 2) and (3 or 4)). This modification can be made using the Change Pattern option.
Ordering and re-ordering instant workflows in the list view
By default, the Instant workflows will be executed in the order of their creation. However, you can change the order of execution by changing its order in the list view. Execution is always from bottom to top. To reorder the Workflows execution:
- From the Navigation toolbar, select Automation and choose workflows.
- In Workflow list view, drag and drop the Workflow to an appropriate position.
- A pop-up will prompt you to confirm the reorder.
- Click OK.
Workflow reports
You can view reports for any active workflow. To view reports:
- From the Navigation toolbar, choose Automation and select Workflow.
- Select the workflow for which you want to view reports.
- Navigate to the intended action and click View Reports.
The report will display a list of contacts on whom actions were performed and a list of those that were missed out, along with the reason they were skipped.
Related Articles
Workflow Reports
Once you've activated your workflow you will be able to view the reports. There are three types of reports: Version-based report Detailed report Action-based report Version-based report To view version-based report: From the Navigation toolbar, ...Activity-based Workflow
This workflow's trigger is based solely on contact activity. These are pre-definable workflows that can be invoked for any entity, including signup forms, campaigns, and more. User scenario 1 Jane has embedded signup forms in her website, blog, and ...When will an instant workflow trigger, and who will it trigger for?
The workflow will trigger for any contacts as soon as they meet the specified criteria.What is the order of execution for instant workflows?
Instant workflows will be executed in the order of their creation. You can change the order of execution from the list view. Execution order is always from bottom to top.Email Action Autoresponder
Understanding email action autoresponder Gaining and retaining contacts is about creating a personalized experience for your reader. Email-action based autoresponders allow you to send targeted messages and follow up with contacts based on their ...