Input Blocks
Input blocks can be used to collect information from the visitor such as date & time, location, feedback, and more according to the requirement.
Button
Button block allows you to give multiple options for the visitors to choose from, and you can create multiple flows based on the visitor's choice.
- To add a button card to your flow, click on the card holder icon (+) to view the blocks gallery, choose the Button block.

- Give your card a name, message, and define the choices for your visitors under the Button text section.
- You can add any number of choices, and each choice will enable a new flow path in the codeless bot builder page.
- Besides, you can also add a card image and field name to map the input data.
- Moreover, the response from the visitors can be stored in the bot context/visitor field to invoke further actions.
- After configuring the button block, click Save.
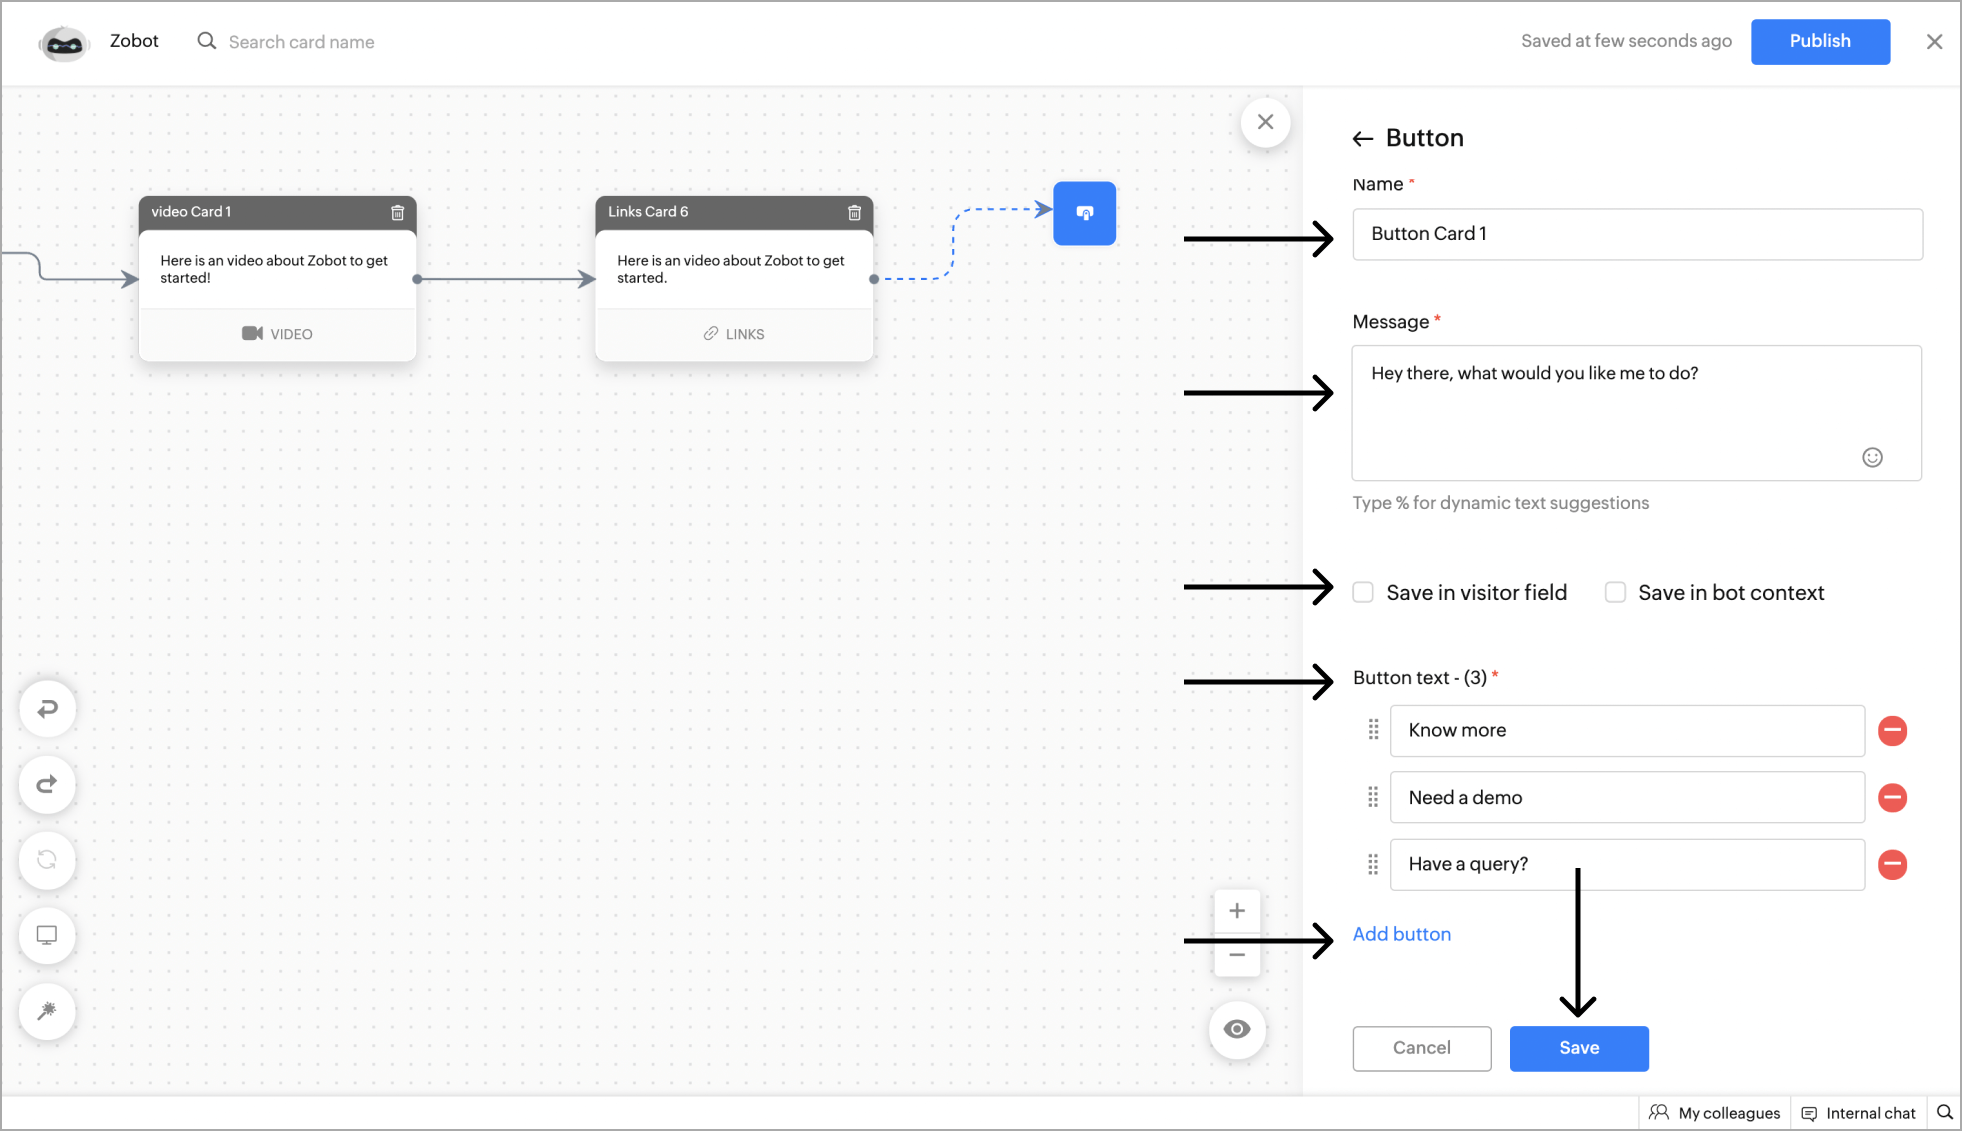
- After adding the Button card to the flow, the flow of the code-less bot will be split into the number of button text added. Using this you can add multiple flows based on the visitor's choice.
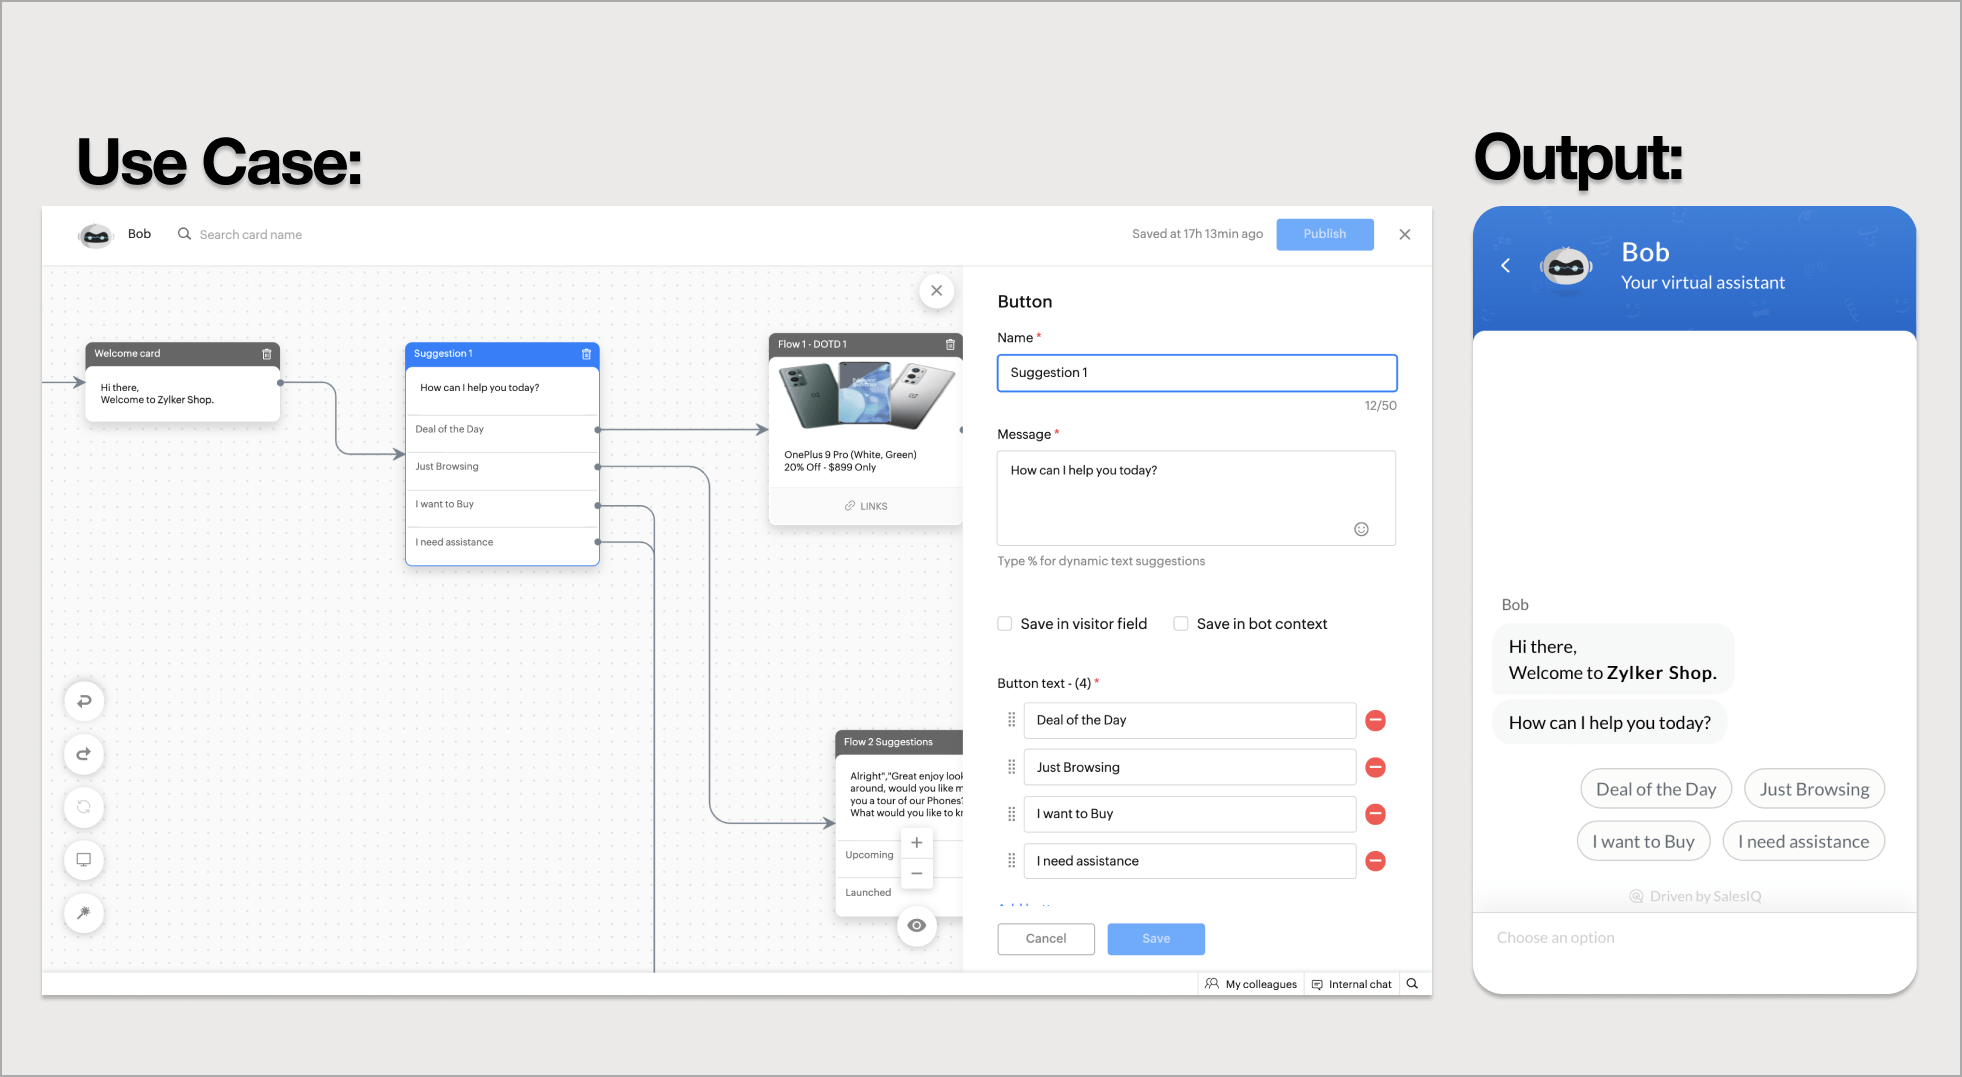
Example - Displaying various suggestions via Buttons to the website visitors.
Option
This block can be used to get the required information for specific details. You can present the visitors with multiple options and get their responses. The main difference between an Option card and a Button card is that the button card can create multiple flows based on the visitors' response, whereas the options can be used to collect the information from the visitors and enrich the conversation.
- To add an option card, click on the card holder icon (+) to view the blocks gallery, select the Option block.

- Configure the option block as per your requirements, and click Save.
- Give your card a name, message, and define the choices for your visitors under the item name section.
- You can add any number of choices, and save these responses in the bot context/visitor field.
- Moreover, you can also add a card image and field name to map the input data.
- After configuring the option block, click Save.

- Now, the option card has been added to the flow.
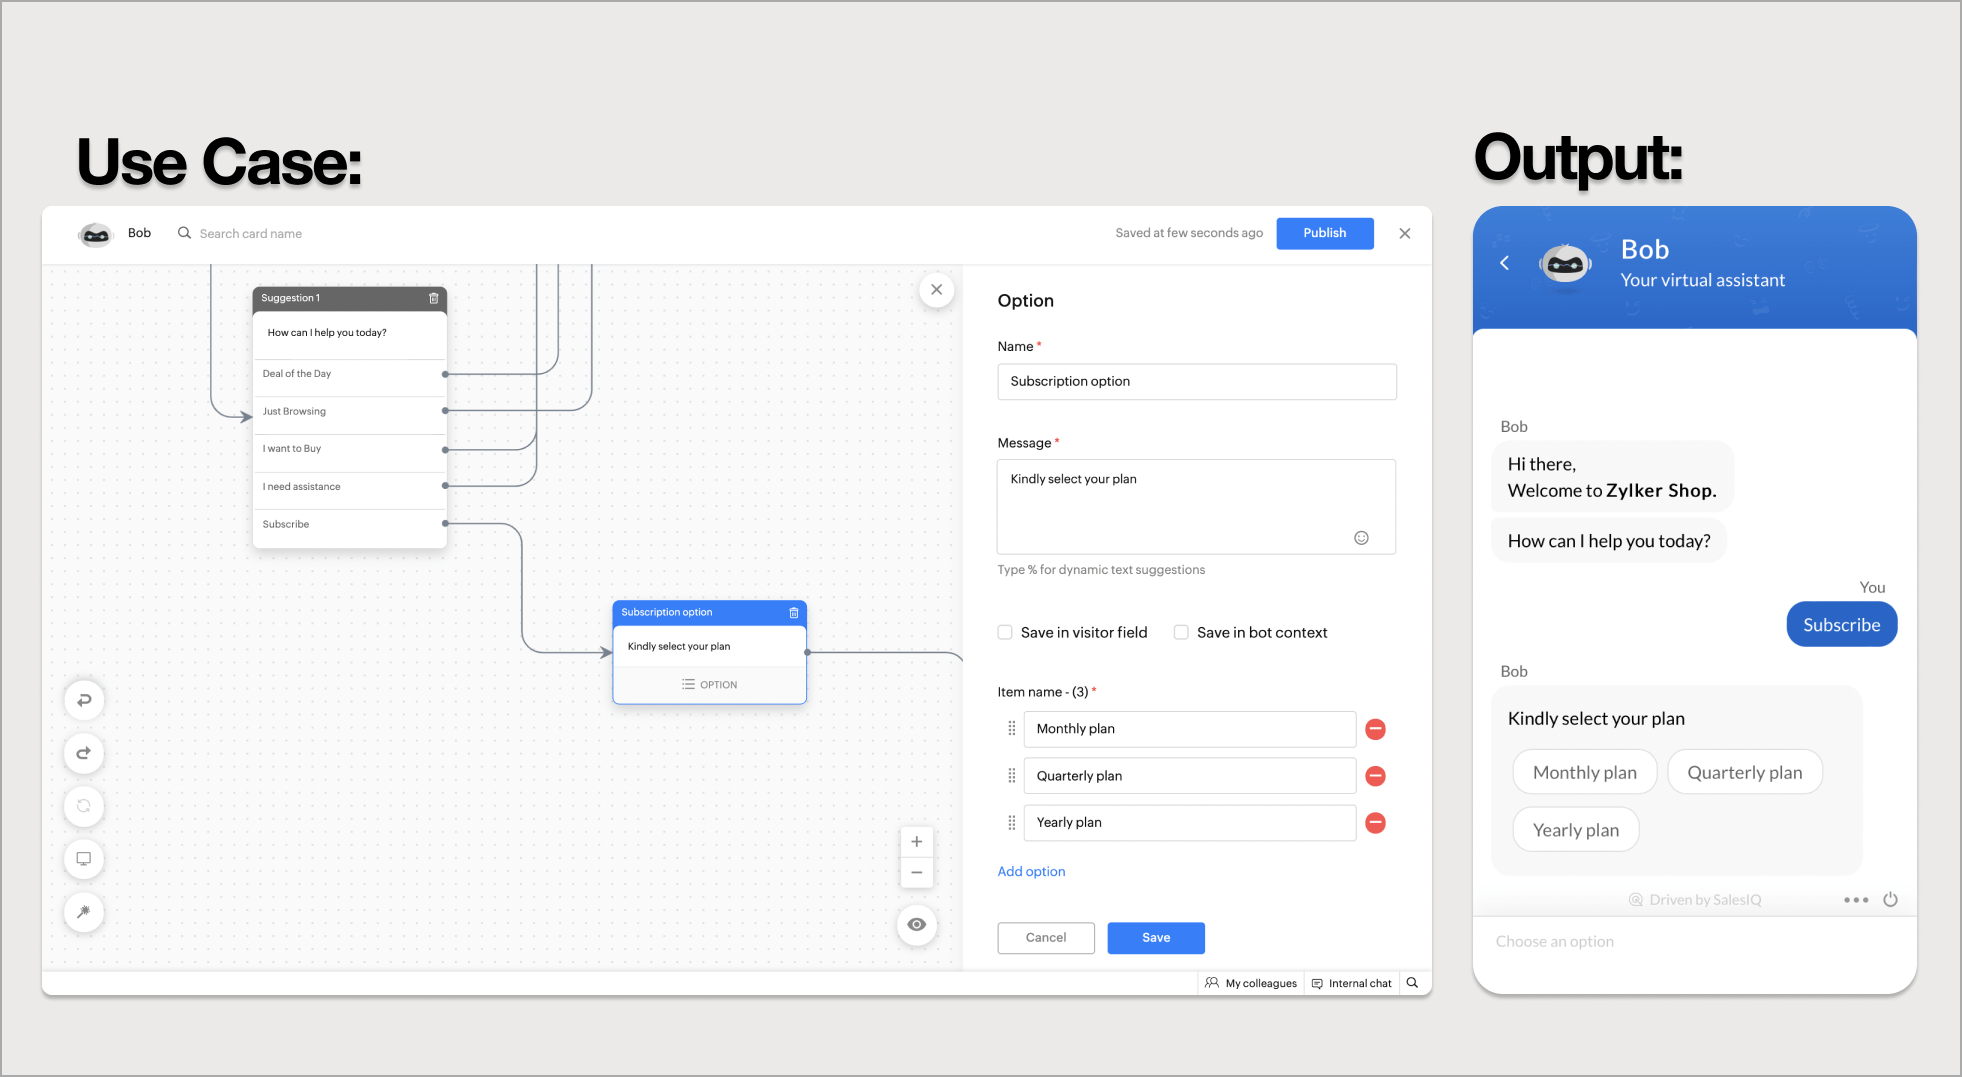
Example - Displaying the subscription plan to the website visitors.
Multiple Options
Multiple options provide a checklist-style option that lets visitors pick one or more choices. This can be used to get more info from the visitor using a single card.
- To add a Multiple option card, click on the card holder icon (+) to view the blocks gallery, select the Multiple option block.
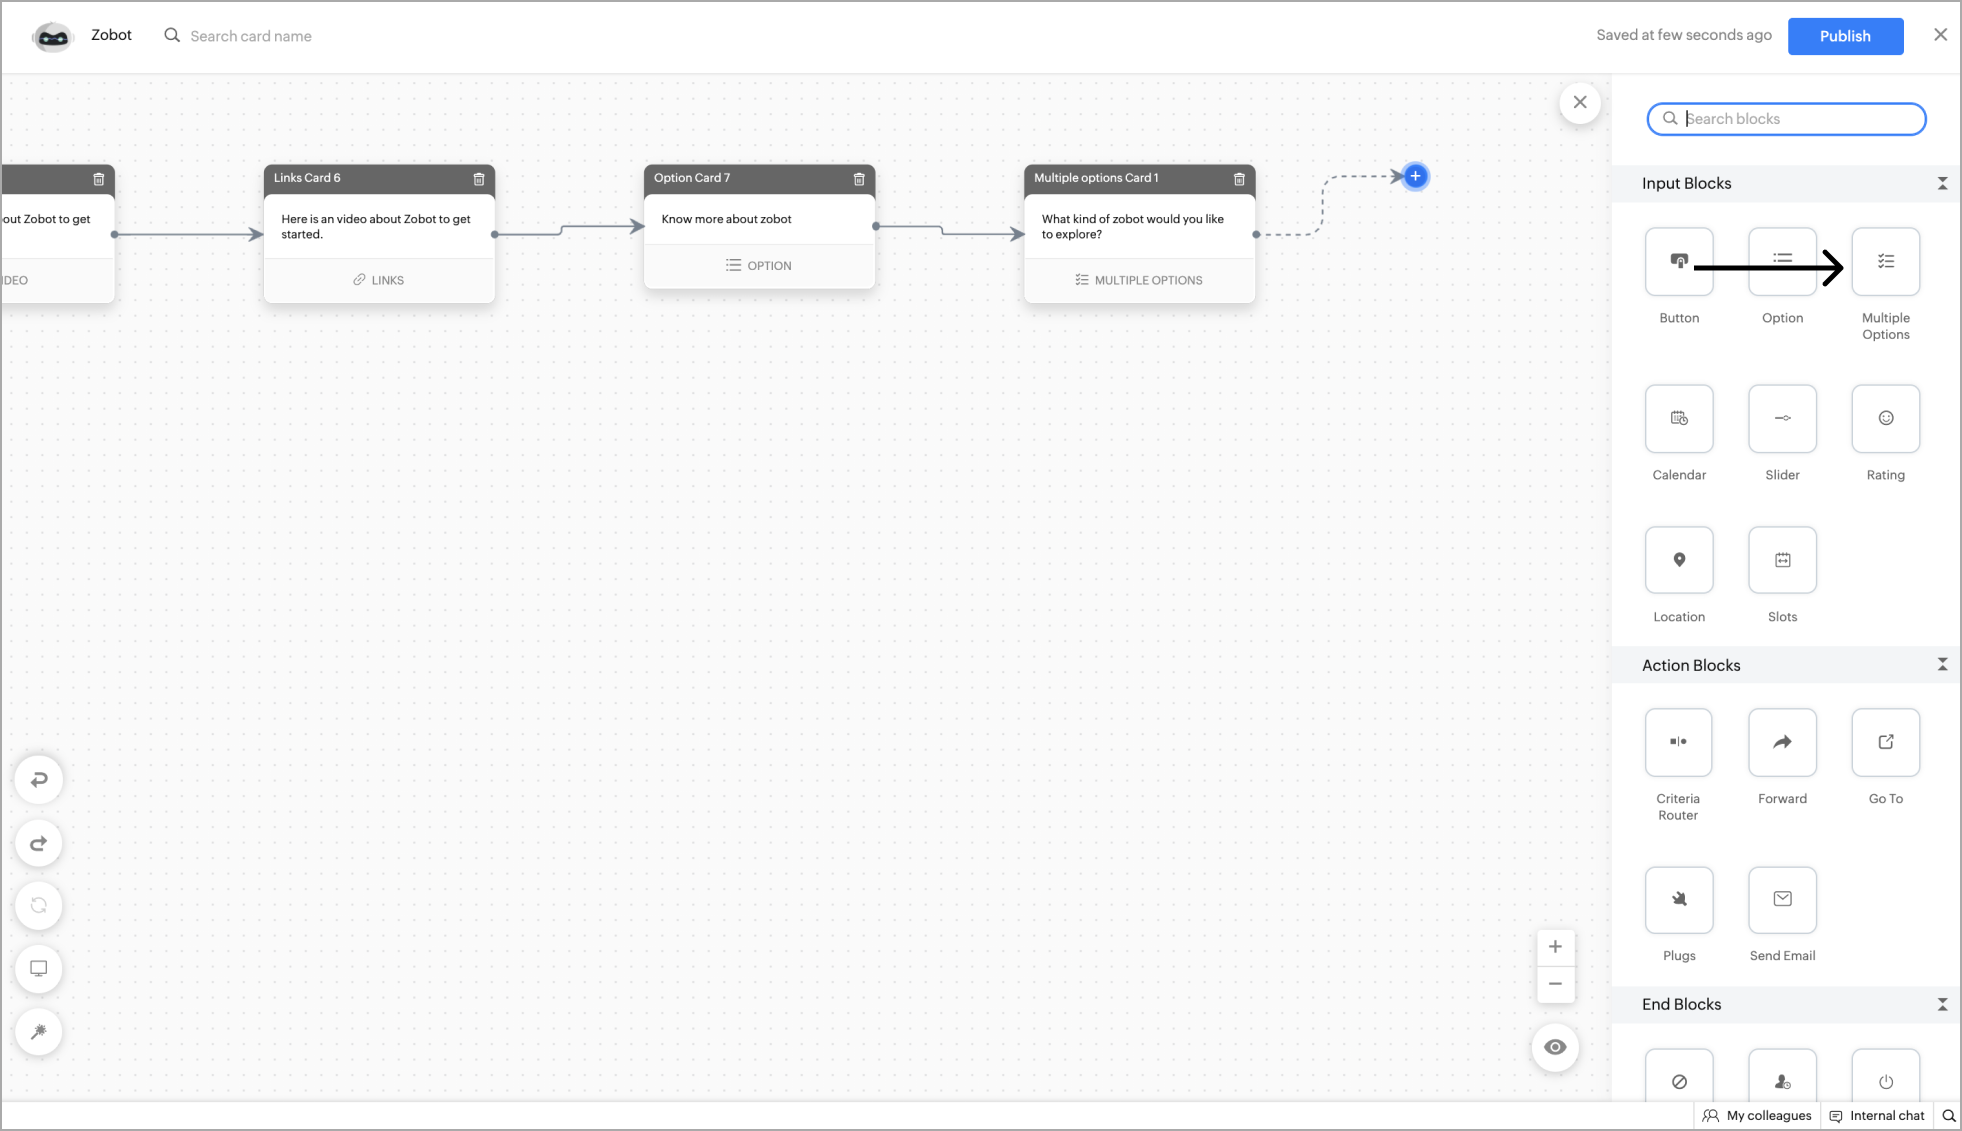
- Add all the options under the Item name section and the response can be saved in the bot context/visitor field.
- Once added, you have to define the minimum and the maximum number of selections that the visitor can make.
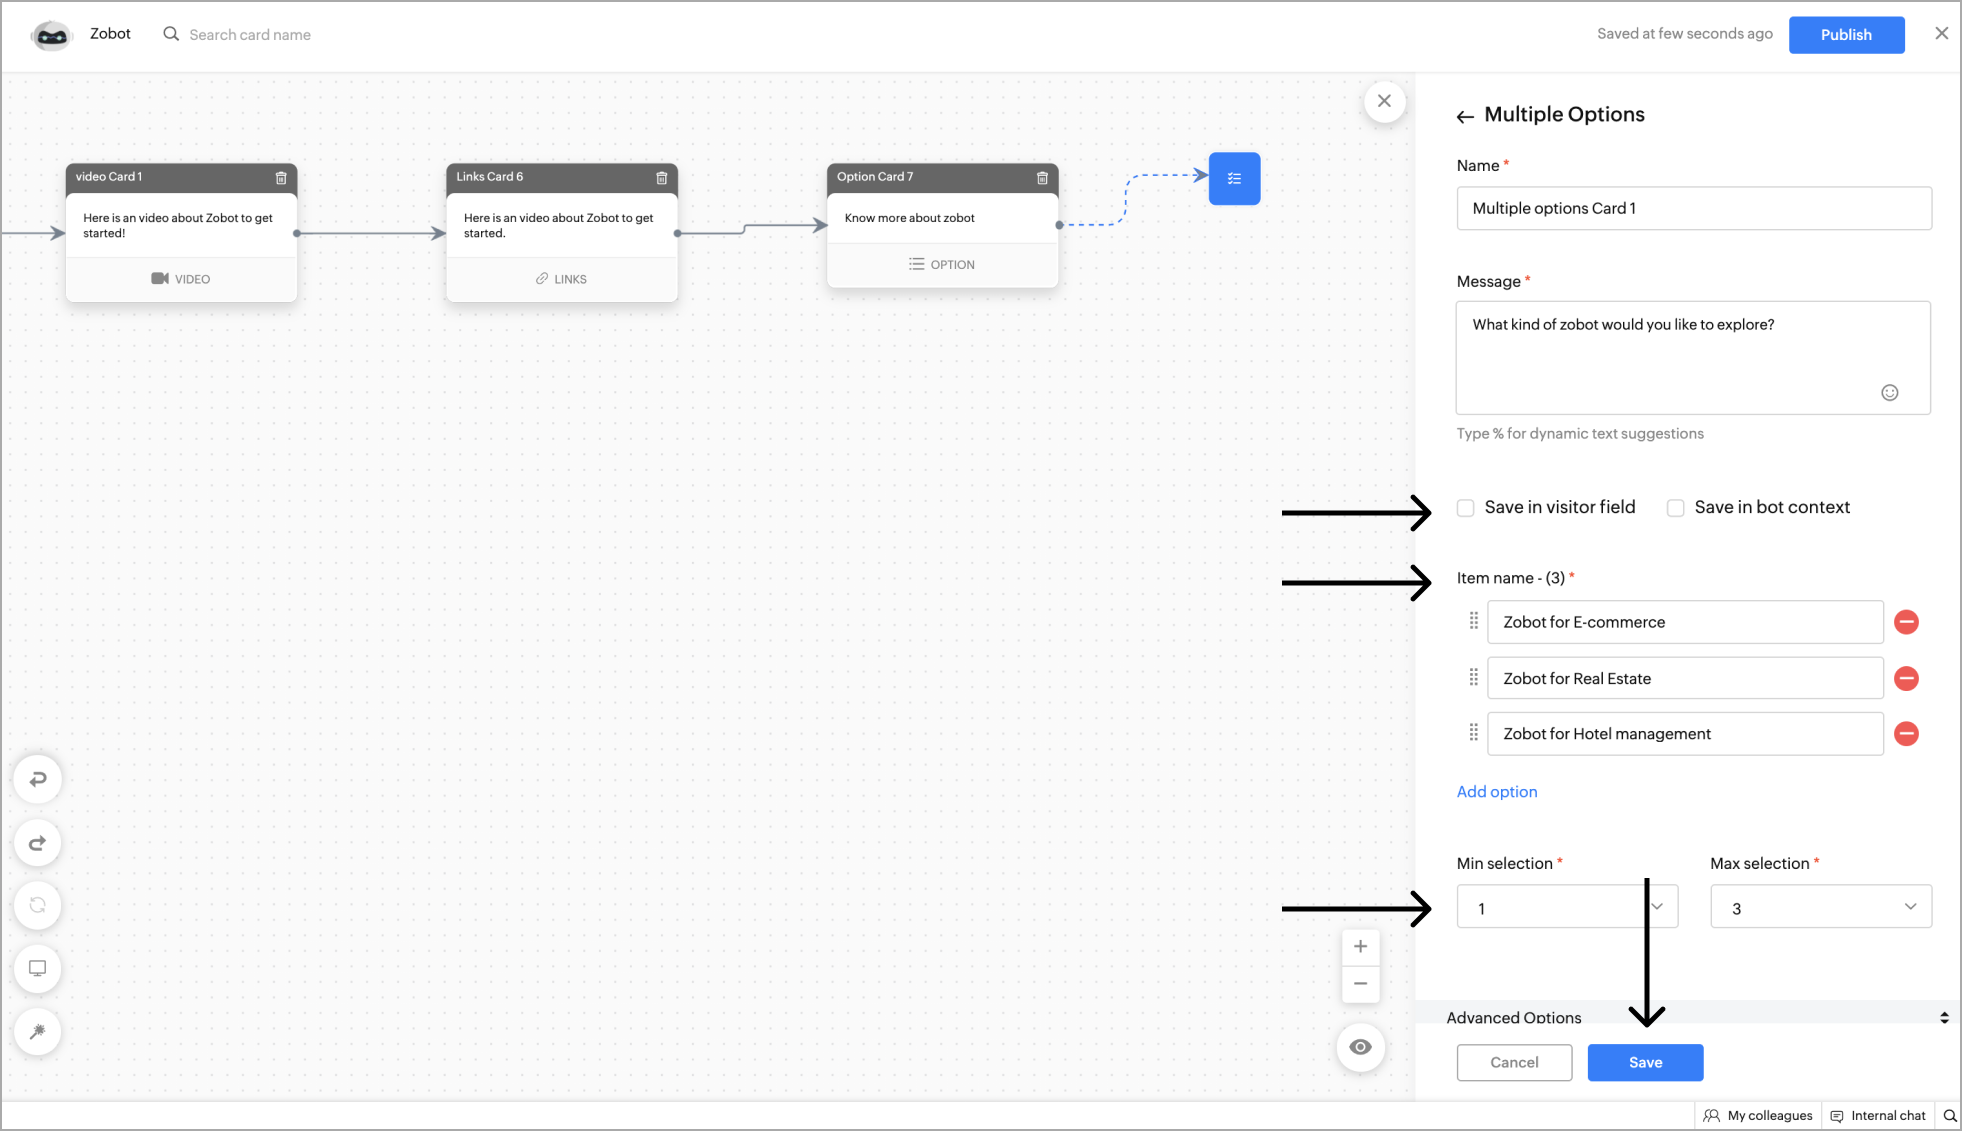
- After configuring the multiple option block, click Save.
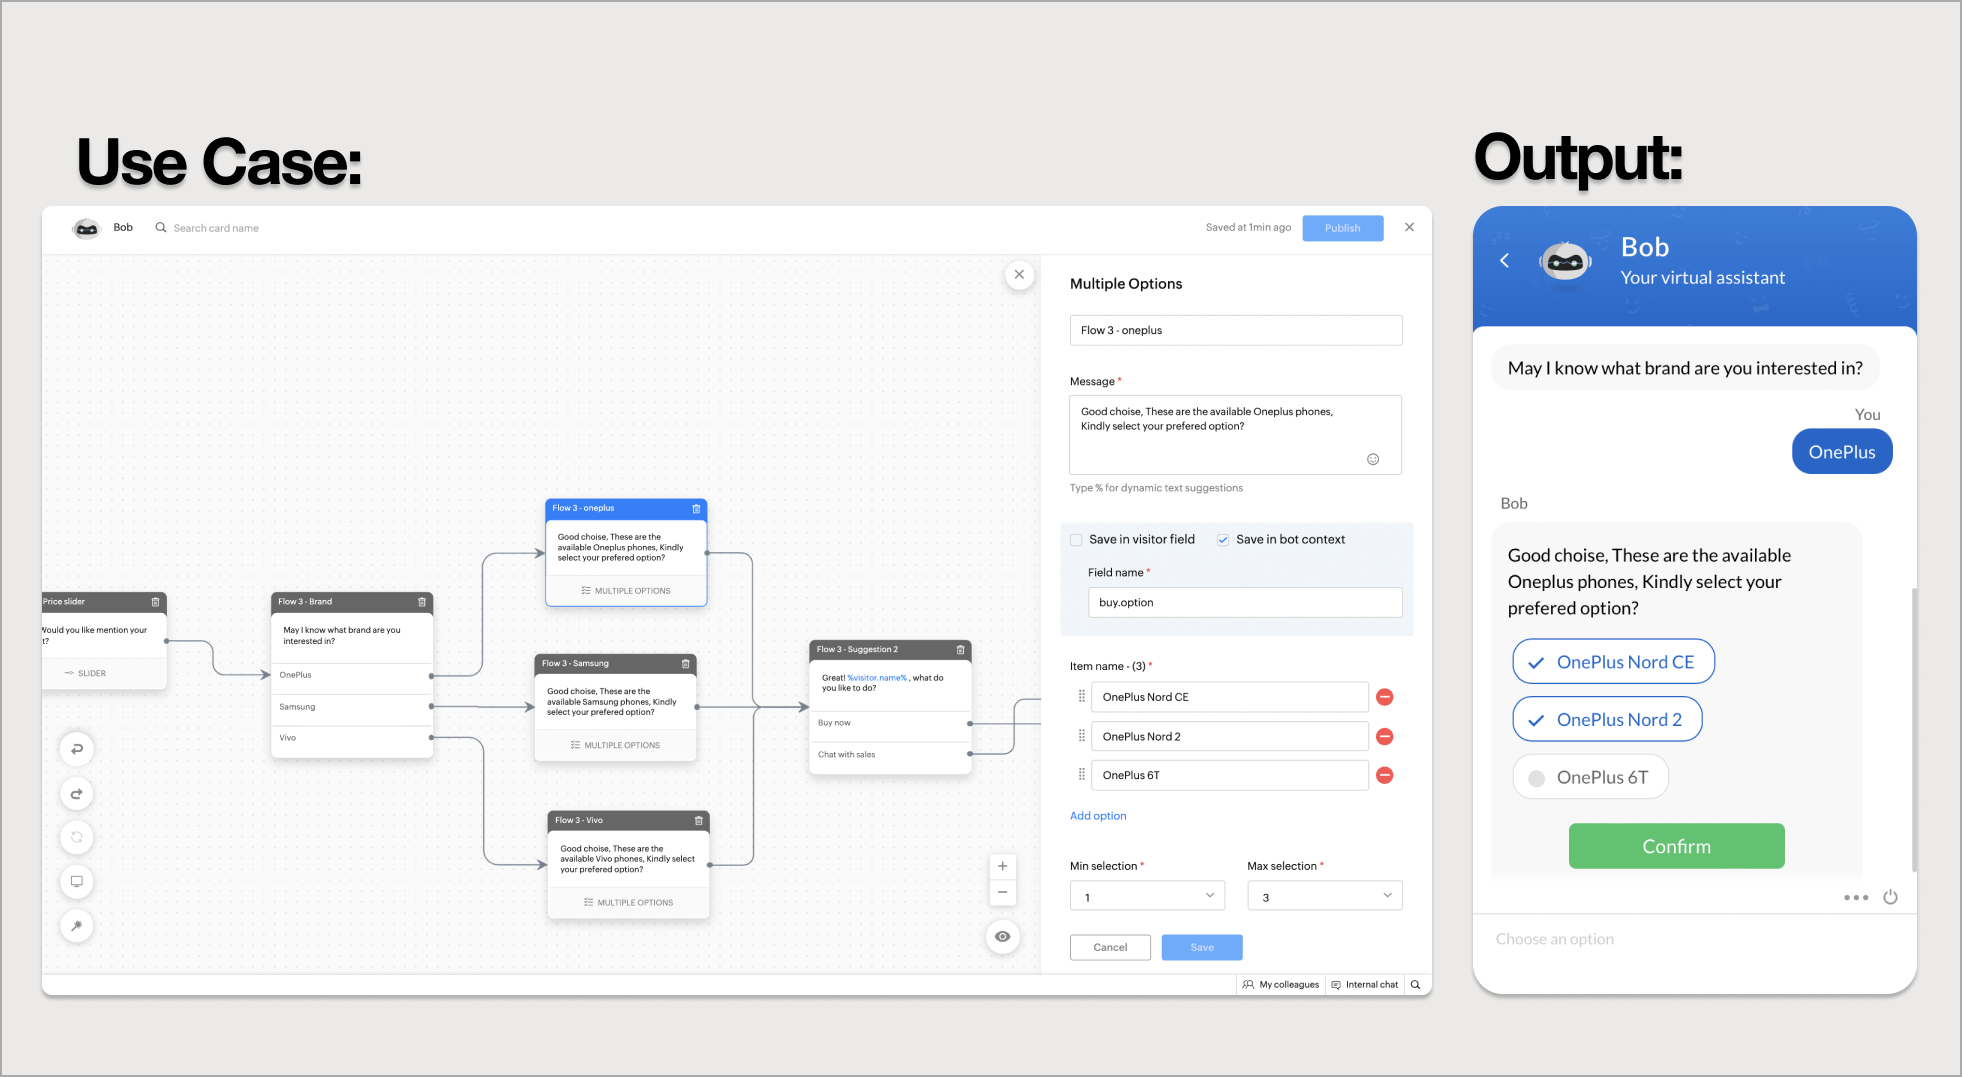
Example - Displaying multiple options of products in the same brand and allowing the visitors to choose one or more as per their interest.
Calendar
A calendar card allows the visitors to pick a time and date to schedule events.
- To add a calendar card, click on the card holder icon (+) to view the blocks gallery, select the Calendar block.

- Add name, message for the calendar. Now, choose the calendar type as single date or date range.
- Single date: The single date option allows visitors to pick a particular date that can be used to fix appointments, schedule events, etc.
- Date range: The date range option allows you to choose a range of dates that can be used to book flights, plan a trip, etc.
- If you also want the visitor to specify the time, click the Date & time option under the Choose a value to select section.
- Allow visitors to change their time zones by enabling the 'Allow visitor to change time zone' option.
- You can save these responses from the visitor in the bot context/visitor field to do further actions.
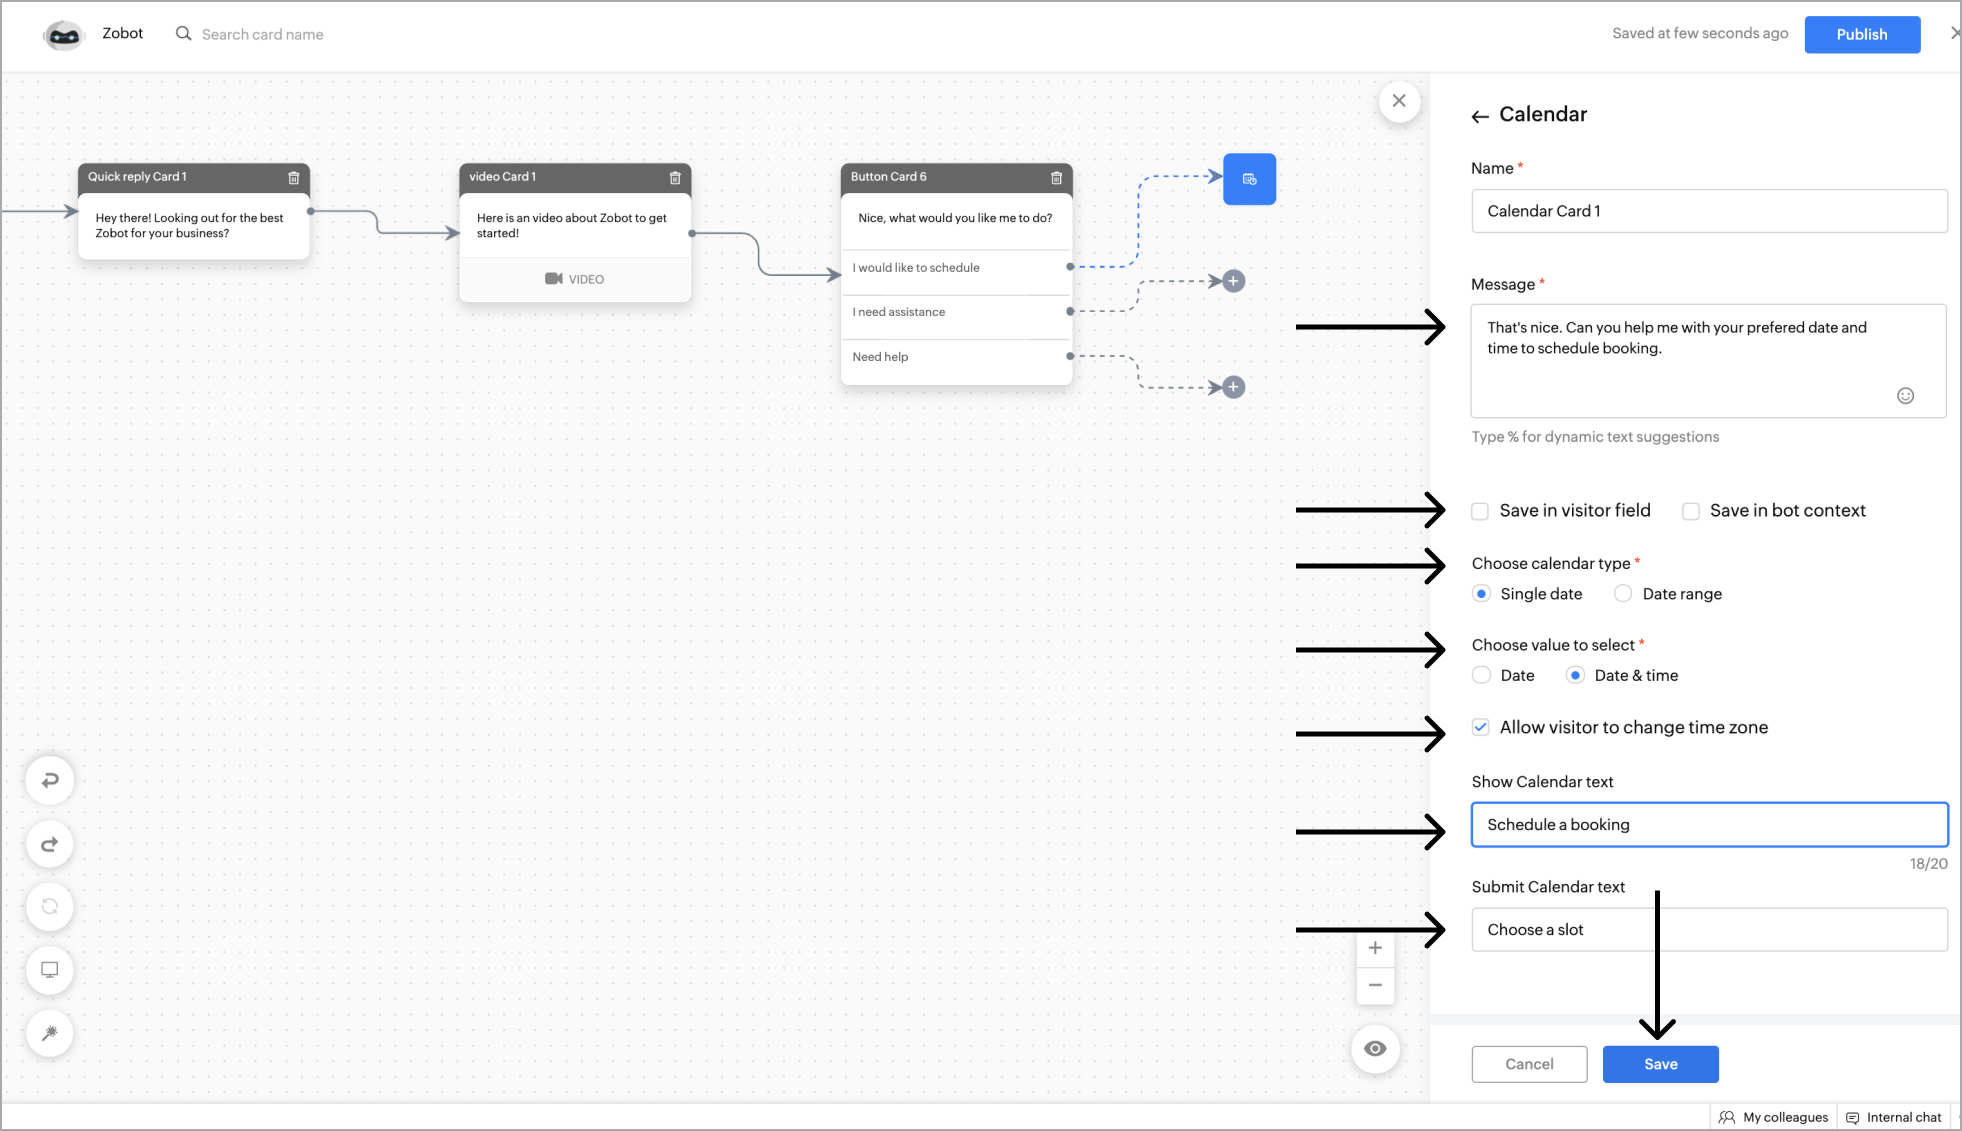
- Finally, add the Show and Submit calendar text. The Show and Submit text will be shown while the visitor picks and submits a date, respectively.
- Click Save.
Example: Getting the date and time as input from the visitor for product delivery.
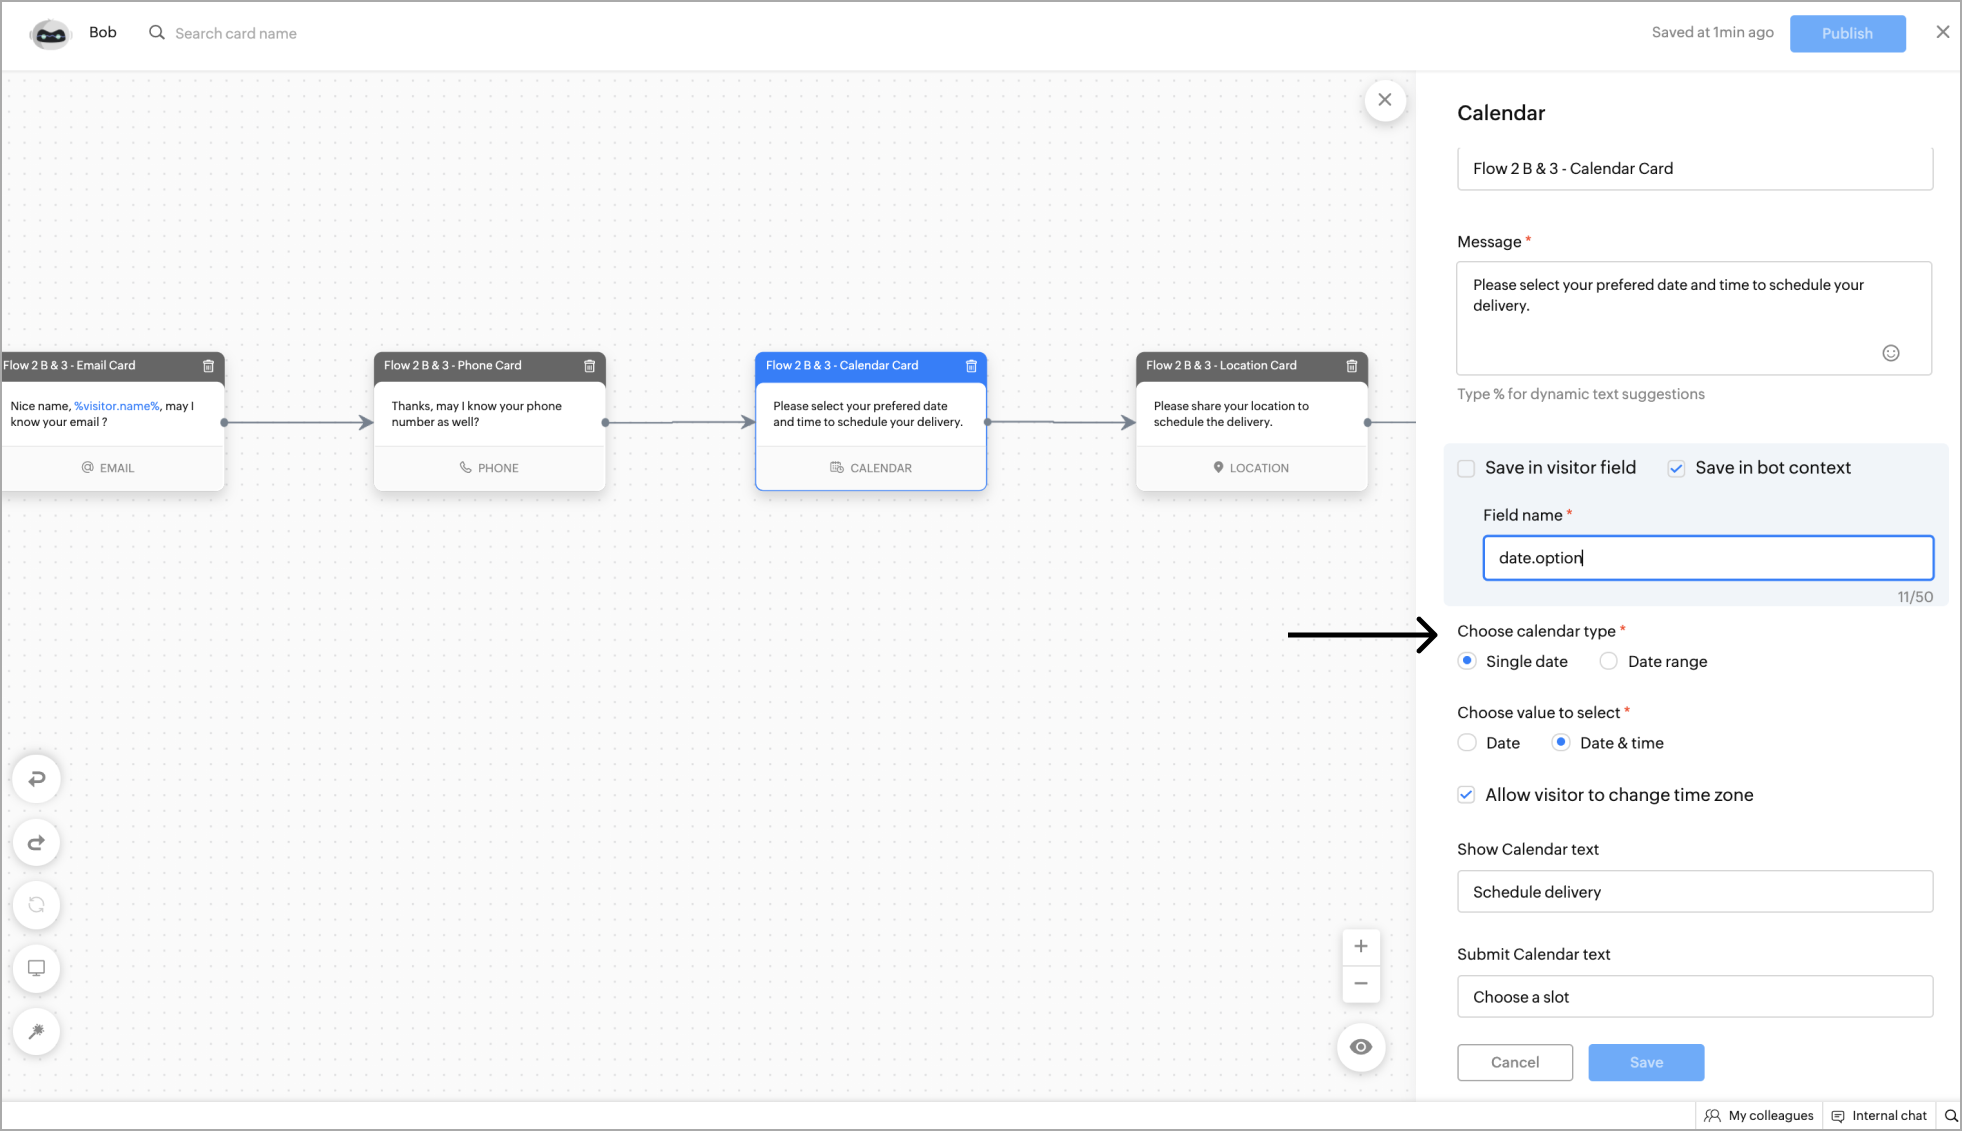
- Once configured, the visitors will be able to select the desired date and time using the calendar widget.
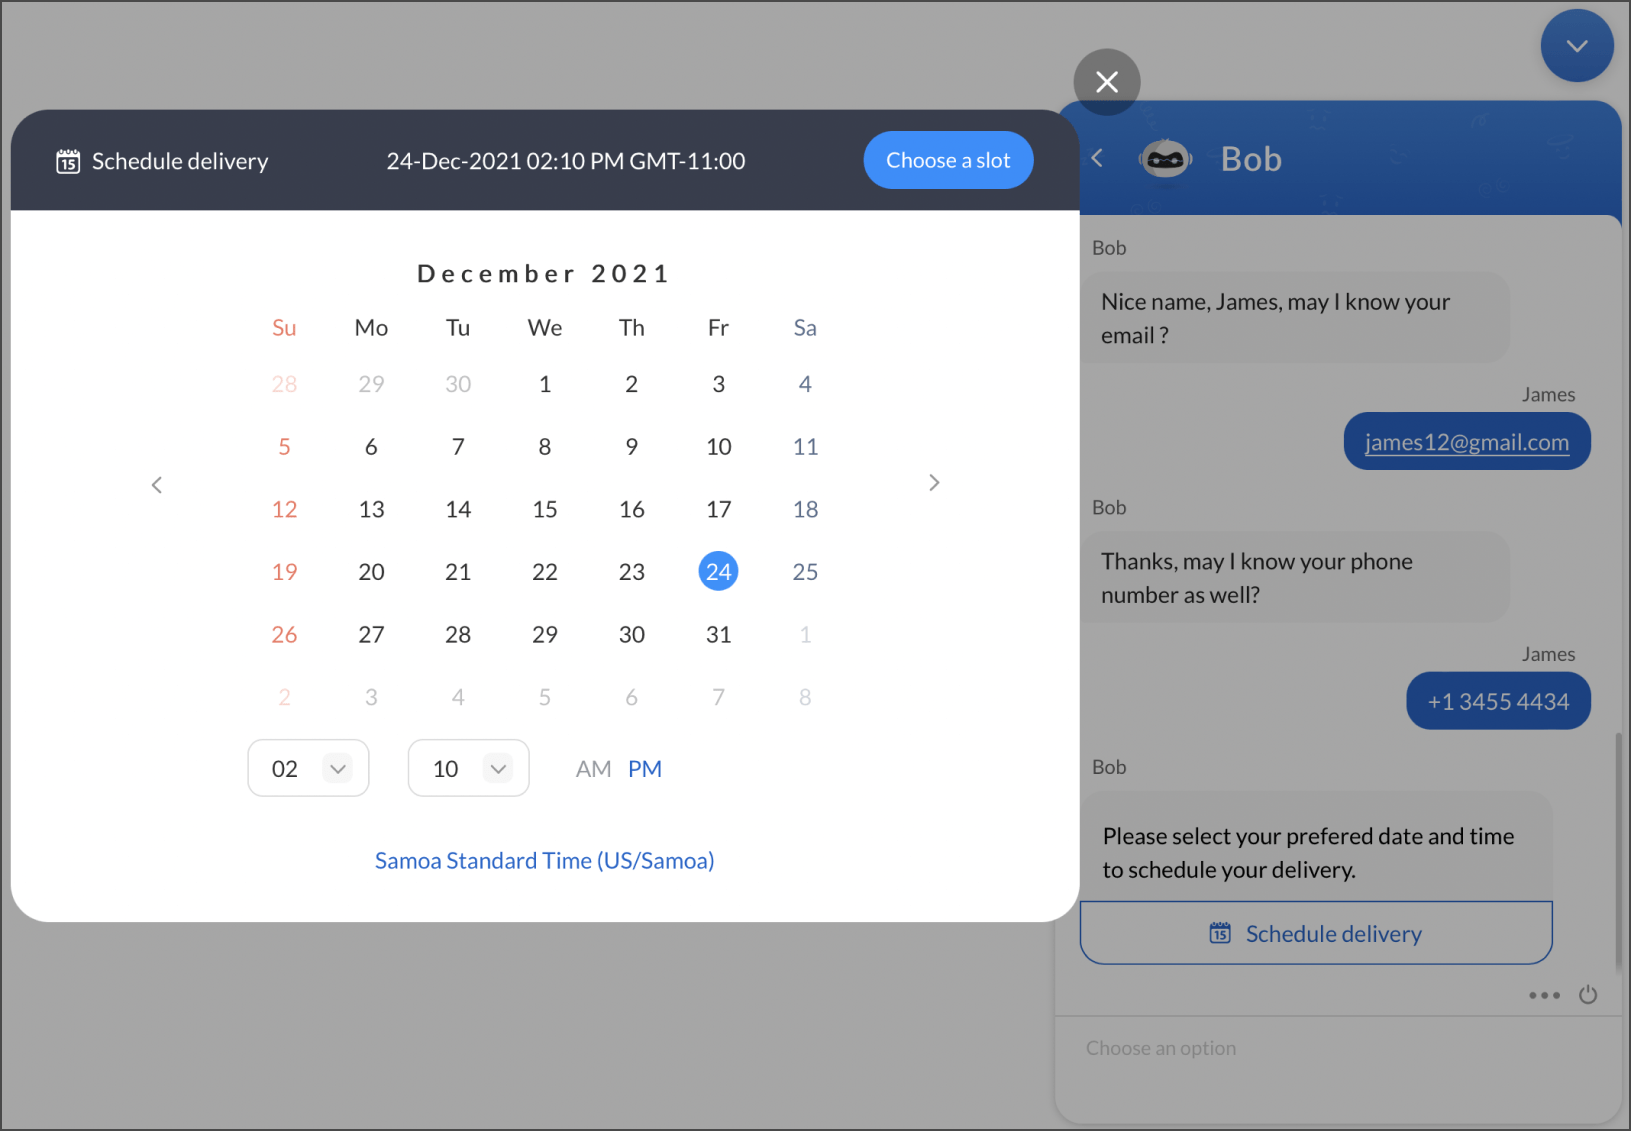
- The above is an output of displaying a single date to schedule delivery to the website visitors.
Slider
The Slider card allows you to get a required number from the visitor.
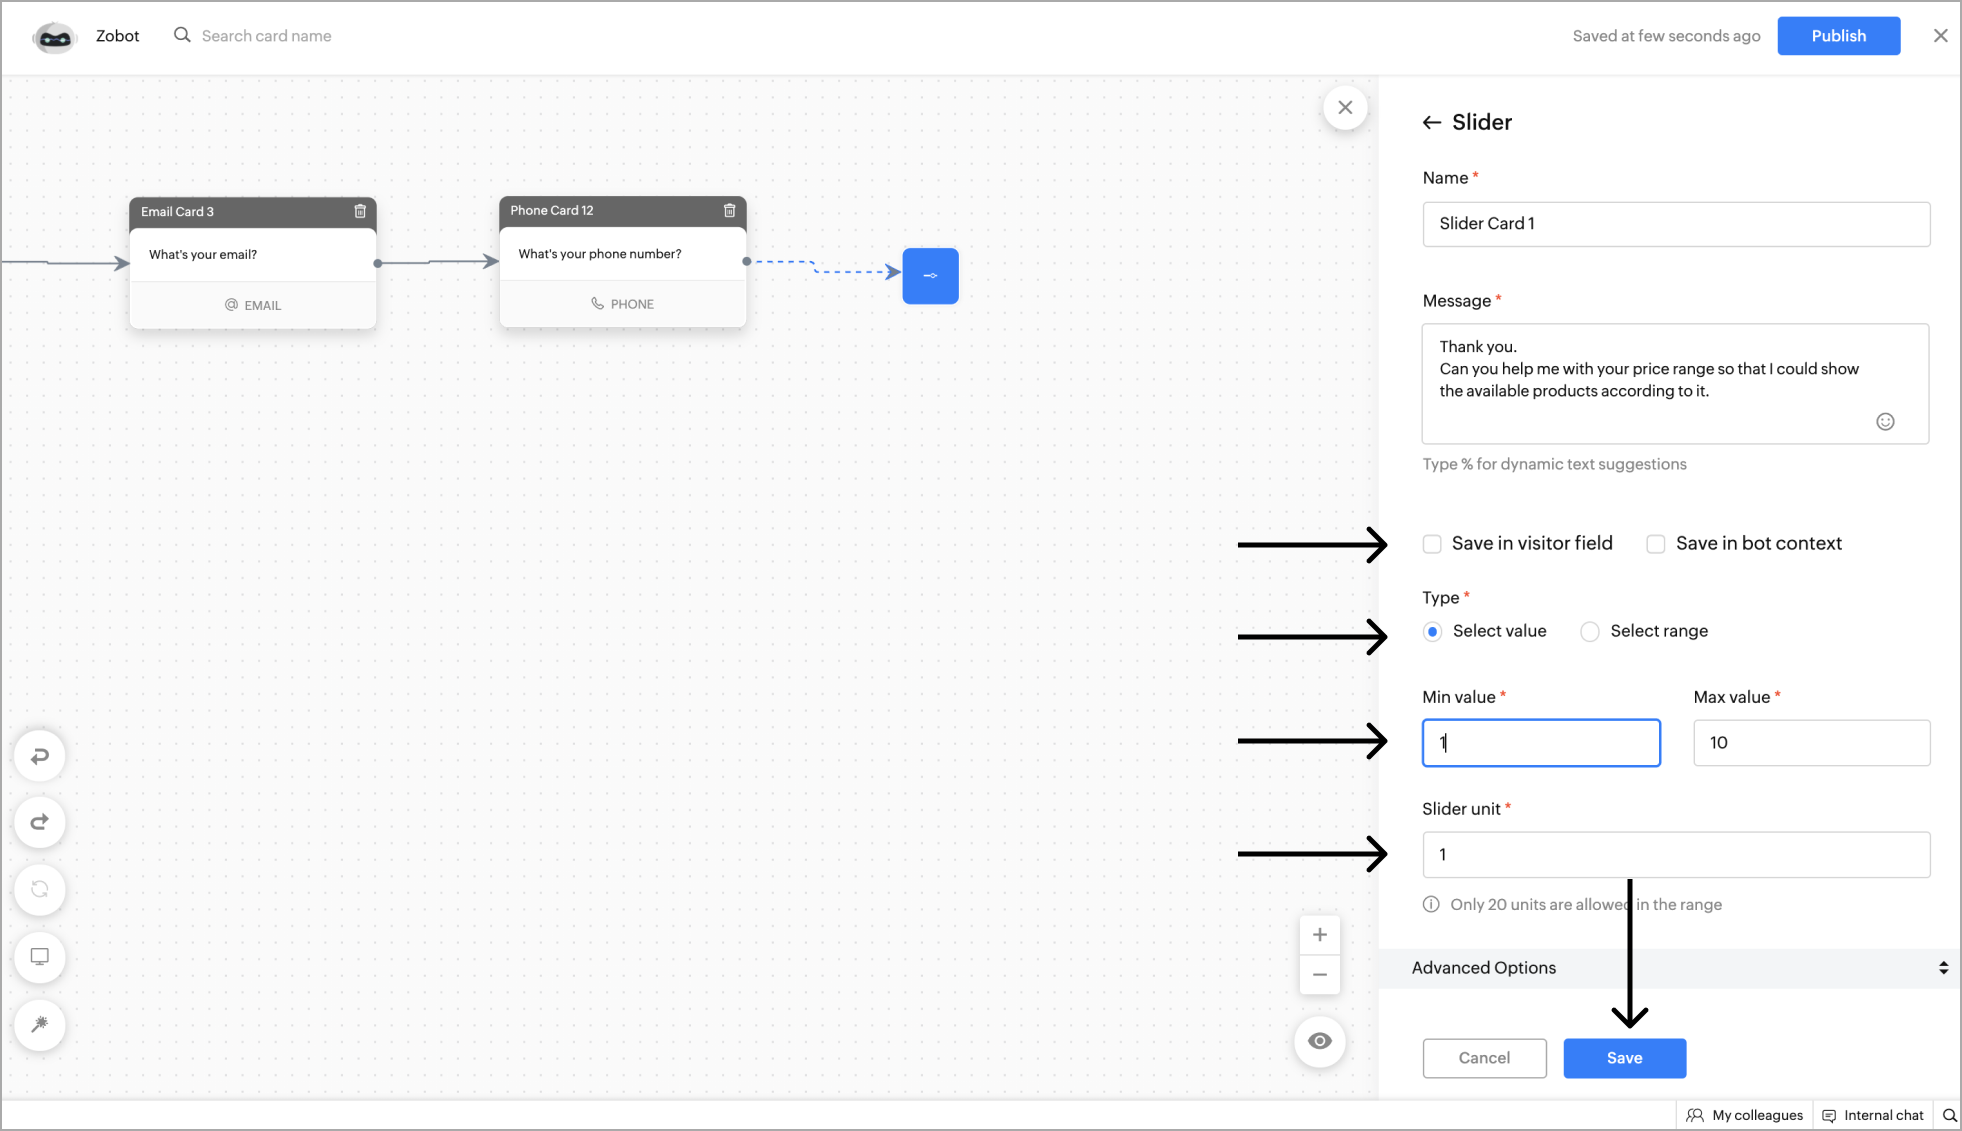
- To add a Slider card, click on the card holder icon (+) to view the blocks gallery, select the Slider block.

- Add name, message for the Slider. Now, choose the Slider type as a normal slider or range slider.
- Select value - This option allows visitors to pick a specific value using the slider.
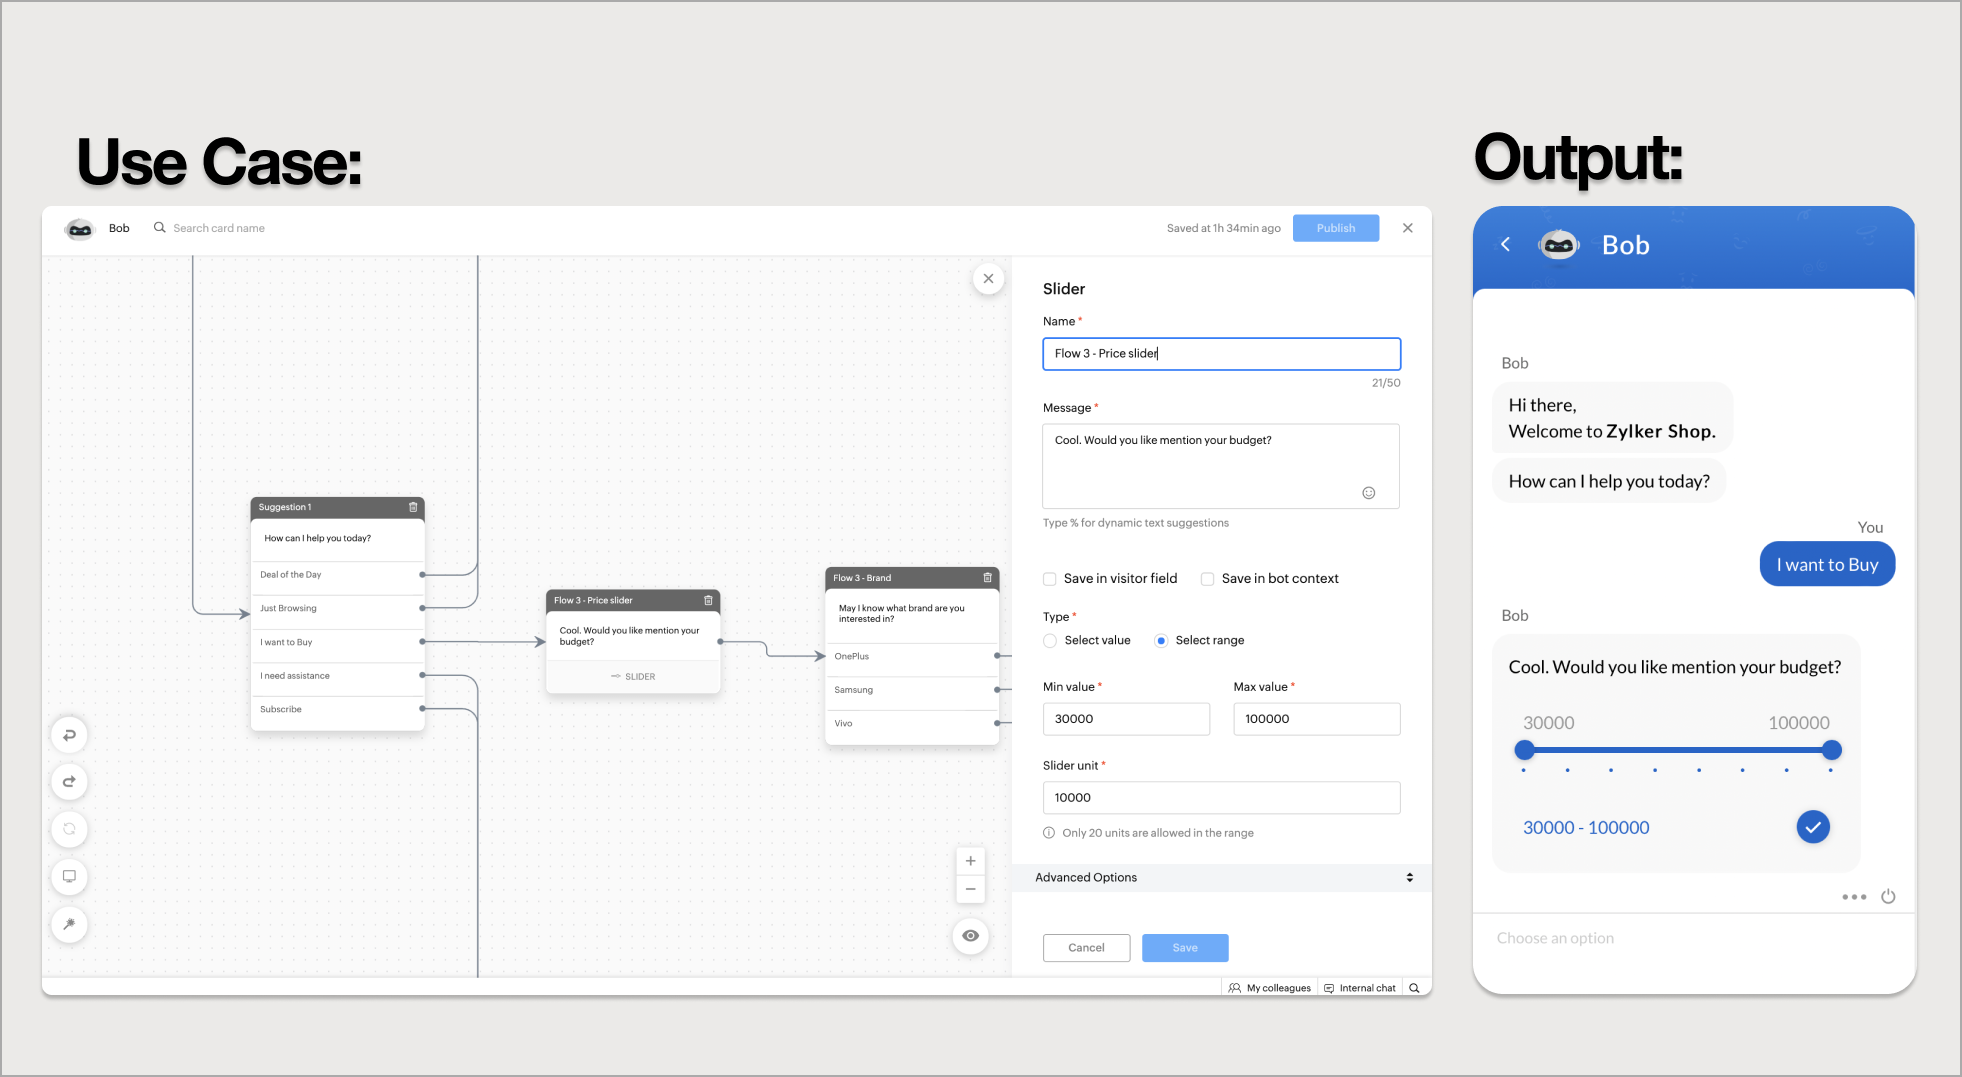
- Select range - The range slider allows the user to select a specific range of values. This can be useful for e-commerce related bots that can ask the visitors to choose a price range.
- Define the minimum and maximum values of the slider and the slider interval units. Then, click Save.
- You can save these responses from the visitor using the bot context/visitor field.
Example - Displaying the products within the price range using slider to the website visitors.
Rating
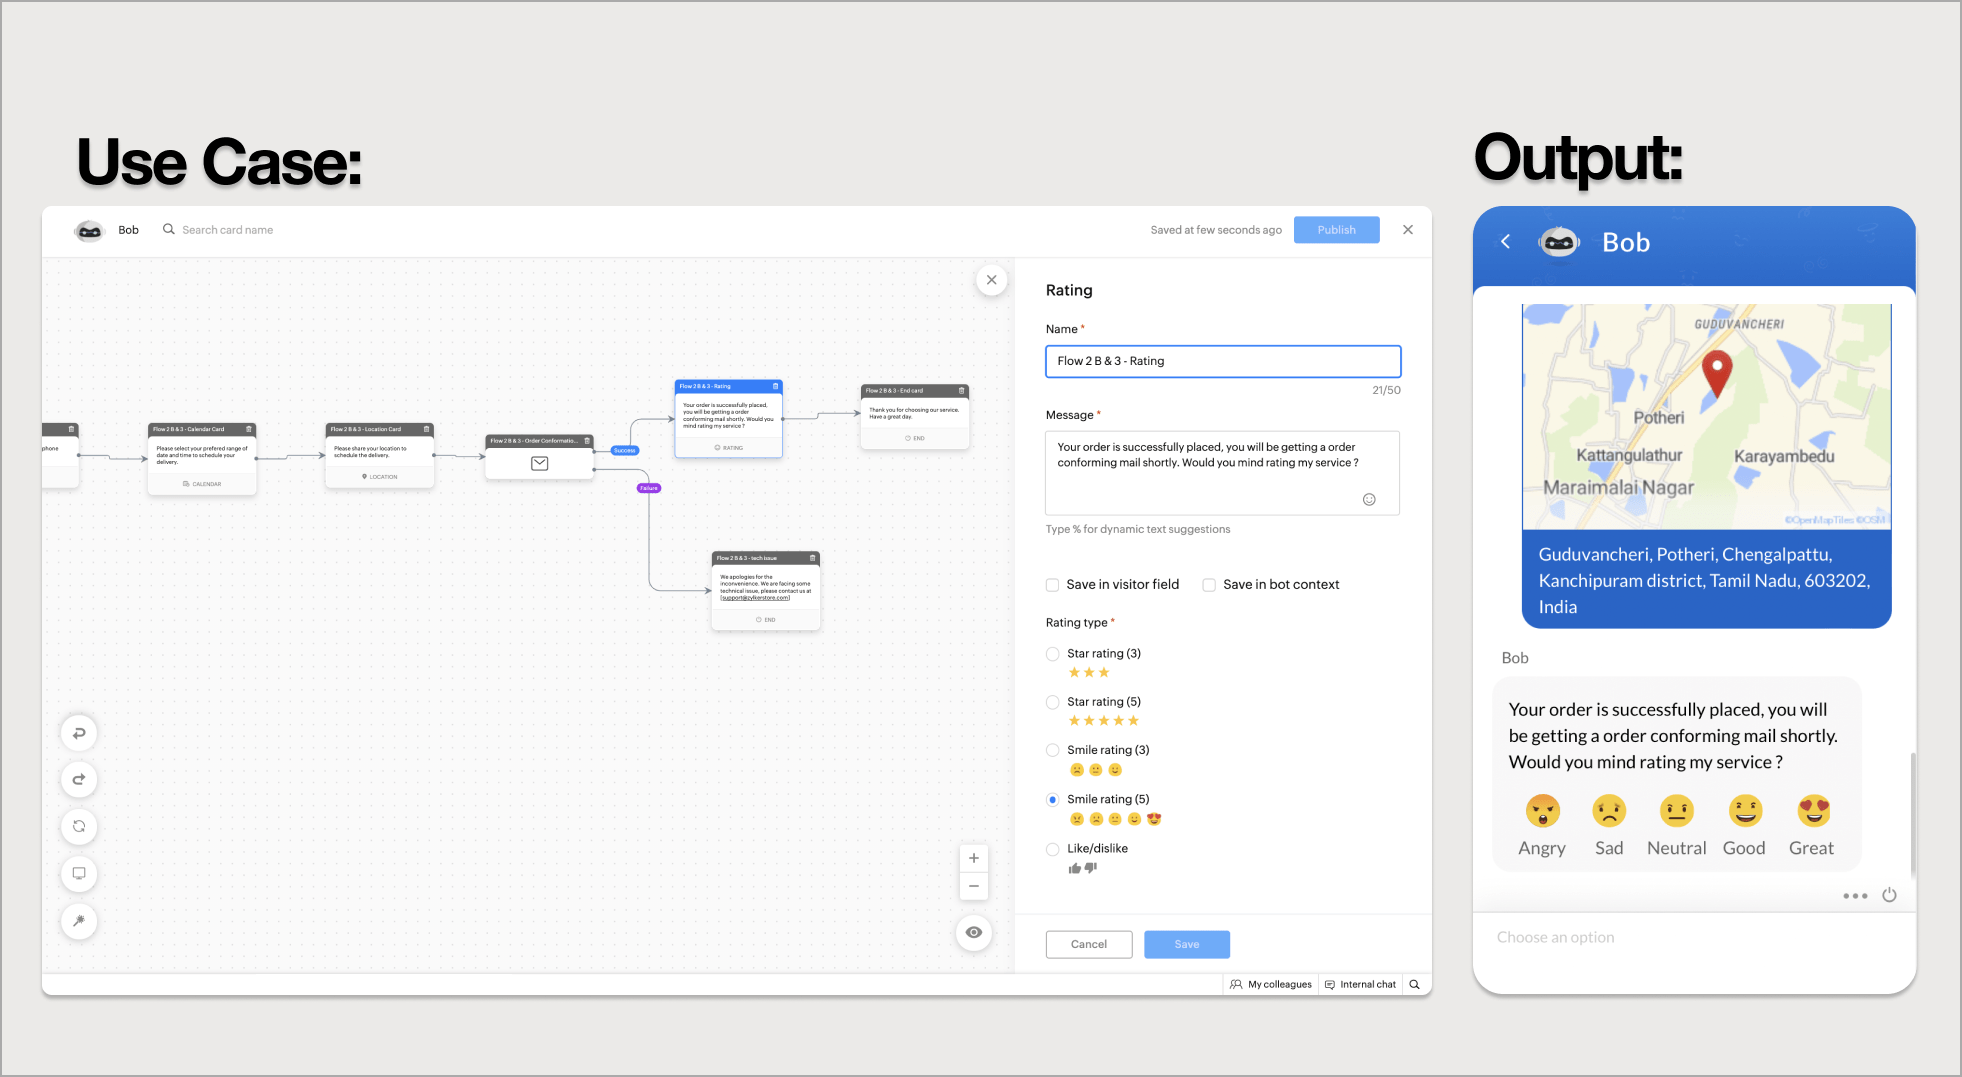
The rating card can be used by the bot to get ratings and immediate feedback from the visitors.
- To add a Rating card, click on the card holder icon (+) to view the blocks gallery, select the Rating block.

- Add a name and text for the Rating block, add images to the block to get feedback for your products.
- Next, choose the rating type. In the Rating block, you can choose five different types of ratings. They are:
- 3-star rating
- 5-star rating
- Smile rating (Neutral/Good/Great)
- Smile rating (Angry/Sad/Neutral/Good/Great)
- Like and dislike
- After selecting your desired rating type, click Save.
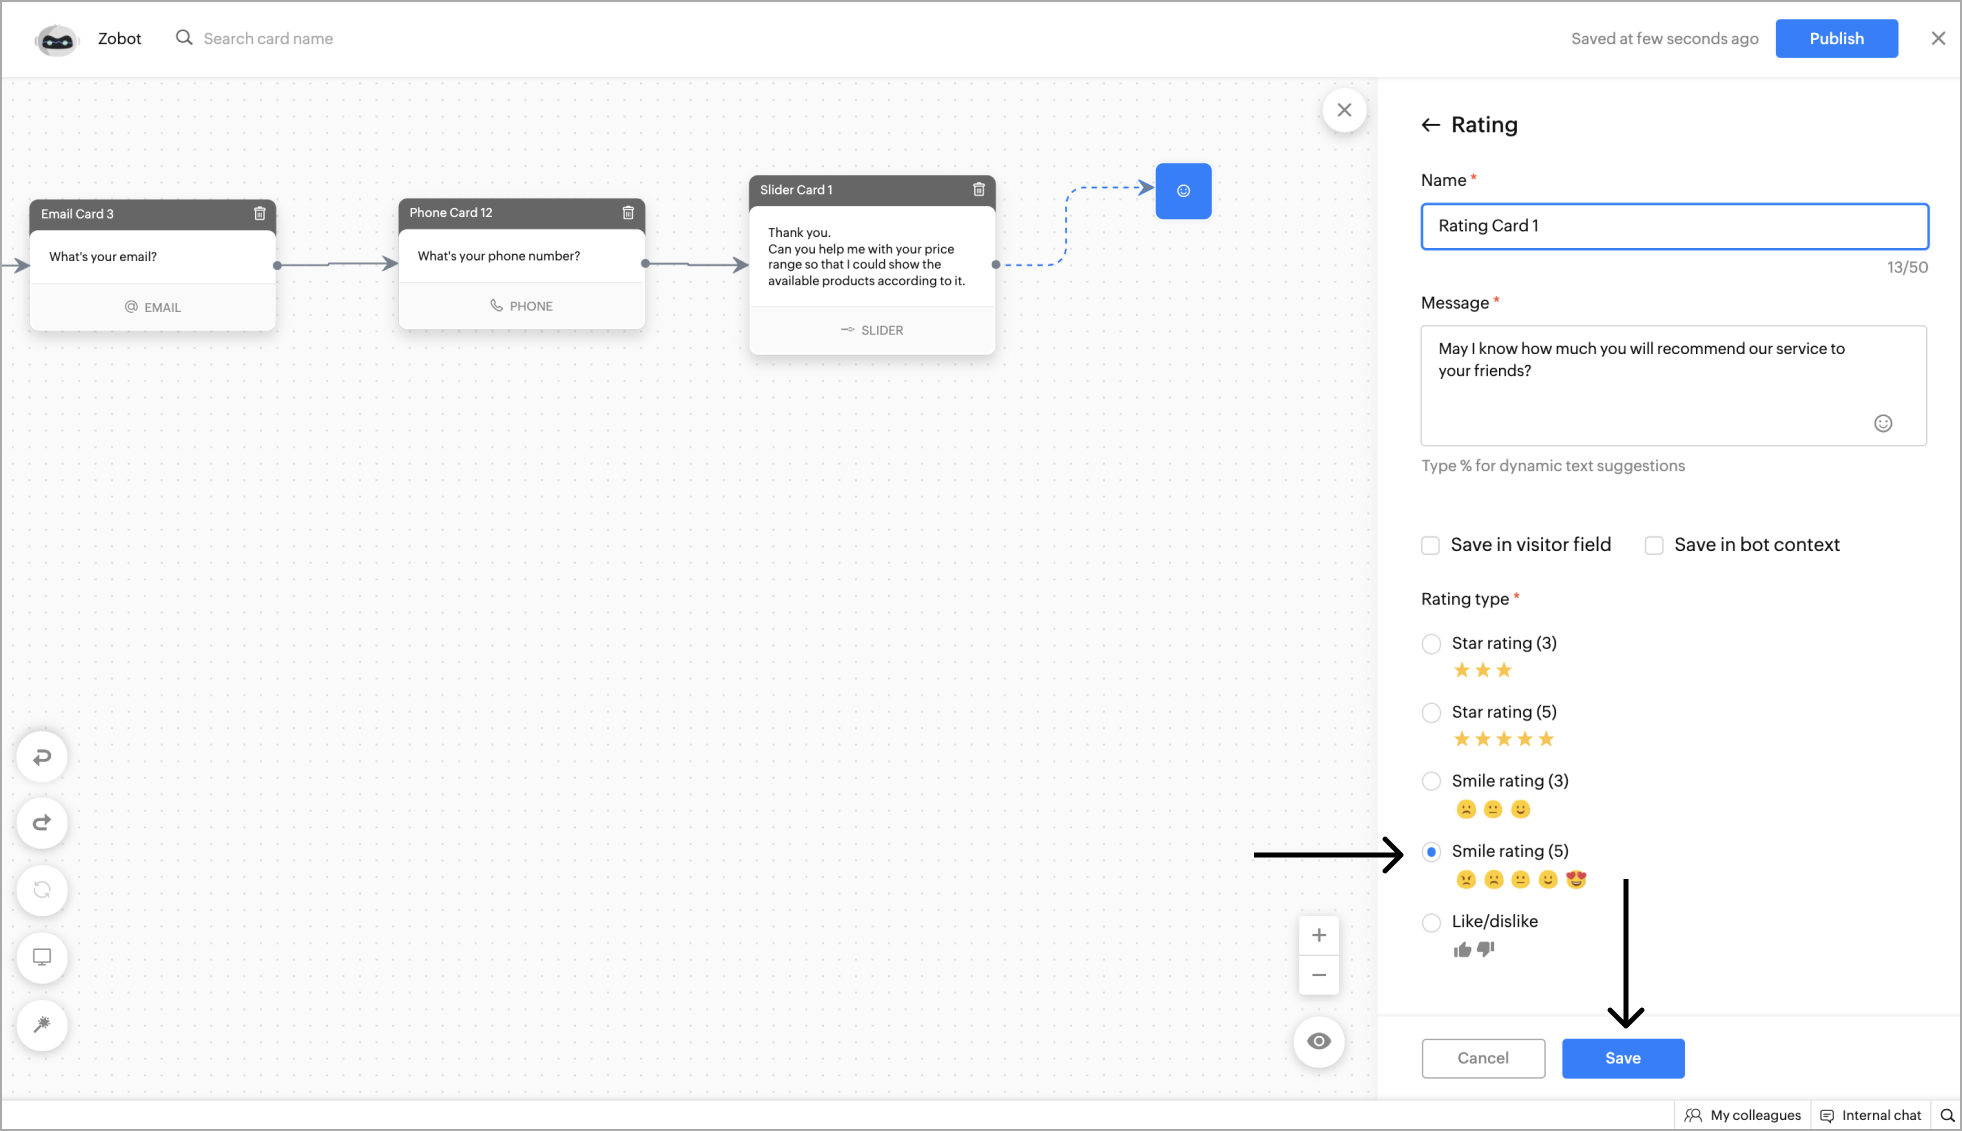
Example - Get feedback for the bot from the visitor using a smile rating (5).
Location
Location card can help you get the visitor's current location using the GPS system on their device.
- To add a Location card, click on the card holder icon (+) to view the blocks gallery, select the Location block.
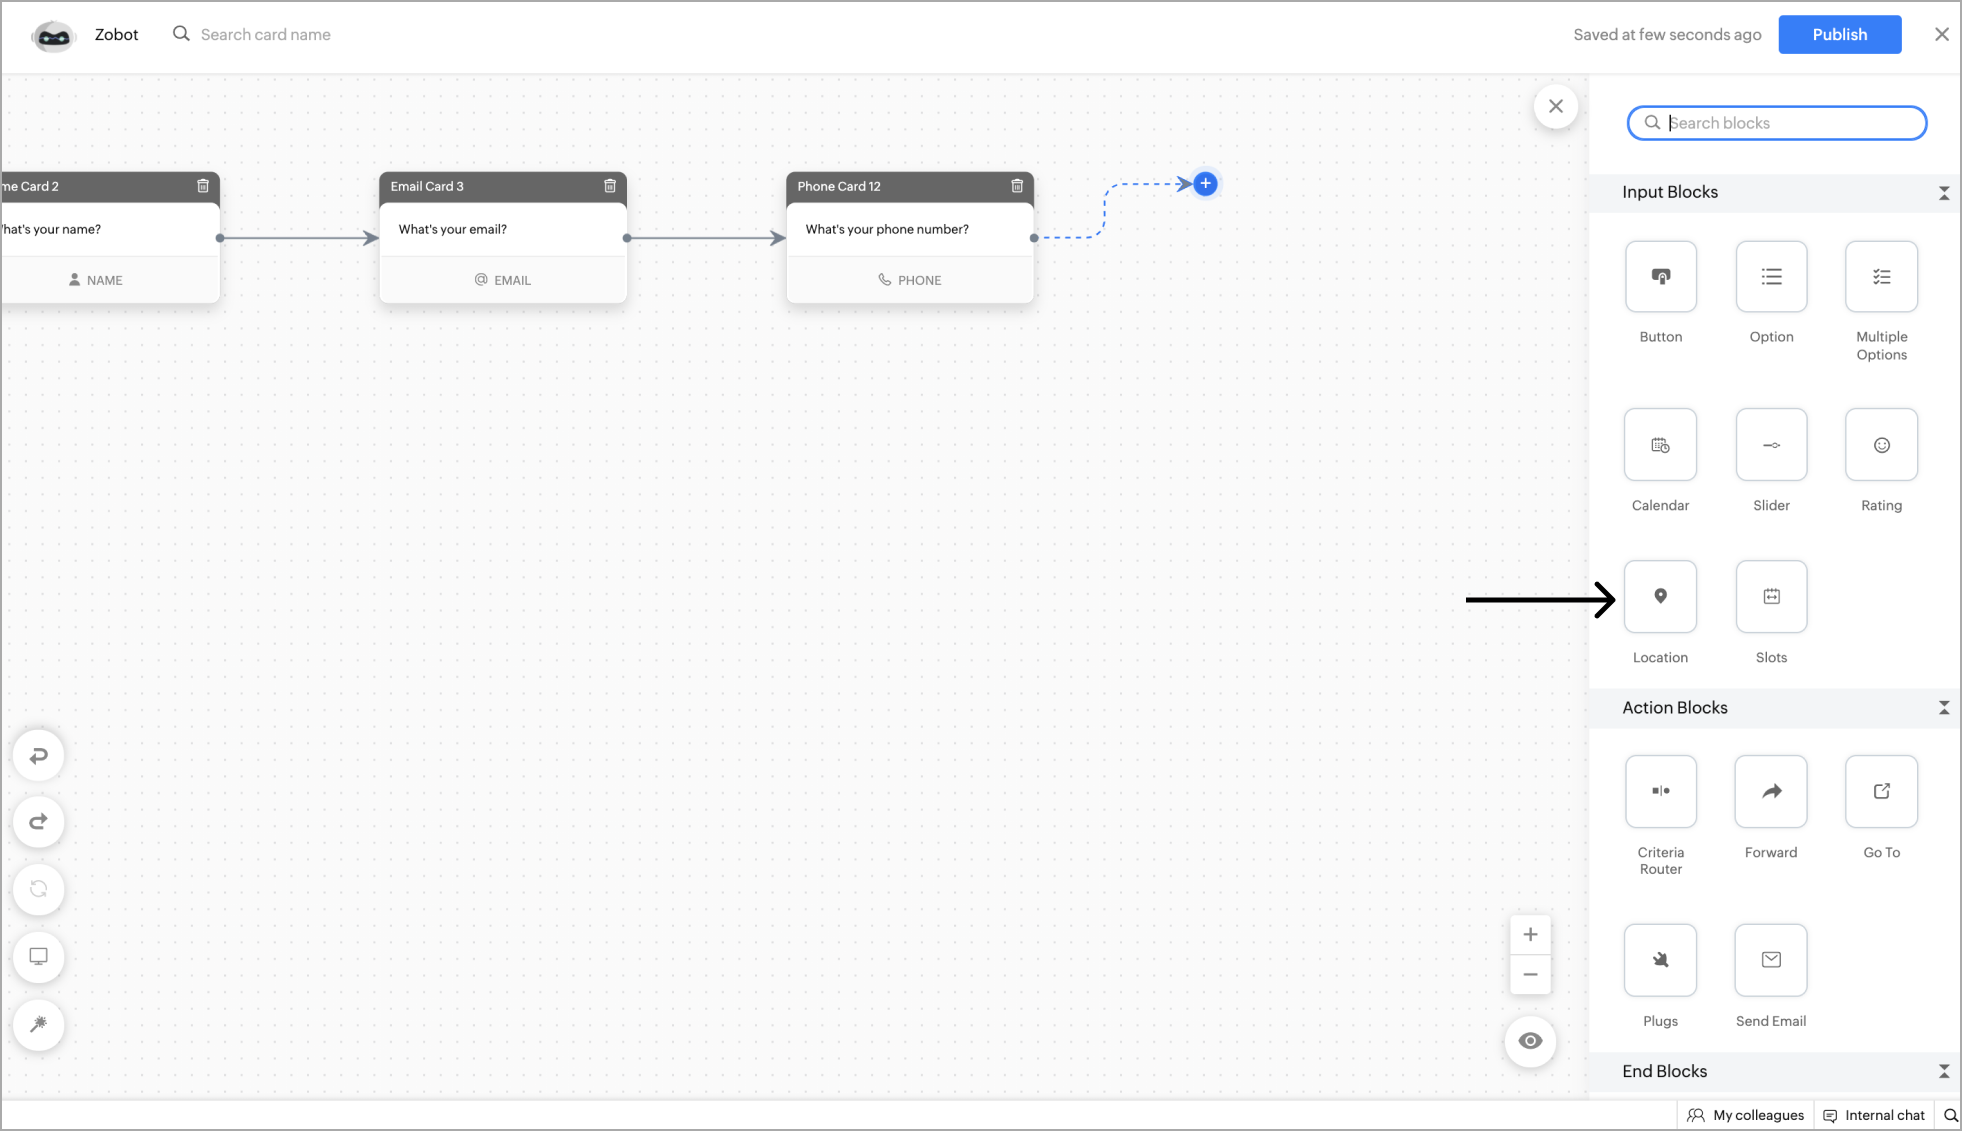
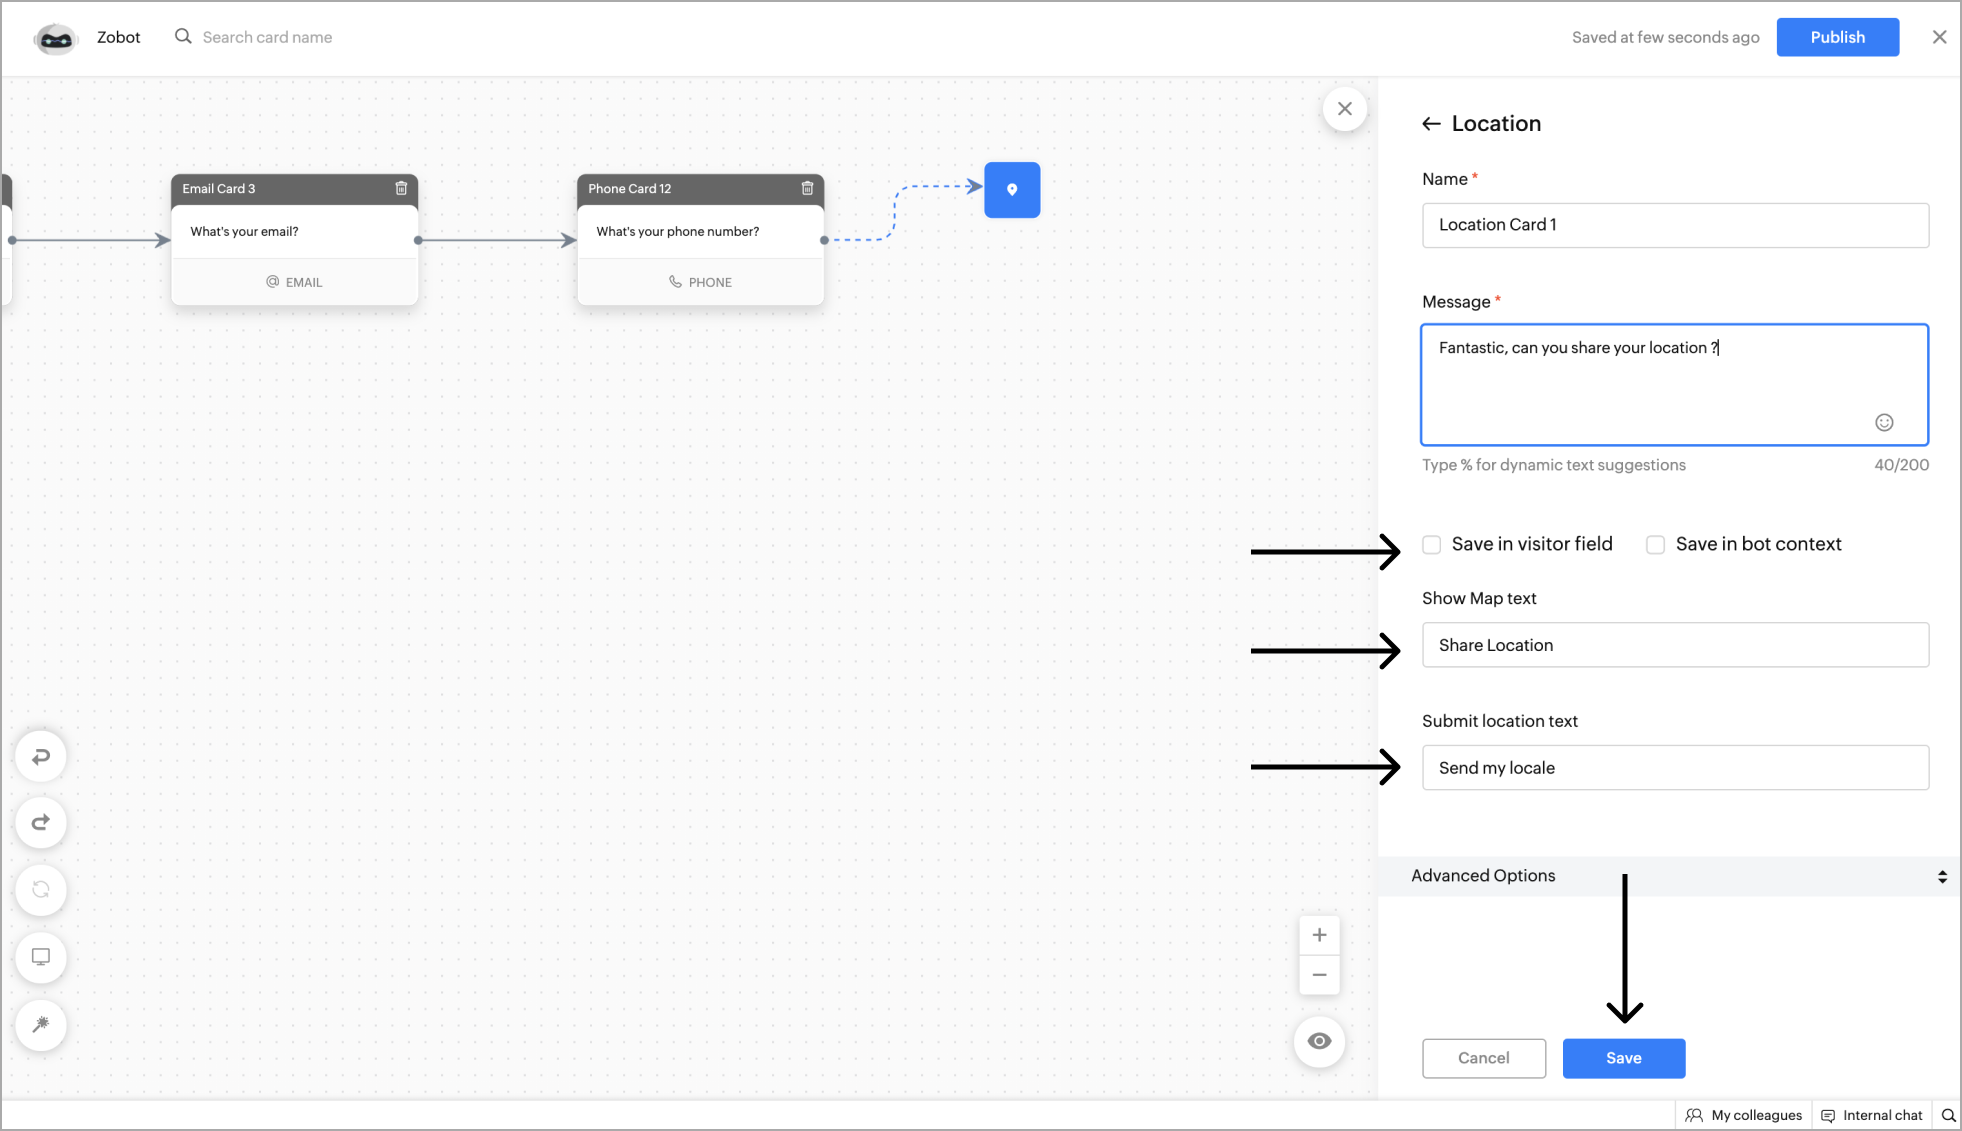
- Add a name and text for the Location block, add images to the block based on your requirements.
- Next, give the Show Map and Submit location text, and click Save.
- You can save the location obtained from the visitor using the bot context/visitor field.
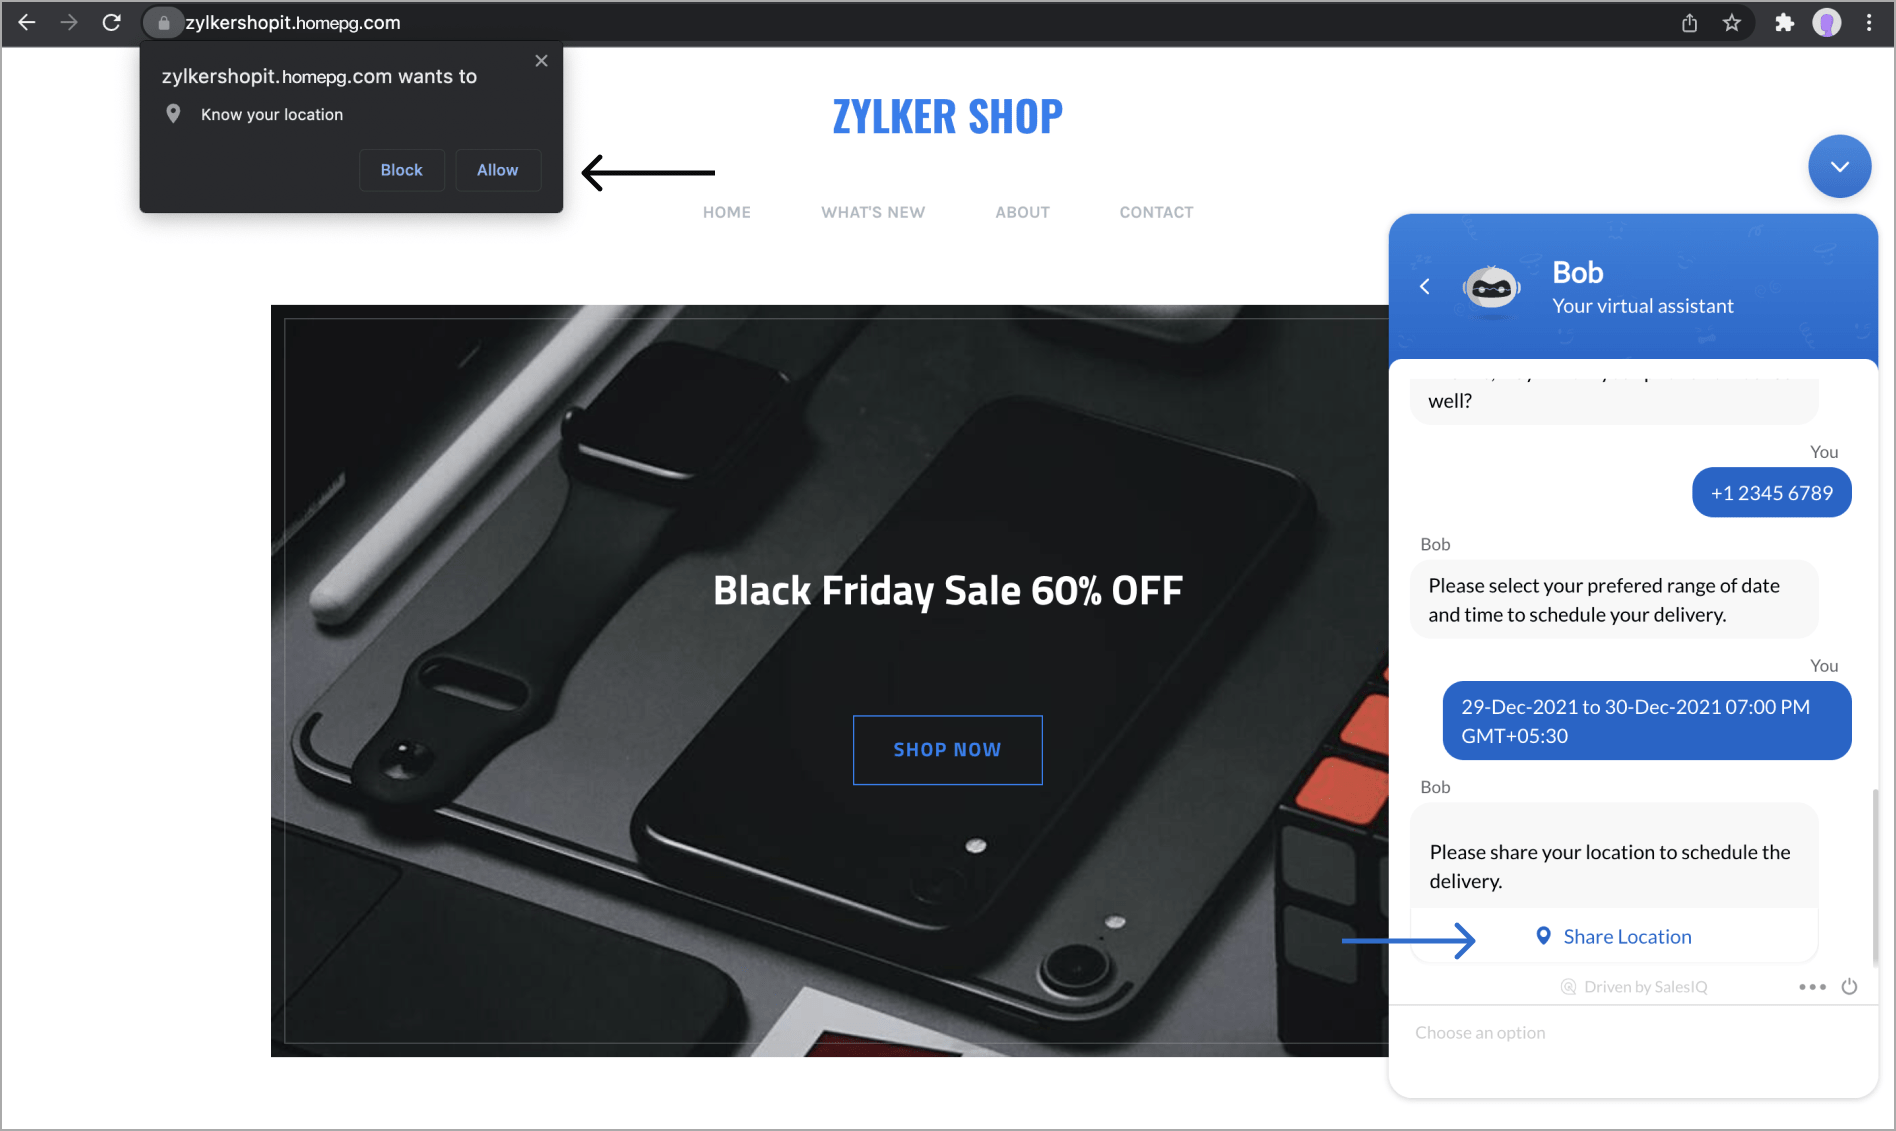
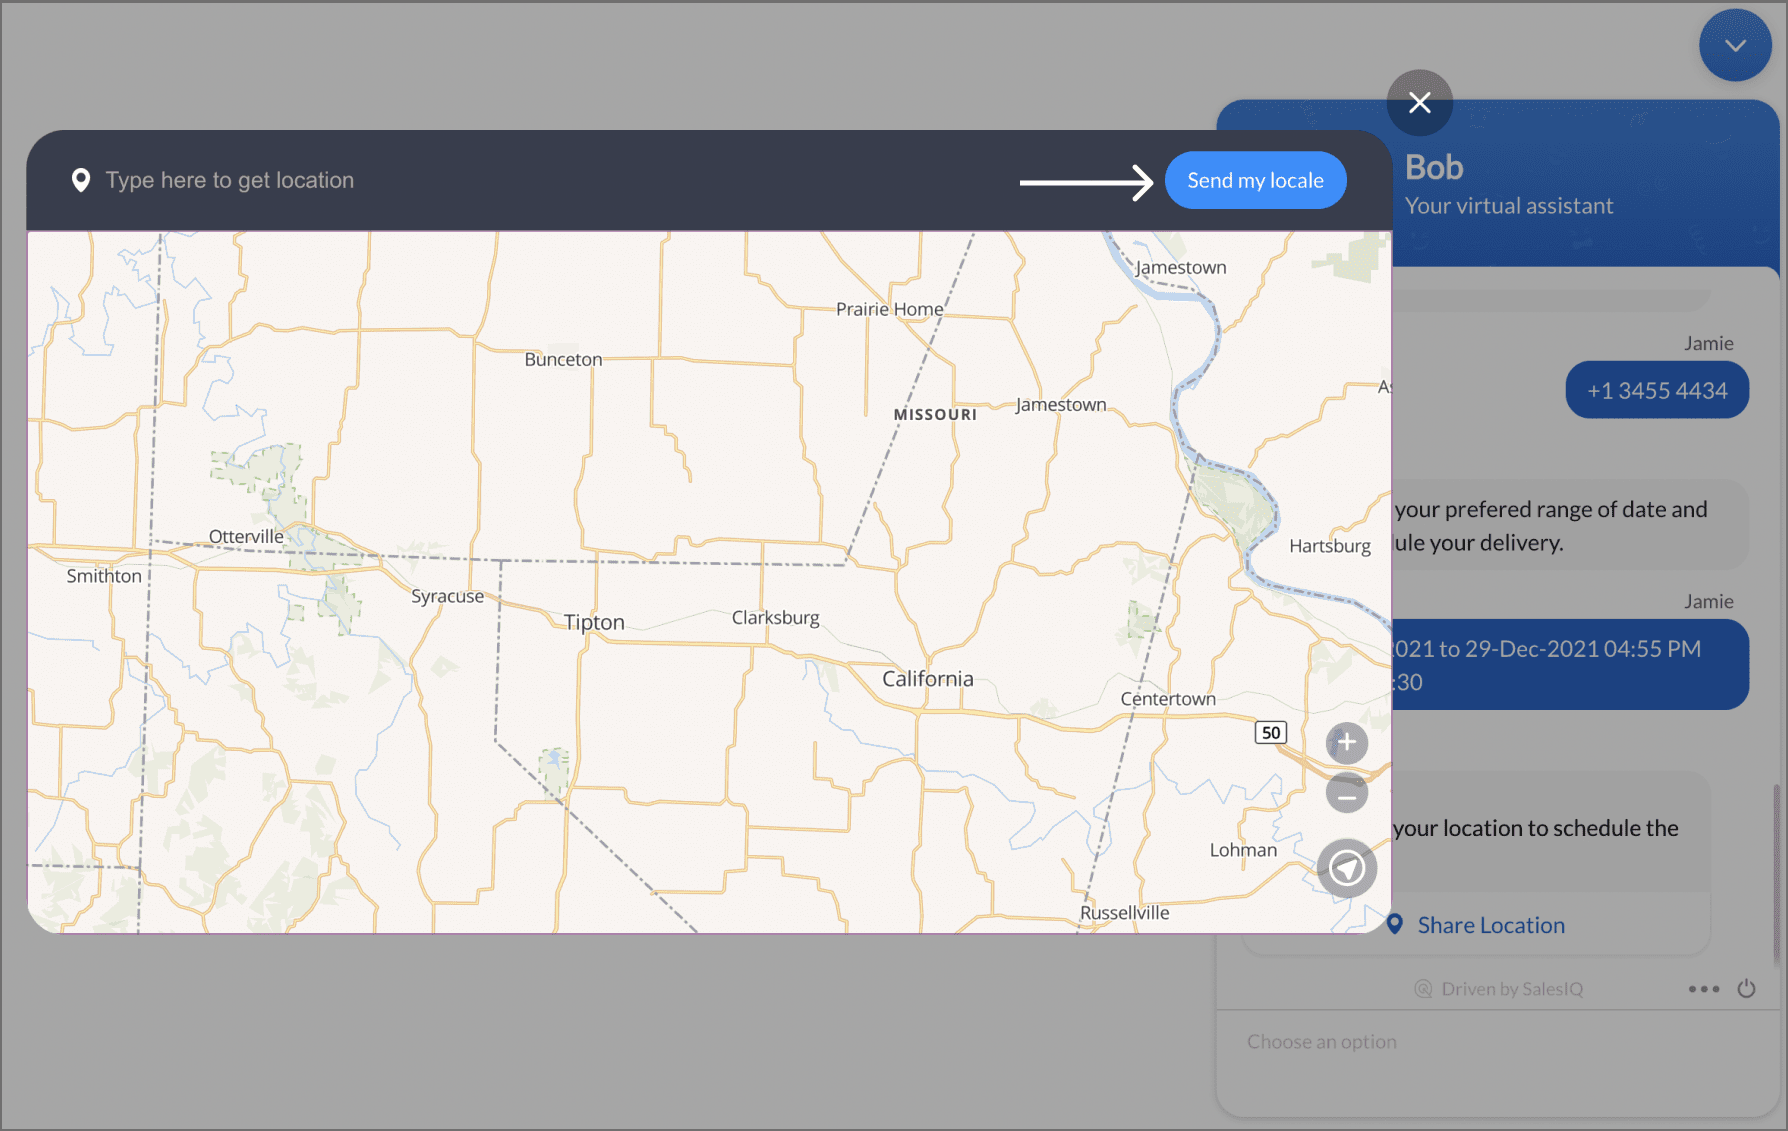
Example - Get location from the website visitors to schedule a delivery (online shopping) using location block.
- Once enabled, the visitor can view the location widget in the chat. After clicking on the Share location option, the visitor will be prompted to allow access to the location on their browser or mobile device.
- Now, the visitor can view their live location on the map or enter a location manually and share the details with the bot.
Slots
This block can be used to schedule slots for appointments and bookings.
- To add the slots block to the flow, click on the cardholder icon (+) and choose Slots under the Response Blocks section.

- Specify a name for your card and reply text to be displayed.
- Provide the bot context if required.
There are two options available:
- Time Slots - To get a time for scheduling/booking.
- Date-Time Slots - To get a date & time for scheduling/booking.
- You can also add card images or attachments to enrich your response.
- Click Save.

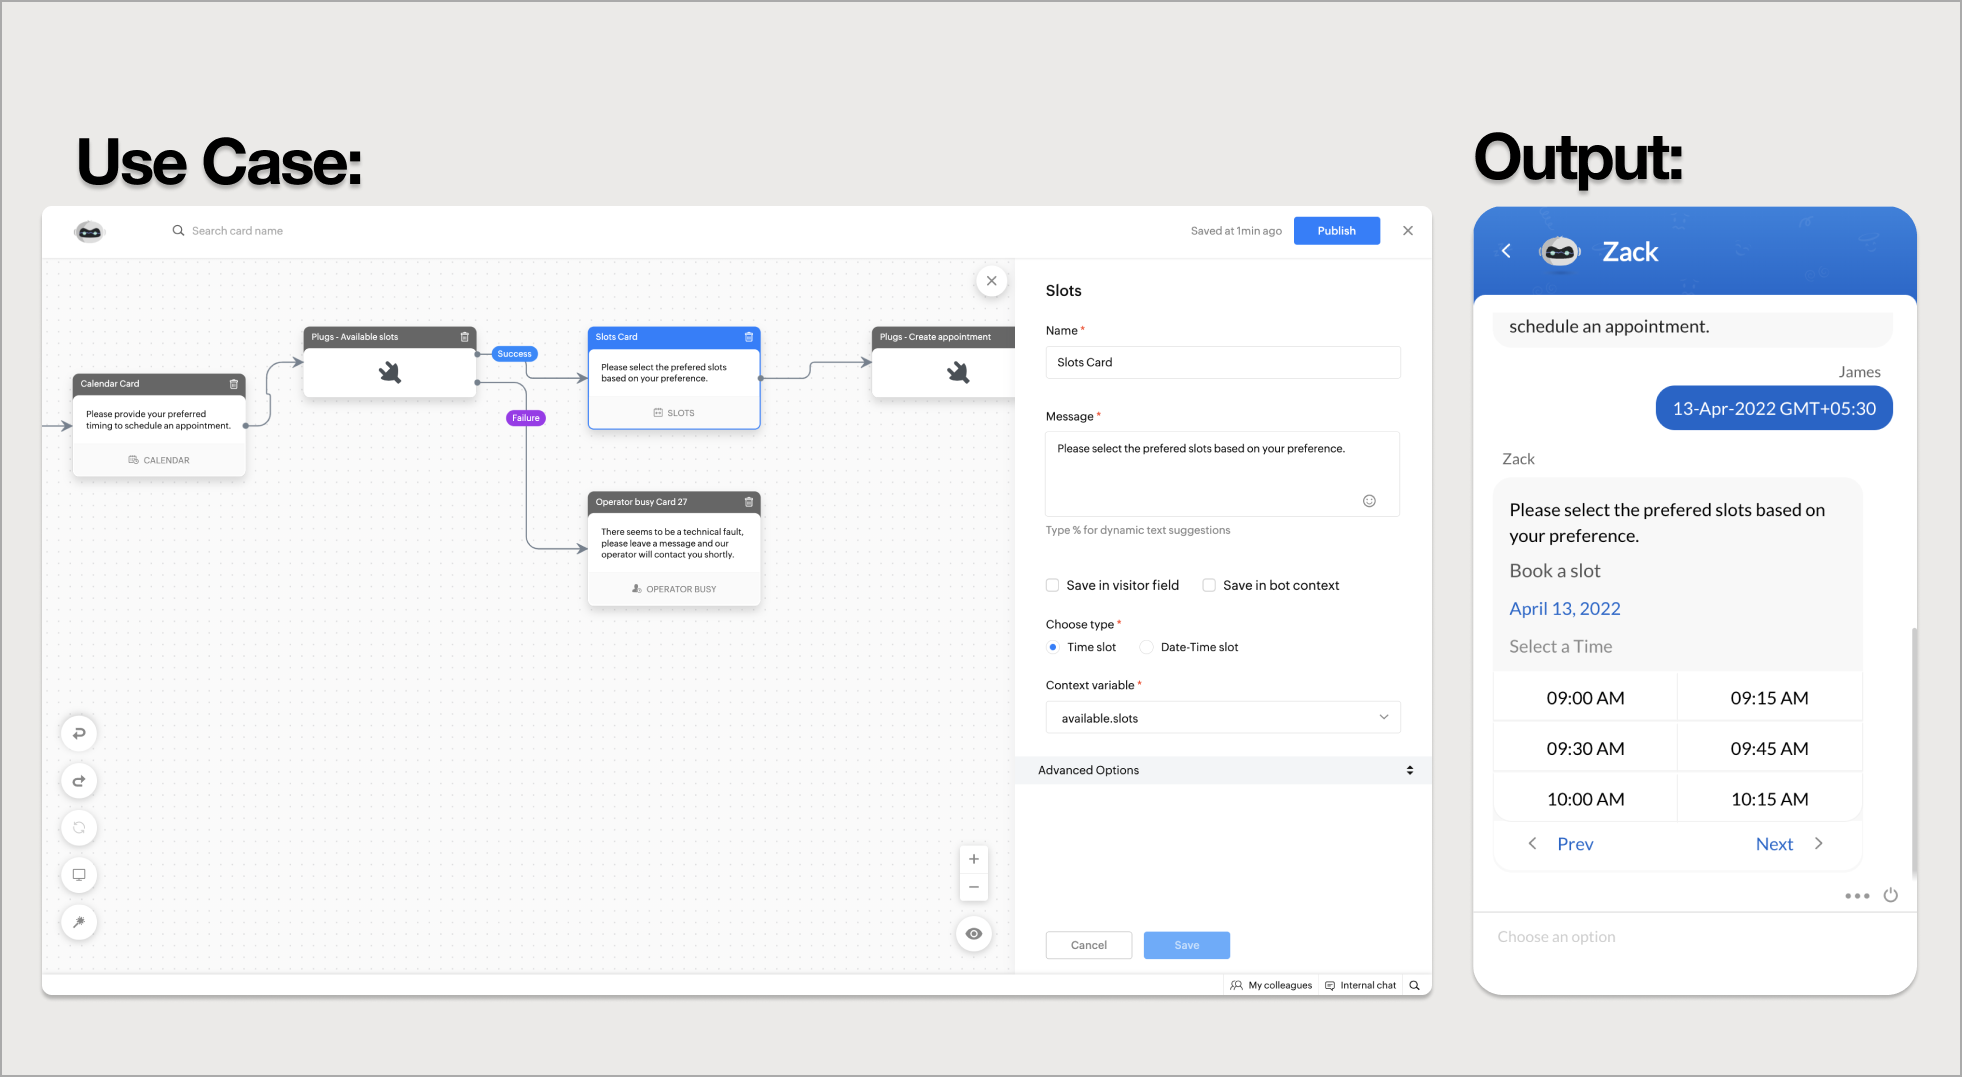
- After clicking Save, you can view the card on the bot builder page.
 Note: Dates need to be passed as a timestamp in the UTC format from the plug as a number list datatype.
Example - Fetching available slots for the visitor's preferred date from the Zoho Bookings.
Related Articles
Response Blocks
Response blocks are used to send responses to the visitor such as text, images, videos, and links. Quick Reply This block can be used to send informative messages/files to the visitor. To add the quick reply block to the flow, click on the card ...Integration Blocks
Integration blocks allow integration-related operations like mail subscription, ticket creation, lead creation, etc. These blocks will work based on the configurations set under the product integration. Associate Lead This block can be used to send ...Block Gallery
Blocks gallery is a collection of enriched UI elements & actions offered by Codeless bot build platform in SalesIQ. These blocks can be used to build your bot according to your requirements. There are 6 categories of blocks: Response blocks: ...End Block
End blocks are used to end or conclude the chat. Block The block card allows you to block the visitor. To add a block card to your bot's flow, click on the card holder (+) icon to view the blocks gallery and select block under the action blocks ...Data Block
Data blocks are used to collect type-based information like name, email, phone, website, etc. from the visitor and store them as per the requirement. Name The name data cards can be used to get the Name of the visitor during the bot conversation. The ...