Designing a Blueprint
Building a process is largely a 3-step procedure.
- Enter Basic Info:Specify the module , layout and field for which the process should be created.
- Define the Process Flow:In the Blueprint Editor , define the process flow right from the Starting or the Default State (whichever applicable) through to the Exit State .
- Configure Transition Settings:
Configure Before , During and After Transition settings between different States in the process as required.
Step 1 - Enter Basic Information
- Go to Setup > Automation > Blueprint .
- Click Create Blueprint .
- In the Create Blueprint popup, choose the module, layout and field for which the process is being created.
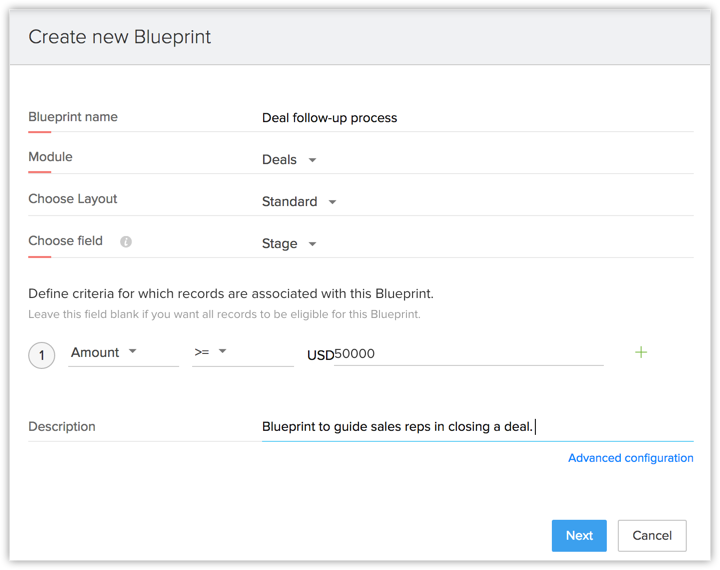 In our scenario, since the process is Deal Follow-up, let us choose the Deals module, Standard layout and Stage field.
 - Specify criteria for records to enter a process, if applicable. Example, Amount is >= 50000.If you don’t enter criteria, all records created in the layout will enter the process. Click Next .

- Under Advanced Configuration , you can create a continuous Blueprint. A Continuous Blueprint is one that occurs without a pause - ideal for Sales Call Scripting.
- The primary field of the Blueprint can be updated via
- Transition API
- Workflow API
- Custom Functions in Workflows.
Step 2 - Define the Process Flow in the Blueprint Editor
- In Blueprint Editor , drag and drop all the States (stages) that form a part of the process.
- Establish the process flow between the States by connecting the nodes in the State buttons .
 Note that the Start State is the equivalent of " None " value of the chosen picklist field.
 - Create Transitions by clicking on the + button between two States.(To delete a transition, simply Right Click on the transition line and click Remove Transition )
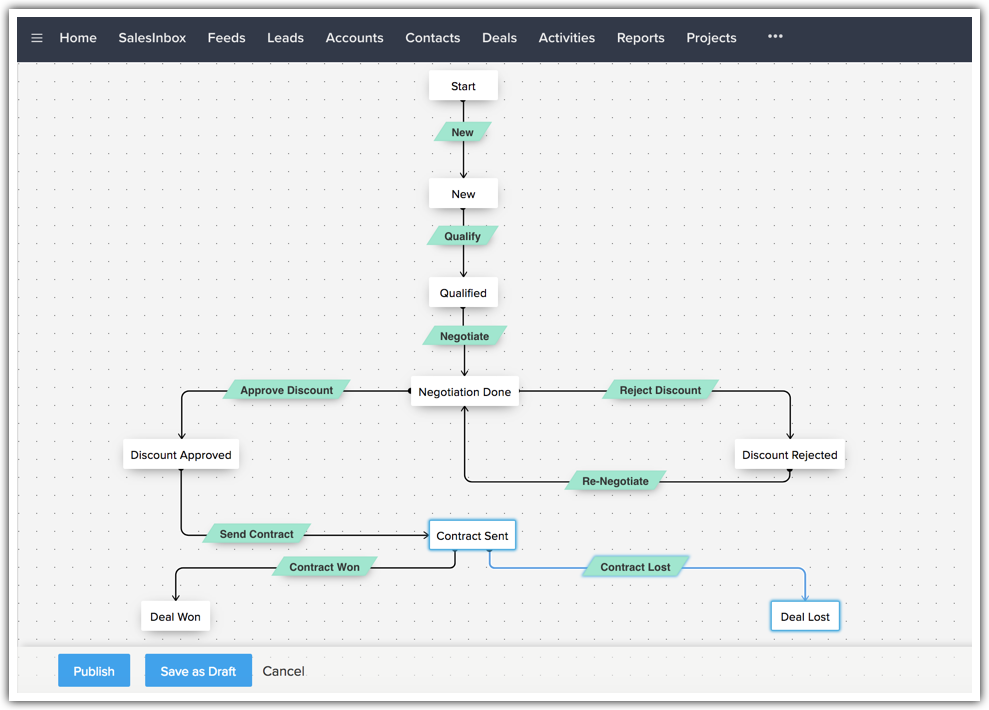
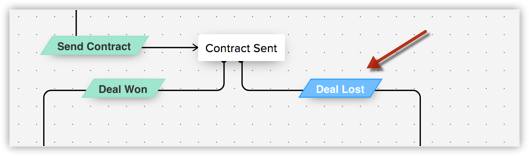
What does the above process flow mean?
This is a pictorial representation of the Deal Follow-up process followed in Zylker Inc. Deals entering this process will go through every stage in the order seen in the picture.
- The white buttons represent States in the Blueprint (Deal Stages).
- The green buttons represent Transitions (Conditions required to complete each stage).
- Each Transition you configure is displayed as a button on the record's details page.
- To complete a Transition, click on the Transition button and execute the actions mentioned in the ensuing popup window.
- Example, clicking on Qualify will throw up a popup window, which will guide you in executing this Transition.

- On successful completion of the Transition, you will move to the next State in the Blueprint.
- The blue button Deal Lost is called a Common Transition and will appear at all States of the Blueprint.
- Click here to see more sample process flows from various sectors such as Education, Real Estate, Insurance.
Step 3 - Configure Transition Settings
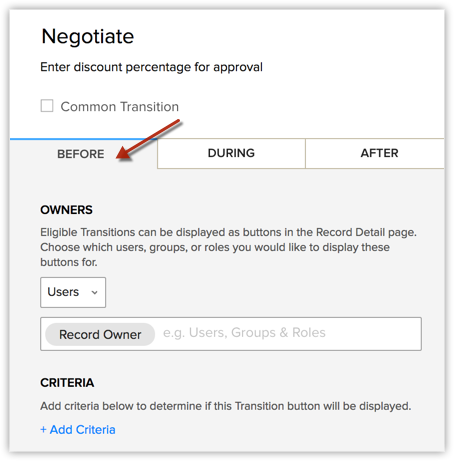
“Transition” refers to the change of state in a process. It is the connecting link between two States, where the conditions for the change are clearly defined. A Transition is made up of three parts - Before , During and After .
![]()
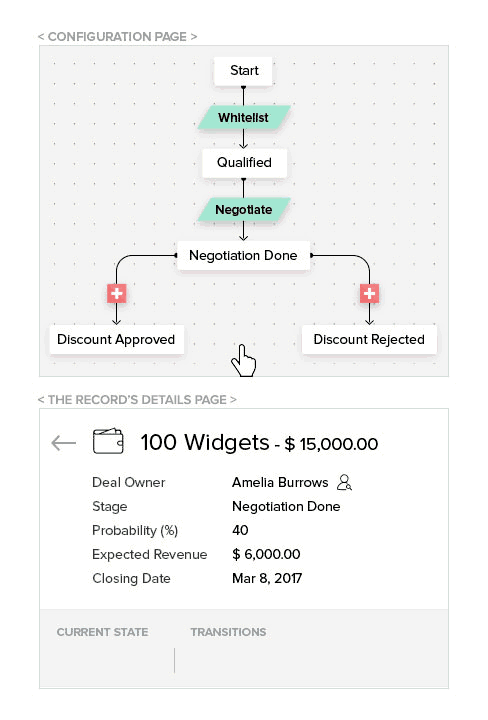
For example, let's look at the Transition between the States - Qualified and Negotiation Done. Let's name this " Negotiate ". In Zylker's example, following are some guidelines to be observed while configuring the Transition settings in this scenario.
Note : The length of the transition's name can be upto 50 characters.
- In order to complete the Negotiation Transition, a sales rep in Zylker must enter the Discount percentage and the Closing Date.
- As per Zylker's policy, discount for a product cannot be greater than 25%.
- As soon as the Negotiate transition is executed, an email notification must be automated to the sales rep's manager informing him/her about the deal submission.
Let's see how we can accommodate all of these points in the Blueprint.
Before Transition
- Specify people responsible to execute a Transition.Example, Record Owner. When you choose Record Owner, only the Record Owner (and those above the record owner in the role hierarchy) will be able to view the Transition.
- Define criteria that dictates exactly when this Transition should be available for the records in a process.Example criteria: "Product Demo is Completed".In this case, the Transition will be shown to records only when the Product Demo field is updated to Completed .If you have no such conditions, you can skip the criteria section. In such a case, the Transition will be visible on all records right away.
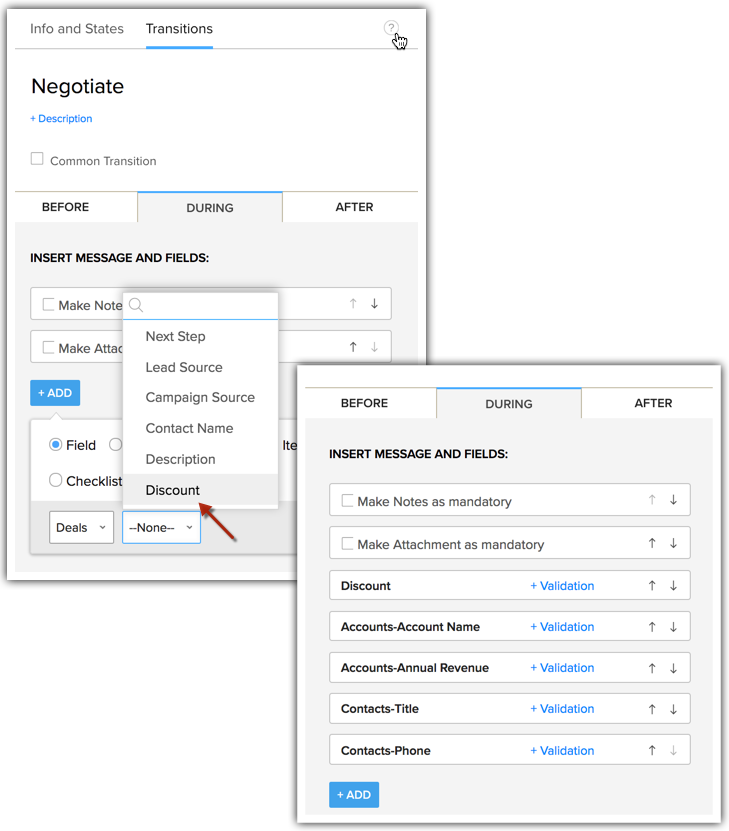
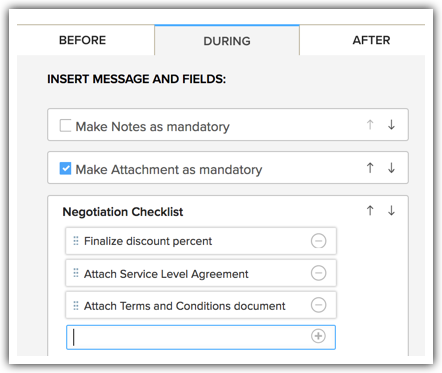
During Transition
This section guides the Transition owners in completing a particular stage in a process by prompting them to enter specific fields, notes, attachments and other information contextually. For example, in the deal follow-up process, sales reps may be required to enter the discount percent, notes and attach a few sales documents according to the organization's policy. In such a case, all these details can be mandated in the During Transition section of the Negotiation Transition.
Following are the details that you can mandate in the During Transition section:
- Mandate and validate fields from the primary module and related modules, including multi-select lookup and multi-user fields.
- Include checklists
- Mandate Associated Items
- Add a message to Transition owners
- Make notes mandatory
- Make attachments mandatory
- Make tags mandatory
- Add Widgets
- Deal Discount
- Related Account Name
- Annual Revenue of the Account
- Contact person's title and phone
To mandate fields of the Blueprint module and related modules
- In the During Transition tab, click Add .
- Choose the required module from the drop-down list.
- Select the field to be mandated.Repeat this action for the number of fields required.
- Deal Discount
To mandate fields of the Blueprint module and related modules
- In the During Transition tab, click Add .
- Choose the required module from the drop-down list.
- Select the field to be mandated.Repeat this action for the number of fields required.
 You can also mandate MxN and MxU fields as part of the Blueprint. That is, multi-select lookup fields as well as multi-user fields along with Single User lookup.
However, note that you cannot validate them. - Validate fields to ensure that your sales teams enter acceptable values.
- Example: Discount cannot be greater than 20%
- Closing date cannot exceed 30 days.
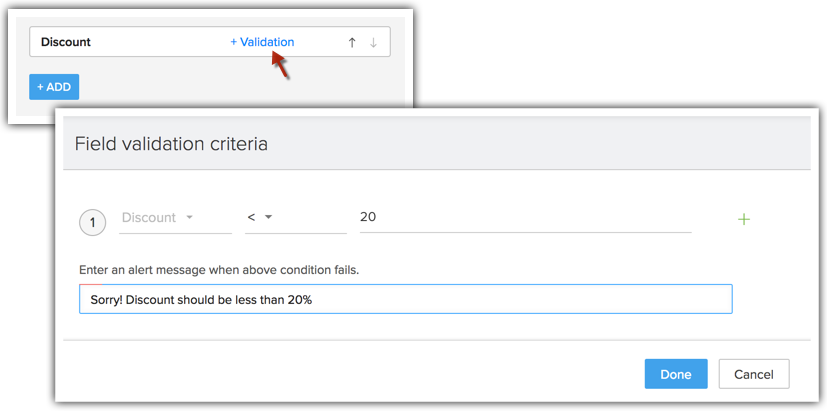
- Example: Discount cannot be greater than 20%
Checklist will be part of your During Transition, which, when configured by the manager or the process architect, will be shown to the eligible transition owners.
For example, in our Deal follow-up process, the following items could be part of a Negotiation Transition Checklist.
- Finalize discount percent
- Attach Negotiation documents as mandated
- Check competitor's discounts
To mandate checklists
- In the During Transition tab, click Add .
- Select Checklist .
- Add a title for the checklist and the list of To-do items.
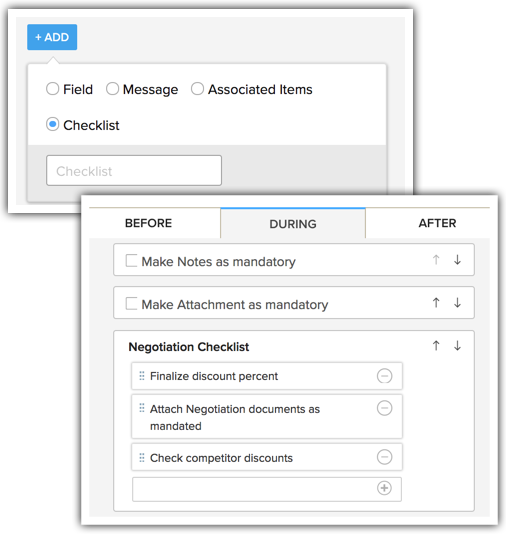 This will be displayed to the selected Transition owners. Only when the Transition owner "checks off" these items from the list, will he/she be able to proceed to the next State in the Blueprint. This gives you a solid, clear picture of progress of each stage.
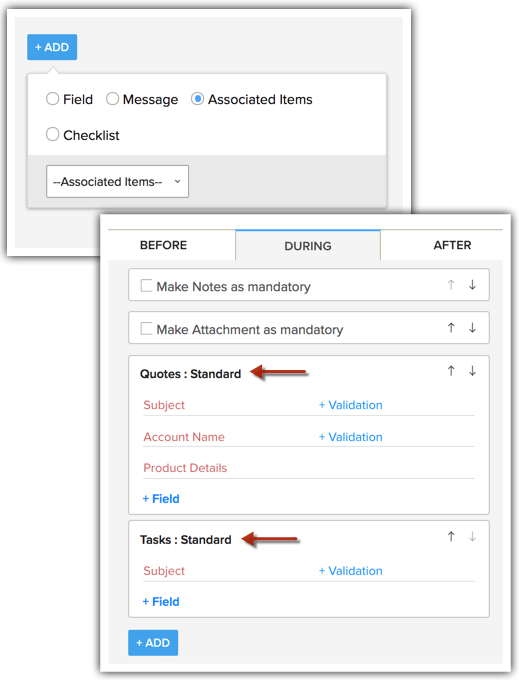
- Tasks
- Meetings
- Calls
- Quotes
- Sales Orders
- Cases
For example, once the discount has been approved and the deal is in the Contract stage, you may want the sales reps to associate the Quote and schedule a call with the customer to proceed with the legal requirements. So here, you can mandate Task creation and PO association.
This will be contextual and guide the sales teams in breaking down a possibly overwhelming process into smaller pieces and doable action items.
To mandate the creation of associated items
- In the During Transition tab, click Add .
- Select Associated Items .
- Choose from the Associated Items dropdown list: Tasks and Quote.
To add a message to the Transition owners
- In the During Transition tab, click Add .
- Select Message.
- Write a suitable message in the text box.
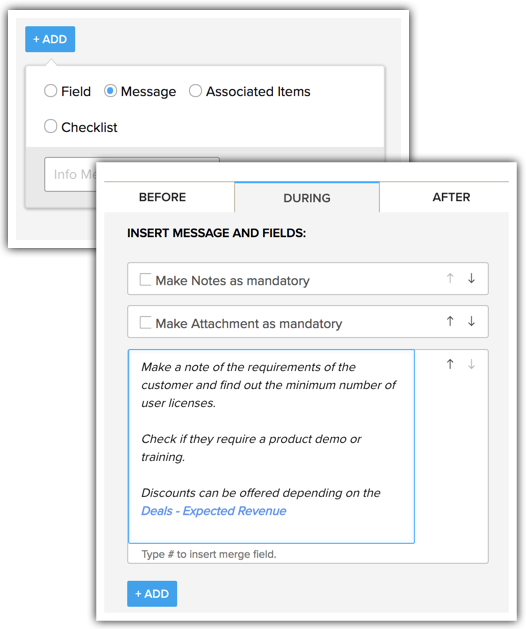
To make notes mandatory
- In the During Transition tab, select the Make Notes as Mandatory checkbox.
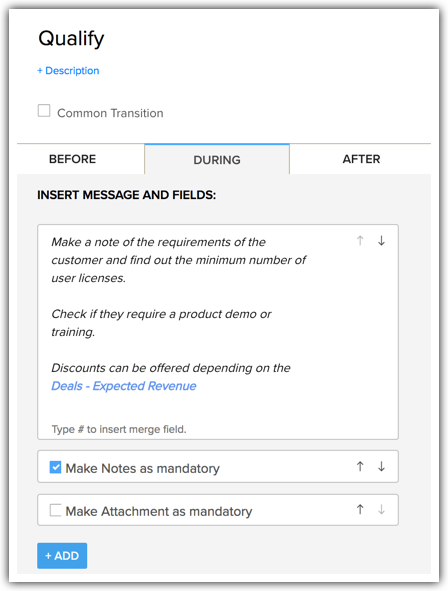 So here, while executing the Qualify transition, the transition owner will be required to enter details of the customer requirements as notes, as outlined in the message.
To make attachments mandatory
- In the During Transition tab, select the Make Attachment as Mandatory checkbox.
 So here, while executing the Negotiate transition, the transition owner will be required to attach the documents as mandated in the checklist.You can reorder the items to be displayed in the popup window by using the UP and DOWN arrows. You can also make use of merge fields to display data from CRM on the screen.
After Transition
Define actions to be automated at the completion of the Transition. Actions that can be automated in the After Transition section are:
- Send Email Notification
- Assign Tasks
- Make a Field Update
- Trigger Webhooks
- Trigger Custom Functions
- Convert Record (Applicable for the Leads and Quotes modules)
In Zylker's example, an email notification must be automated to the Sales Manager regarding a deal submitted for discount approval. So, choose Email Alerts and associate the required email template.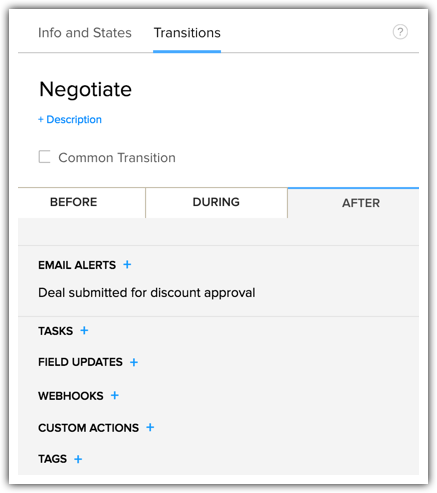
In a similar manner, you can build conditions for each Transition until the end of the process.
Common Transition
A Common Transition is a Transition that can be executed from all States in a process.
To make this possible, you must make Deal Lost a Common Transition by selecting the checkbox as seen in the following image. Once you do, you will see the Deal Lost Transition on all States.
![]()
Automatic transitions

To configure an automatic transition


Same-state looping
Configure SLAs for States
- In your Blueprint Editor, click the State for which you wish to configure the SLA. Example, Negotiation/Review.
- Set the maximum time limit for which the deal can be in the Negotiation State. Example, 5 Days.
- When the deal exceeds the SLA time limit, specify who should be notified and when.
Example, escalate on the 5th day to the record owner. - In addition to this standard notification ON escalation, you can set an additional alert to be sent before or after the SLA time limit.
Reordering Blueprints
Create Blueprint in Sandbox
While formulating a blueprint for your sales process, there are chances that it has to be frequently modified to find the right one. Zoho CRM provides a testing environment called Sandbox for you to check how your blueprint works, without affecting the live data.
See also : Sandbox
Sample Process Flows
In the following slide deck, you will find sample process flows for business from various sectors such as Education, Real Estate, Insurance, Banking and Finance. These are generic process flows meant to give you the perspective you need to start designing your own Blueprints. You can tweak the States, Tranistions and flow based on your unique needs. Start browsing the gallery now!

Troubleshooting Tips
SEE ALSO
Related Articles
Blueprint
Create a mirror image of the entire business process with Blueprint Help guide Blueprint - An Overview Designing a Blueprint Executing a BlueprintBlueprint - An Overview
Right from the moment you capture a lead in your CRM system up until deal closure and beyond, your organization may have several sales processes in place. For instance, leads generation and follow-up, deals closure and order management. Each of these ...Execute a Blueprint on Android
A Blueprint that you have configured in your Zoho CRM web account can be executed on the mobile app. Suppose you are out on a field visit to meet a customer regarding a deal and the deal has progressed from Qualification to Negotiation. You can ...Troubleshooting Blueprint
1. I am not able to find a blueprint that I created. Check whether All Modules is selected under Setup > Process Automation > Blueprint. Only then Blueprints created for all modules will be displayed in the list view. 2. Transitions are not shown for ...Check Blueprint Usage Reports
Blueprint Reports will give you valuable insights about your business processes and their execution and help you streamline them better. Blueprint reports of two types - Built-in reports and Customized reports. Built-in Blueprint Reports Following ...