Configuring built-in telephony in Zoho CRM
Configuring a telephony system in your organization ensures the security of your daily business correspondence. In addition to building and personalizing the telephony system, you can also manage subscriptions, payments, and recordings without any third-party dependencies.
Setting up built-in telephony
Built-in telephony in Zoho CRM is powered by Twilio's telecommunication infrastructure.
Setting up built-in telephony consists of the following steps:
- Buying a number
- Configuring incoming call routing
- Setting voice configuration
- Configuring outgoing call users
Step 1: Buying a number
The CRM admin must purchase a number and enter details including the country, number type, and region for the customers the calls will be connected with.
There are three types of numbers you can choose: Local, mobile, and toll-free.
The cost of buying a number depends on the type of number you choose. Click here to learn more about the call rates.
To buy a number
- Go to Setup > Channels > Telephony.
- In the How would you like to Proceed? page, click Set UpNow button.
- In the Getting started page, click Buy a number.
- In the Buy a number pop-up:
- Choose the Country .
- Select the Number Typ e as Local, Mobile, or Toll Free from the dropdown list.
- Select the Region .
- Choose a number from the Available Phone Numbers dropdown and click Next .
- Verify the purchase summary and click Buy .
- In the Confirm Your Purchase pop-up, click Buy Phone Number.

Notes :
- Each organization can buy and maintain multiple phone numbers. The purchase and maintenance of each number will be charged monthly .
- Each built-in telephony transaction (purchase of number, making a call, or upgrading recording storage) will be charged in credits.
- The value of 1 credit is 1 USD . The price for purchasing credits will be converted into your local currency. Click here to learn more about pricing.
- To get started with built-in telephony, admins will have to buy credits. Credits will then be deducted from the organization's built-in telephony wallet for each activity.
- The number of available credits will be displayed on the home page, where the admins can manage the transactions.
Step 2: Configure incoming call routing
Once you have purchased phone numbers, you can set preferences for how incoming calls will be routed, either directly to CRM users or through IVR menus.
IVR menus
IVR (Interactive Voice Response) is a computer-operated response system which will interact with callers and route their call based on the inputs they make. You can configure IVR using the Key Press, Menus, and Actions options and you can associate an action with specific users or configure another level of the IVR menu with another set of IVR options.
You can configure up to 5 levels with up to 9 key press actions at each level.
Direct Users
You can associate one or more users with a number so that calls to that number will be routed to those users.
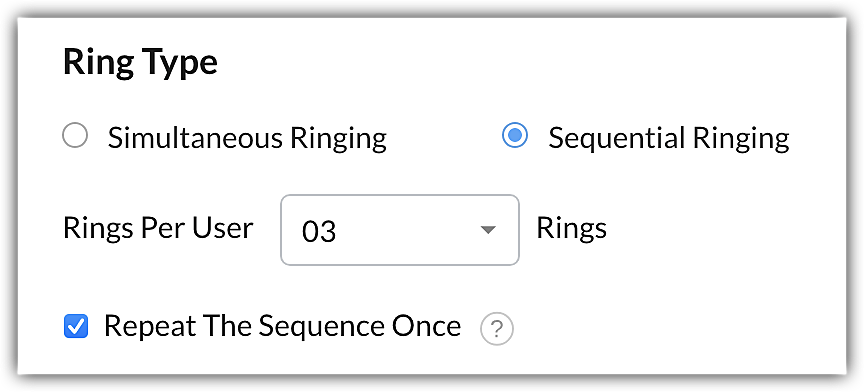
If multiple users are associated with a number either directly or via IVR menus, the ring type has to be set as either simultaneous or sequential .
- If Simultaneous ringing is selected, all the users will get an incoming call at the same time. Simultaneous ringing is the default ringing type.
- If Sequential ringing is selected, the call will be routed to the users one at a time in the same order that they logged into the Zoho CRM account. If a user is unavailable, the call will be forwarded to the next user.
If sequential ringing is selected, you can set the maximum number of rings for each user up to a maximum of 10 rings . You can also choose whether to repeat the sequence once more if none of the users answer the call.
For cases when the users are busy or unavailable, you can choose to send the call to voicemail or inform the caller that the user is busy and decline the call.
Setting Voice configuration
You can make voice configurations for incoming calls and set IVR messages like a welcome message, a menu message, a message for when the user is busy, and a message for when user is unavailable to help guide callers through your system.
- Voice Format : You can choose Text, Audio File, or Audio URL to enter or upload the script for the following messages:
- Welcome Message
For example: "Thank you for calling Zylker, Inc."
- Message When User Is Busy
For example: "Thanks for waiting, an agent will soon be assigned to you."
- Message When User Is Unavailable
For example: "All our agents are currently unavailable. Please stay on the line or call again later. Thank you!"
Call Queuing
You can queue up to 25 callers at a time and you can set a maximum waiting time for each caller of up to 25 minutes . You can also play music or announcements as the callers are waiting to be connected.
See Also: Manage Call Queuing.
Call Recording
Many organizations choose to record calls to monitor the quality or evaluate agents' performance. These recordings are stored in the Zoho File System and the storage amount can be upgraded for an additional cost.
See Also: Manage Recording.
To configure incoming calls
- On the Incoming Call Routing tab, click Configure.
- On the Incoming Call Configuration page, select either Configure IVR Menu or Associate User.
- If you selected Configure IVR Menu, make the following settings in Level 1 in the IVR Menu Configuration section:
- KeyPress: Specify a number between 1 and 9.
- Menu: Enter a menu option for each of the numbers.
- Action: Select either Configure IVR Menu or Assign User.
- Repeat Step 3 for each level of the menu. Click Save.
Click the + and - icons to add and remove menu options. - If you selected Assign User, select one or more users in the Action column.
All active CRM users will be listed here. - If you selected Associate User :
- Select the user(s) you want to route the callers to in the User field.
- Select either Simultaneous Ringing or Sequential Ringing as the Ring Type.
- If you select Sequential Ringing, choose the number of Rings per User .
- Check Repeat the sequence once if needed.
- In When user is busy or unavailable, select either Send to Voicemail or Inform the caller that the user is busy & decline the call.
- In the Voice Configuration section, select the voice format and set all required IVR messages.
- Voice Format: Select the voice format: Text, Audio File, or Audio URL.
- Text: Enter the message as text.
- Audio File: Attach an audio file with a recording of the message.
- Audio URL: Specify the URL of the audio file.
- Welcome message: Add a welcome message.
- Menu message: Enter a menu option for the number and specify the format it needs to be read in.
- Message when user is busy: Enter a message to notify callers when users are busy.
- Message when user is unavailable: Enter a message to notify callers when users are unavailable.
- Select the Call Queue options:
- In the Maximum Callers in the Queue field, select the number of callers you want in the queue.
- In the Maximum waiting time in the queue field, select the number of minutes a caller can be in the queue for.
- In the Music while waiting field, select either Default Music or Customize Music.
If Customize Music is selected, choose Audio file or Audio URL. - Choose an announcement from the Announcement While Waiting dropdown or click Customize Announcement.
- Select Call Recording to record all the incoming calls.
Step 3: Configure outgoing call users
This step lets you determine who can make outgoing calls using which number. There is no limit to the number of users who can be associated with a phone number. If you do not want to display the phone number during an outgoing call, you can mask the number using a custom caller ID so that if the prospect or customer calls you back, they will be redirected to the dedicated support number.
See also: Managing Caller ID.
To configure outgoing call preferences for users
- Select the + Configure button on the Outgoing Call Users tab.
- On the Assign Number for Outgoing Call page:
- Select a user from the dropdown.
- Select a number to assign to the user from the dropdown.
- Click Save.
- Toggle Allow to configure custom caller ID on to allow the user to set a custom caller ID.
- Toggle Call Recording for outgoing calls on to record outgoing calls.
See also:
Related Articles
Using Built-In Telephony
Once built-in telephony is set up, users can personalize their phone preferences, manage user availability, make outgoing calls, receive calls, view calls in conversation and calls in queue, and add follow-up activities in CRM. Set User Availability ...Working with Built-in Telephony
In most businesses, a large volume of calls are made and received each day. These calls often contain information like customer pain points, expectations, or feedback that helps the organization perform better, so they are vitally important. To ...Telephony
Make and manage calls with your customers from CRM using Telephony Help guide Telephony - An Introduction Working with TelephonyEnabling Zoho Telephony
Before you start using Telephony, it has to be enabled from your Zoho CRM account. To enable Telephony Go to Setup > Channels > Telephony. Click Enable Telephony. Note Integrating Telephony with Zoho CRM will be enabled only when it is installed from ...Why can't I see the telephony feature under Channels?
Only users with the Administrator profile can access this feature. To access telephony, contact your Admin and ask them to change your profile to Administrator.